How to Remove, Disable and Change Shipping Charges in WooCommerce
Table of Contents
- Introduction
- What Is Shipping Charges in WooCommerce
- How WooCommerce Shipping Works for Online Stores
- Importance of Using Shipping Charges in WooCommerce Store
- How to Remove or Disable Shipping Charges in WooCommerce Step by Step
- How to Change Shipping Charges In WooCommerce?
- Common Errors When Changing Shipping Charges and Solutions
- Conclusion
Introduction
Shipping fees can confuse customers during checkout. Many stores want simple pricing with free delivery. Some stores sell services and do not ship items. In those cases, you should remove shipping charges in WooCommerce. You can also disable shipping charges in WooCommerce for specific zones. This guide explains each method in simple steps. You will learn how WooCommerce decides shipping costs. You will also learn how to stop paid shipping safely. We will keep checkout working for all customer addresses.
What Is Shipping Charges in WooCommerce
Shipping charges in WooCommerce are the delivery fees shown at checkout. WooCommerce calculates these fees using shipping zones and methods. A shipping zone is a location group like a country. A method is a rule like Flat Rate shipping. You can set different methods for different zones. Customers see rates based on their entered address. This is why one customer sees one fee. Another customer may see a different fee. Shipping can also change due to product shipping classes. A class can add extra cost for heavy items. If your store is charging unexpectedly, check zones first. If you want WooCommerce to remove shipping cost fully, use free shipping. If you want WooCommerce to disable shipping options, remove methods per zone.
How WooCommerce Shipping Works for Online Stores
Shipping Zones Decide Where You Deliver
WooCommerce uses zones to match customer locations. You create zones for countries, states, or zip codes. Each zone can have different shipping rules. When a customer enters an address, WooCommerce checks zones in order. It applies the first zone that matches the address.
Shipping Methods Control What Customers Can Choose
Each zone needs at least one shipping method. Common methods are Flat Rate, Free Shipping, and Local Pickup. Flat Rate adds a fixed fee. Free Shipping removes the fee based on rules. Local Pickup lets customers collect orders themselves. You can enable one or multiple methods per zone.
Shipping Rates Are Set Inside Each Method
Flat Rate has a main cost field for shipping charges. You can also add a handling fee if needed. Some setups allow per-item pricing using simple formulas. If no valid method exists in a zone, checkout can fail. So each active zone must be configured carefully.
Shipping Classes Help Set Product-Based Charges
Shipping classes let you charge differently for different products. For example, heavy items can have higher shipping costs. You create classes and assign them to products. Then you set class costs inside Flat Rate settings. This helps you control shipping without creating many zones.
Shipping Calculation Happens on Cart and Checkout
Shipping usually calculates after the customer adds an address. On the Cart page, the shipping estimator may appear. On Checkout, shipping updates after address fields are filled. Some themes show shipping in a different layout. But the shipping logic stays the same.
Plugins Can Override WooCommerce Default Shipping Logic
Many stores use shipping plugins for advanced rules. These plugins can replace zone rates or method costs. For example, table rates, weight-based shipping, or carrier live rates. If a plugin is active, always check its settings first. Otherwise, default WooCommerce settings may not apply.
Importance of Using Shipping Charges in WooCommerce Store
Shipping Charges Protect Your Profit Margin
Shipping is a real business cost in most stores. If you do not charge shipping, you may lose profit. A small flat rate can cover packing and delivery. This keeps your product pricing stable and predictable. It also prevents hidden losses on every order.
Shipping Charges Improve Pricing Transparency
Customers want to know the final cost before paying. Clear shipping charges build trust during checkout. If the shipping fee appears suddenly, users may leave. When charges are clear, customers feel more comfortable. This can reduce cart abandonment significantly.
Shipping Charges Help You Offer Location-Based Pricing
Delivery costs can vary by city, state, or country. Shipping zones allow different charges by region. This keeps pricing fair for nearby customers. It also prevents undercharging for long-distance delivery. Your store stays balanced across all service areas.
Shipping Charges Allow Free Shipping Offers Strategically
Free shipping is a strong sales motivator for customers. But it should be planned using minimum order rules. You can offer free shipping above a set cart value. This increases average order value naturally. It also keeps shipping costs under control.
Shipping Charges Support Product-Based Delivery Costs
Some products cost more to ship due to weight or size. Shipping classes allow higher charges for those items. This avoids charging the same rate for every product. Customers pay fairly based on what they buy. Your business avoids losses on bulky shipments.
Shipping Charges Improve Operations and Order Planning
Shipping charges can cover packaging materials and labor time. It helps you plan delivery partners and timelines. You can also use charges to manage peak-season load. With proper rates, operations stay smooth. You avoid delays and customer complaints.
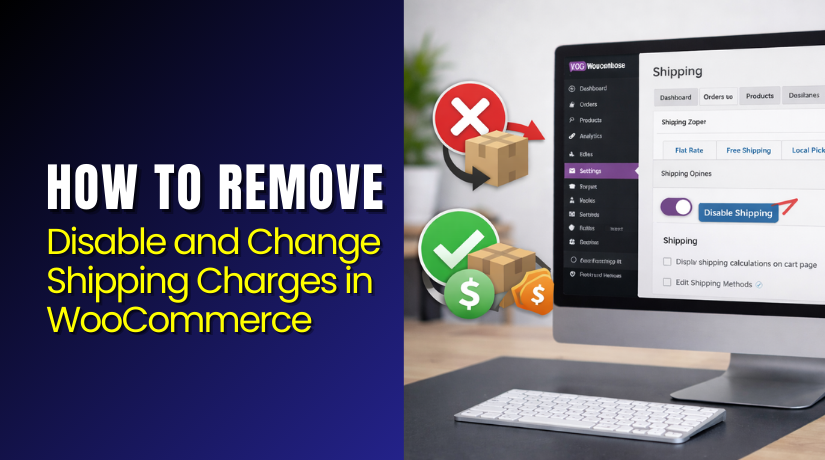
How to Remove or Disable Shipping Charges in WooCommerce Step by Step (Easy Steps)
Step 1: Open WooCommerce Shipping Settings in Your Dashboard
- Go to WordPress Admin → WooCommerce → Settings.
- Click the “Shipping” tab from the top menu.
- You will see Shipping Zones and shipping options here.
- This is where you remove shipping charges in WooCommerce safely.
Step 2: Open Shipping Zones and Pick the Correct Zone
- Click “Shipping Zones” to see all zones.
- Open the zone your customers use most.
- Example zones can be India, USA, or Rest of world.
- Shipping cost comes from methods inside each zone.
Step 3: Add Free Shipping Method (Best and Safest Option)
- Inside the zone, click “Add shipping method”.
- Choose “Free shipping” and click Add.
- Click “Free shipping” to open its settings.
- Set “Free shipping requires” to “No requirements”.
- Click Save changes to apply the free shipping rule.
- This will WooCommerce remove shipping cost for that zone.
Step 4: Set Flat Rate Shipping Cost to Zero (If You Want Flat Rate Visible)
- In the same zone, click “Flat rate”.
- In the Cost field, enter 0.
- Remove any extra values in Shipping class costs fields.
- Check for any handling fees and clear them if needed.
- Click Save changes to update the shipping cost.
- This helps you disable shipping charges in WooCommerce quickly.
Step 5: Remove Paid Shipping Methods and Keep Only Free or Pickup
- In the zone methods list, find paid methods like Flat rate.
- Delete paid shipping methods using the remove option.
- Keep only “Free shipping” or “Local pickup”.
- Click Save changes after removing paid options.
- This is the best way to WooCommerce disable shipping charges fully.
Step 6: Disable Shipping for Specific Products Using Virtual Option (Optional)
- Go to Products → Edit the product.
- In Product data, tick Virtual for services or downloads.
- Virtual products do not require shipping at checkout.
- This is useful when you want WooCommerce disable shipping per item.
Step 7: Test Cart and Checkout to Confirm Shipping Is Disabled
- Open your store in an incognito window for clean testing.
- Add a product to cart and go to checkout.
- Enter an address that matches the updated shipping zone.
- Confirm shipping shows Free or shows 0 cost.
- Test another zone address if you sell in many locations.
How to Change Shipping Charges In WooCommerce? (Easy Steps)
Step 1: Open WooCommerce Shipping Settings to Start Changes


- Go to WordPress Admin → WooCommerce → Settings.
- Click the “Shipping” tab from the top menu.
- This is where you manage all shipping rules.
- You can change prices without touching product data.
- This section supports your Change Shipping Charges goal.
Step 2: Choose the Correct Shipping Zone for Your Customers
- Click “Shipping Zones” to see your zone list.
- Open the zone you want to update by clicking Edit.
- Zones can be country, state, or postcode based.
- Always update the zone that matches customer addresses.
- Wrong zone changes will not reflect on checkout screens.
Step 3: Change Flat Rate Shipping Charges in a Simple Way
- In the zone, locate the Flat rate method.
- Click Flat rate to open the rate settings.
- Update the Cost field with your new amount.
- Example: Enter 50 to charge 50 as shipping fee.
- Remove any extra cost lines if you do not need them.
- Click Save changes to apply the new shipping cost.
- This is the quickest way to update shipping pricing rules.
Step 4: Add Handling Fee or Extra Cost Only If Required
- Open the Flat rate settings again inside the zone.
- Check if there is a field for handling fee.
- Add a small fee only if you must cover packing.
- Keep the fee low to avoid cart drop issues.
- Click Save changes after updating the fields.
- This helps you fine tune the shipping charges properly.
Step 5: Set Different Shipping Charges for Different Locations
- Go back to the Shipping Zones list page.
- Click “Add shipping zone” for a new location rule.
- Enter zone name like “Delhi” or “California” clearly.
- Select regions, states, or add postcodes if needed.
- Click Add shipping method and choose Flat rate.
- Set a different Cost for this new zone.
- Click Save changes to activate the location based rate.
- This makes shipping charges accurate for local delivery areas.
Step 6: Change Shipping Charges Based on Product Type Using Classes
- Go to WooCommerce → Settings → Shipping → Shipping classes.
- Click “Add shipping class” and name it clearly.
- Example names are Heavy, Light, or Fragile items.
- Save the shipping class after adding it.
- Now edit a product and assign the shipping class.
- Go back to the zone and open Flat rate settings.
- Add Shipping class costs for each class shown.
- Save changes so class cost rules start working.
- This method helps you charge more for heavy items.
Step 7: Add Free Shipping Above a Cart Total (Optional Rule)
- Open your target zone where customers checkout most.
- Click “Add shipping method” and choose Free shipping.
- Open Free shipping settings and choose the minimum amount.
- Enter the minimum cart total for free delivery.
- Keep Flat rate as backup for smaller cart totals.
- Save changes to apply the free shipping condition.
- This supports sales and encourages bigger cart orders.
Step 8: Test Checkout to Confirm Your New Shipping Charges Work
- Open your store in an incognito browser window.
- Add a product and go to cart and checkout pages.
- Enter an address that matches the updated zone.
- Confirm the new cost appears correctly at checkout.
- Test a second address from another zone if needed.
- Also test different products with different shipping classes.
- This confirms your Change Shipping Charges rules apply correctly.
Common Errors When Changing Shipping Charges and Solutions
Shipping Still Shows After Enabling Free Shipping
This often happens when Flat Rate is still active. Remove paid methods from the same zone if needed. Or keep Flat Rate but ensure Free Shipping is selectable. Also confirm the free shipping rule has “No requirement.” Save changes and test again.
Wrong Shipping Zone Gets Applied
Zone order matters in WooCommerce settings. WooCommerce picks the first matching zone rule. If a broad zone sits above a specific zone, it wins. Move the specific zone higher if needed. Recheck region rules like states and zip codes.
No Shipping Methods Available at Checkout
This appears when the customer address matches no zone. Or the zone has no shipping method enabled. Create a zone that covers all required locations. Add at least one method like Flat Rate or Free Shipping. Save and test with a real address.
Flat Rate Cost Not Updating on Checkout
Caching can show old shipping values on checkout. Clear your cache plugin and server cache if used. Also clear browser cache or test in incognito mode. Recalculate shipping by changing the address once. Then return to the correct address.
Shipping Class Cost Not Applying
Usually the product has no class selected. Edit the product and assign the right shipping class. Then open Flat Rate settings in the zone. Add class costs and save changes. Test by adding that product alone in the cart.
Shipping Hidden Until Address Is Entered
Many themes hide shipping until they detect a location. This is normal and not an error. Add a shipping calculator on the Cart page if needed. Or guide customers to enter the address early. Checkout will display shipping after address details.
Free Shipping Not Showing Even When Eligible
Free shipping can require minimum cart value or coupon. Check the method rule inside the zone settings. Make sure the cart total meets the requirement. Also confirm taxes are not changing the total unexpectedly. Test with a clean cart and no coupons.
Local Pickup Shows With Paid Shipping Options
Local Pickup is a method like any other in a zone. If you want pickup only, remove other methods. If you want both, keep them enabled together. Rename methods so customers understand options. Example: “Home Delivery” and “Store Pickup.”
Shipping Charges Change After Applying a Coupon
Some coupons can enable free shipping automatically. Check coupon settings for “Allow free shipping.” If enabled, it can override your shipping rules. Disable it if not needed. Then re-test the checkout totals again.
Shipping Cost Looks Too High Per Item
Flat Rate can be configured as per order or per item. If it multiplies cost, it may be set per item. Check the Flat Rate setup and formulas if used. Remove any extra class costs if not required. Test with one item and multiple items.
Conclusion
Shipping settings control how customers feel during checkout. If charges look confusing, sales can drop fast. You can remove shipping charges in WooCommerce using Free Shipping. You can also set the Flat Rate cost to zero. If needed, you can disable shipping charges in WooCommerce by removing paid methods. Always keep at least one method to avoid checkout errors.
When pricing needs updates, edit the correct shipping zone. Then change Flat Rate costs, add zones, or use shipping classes. These options help you control delivery fees with better accuracy. After any update, test cart and checkout with real addresses. This confirms your rules work for every customer location. With these steps, your shipping setup stays clean and customer friendly.


