How to Customize WooCommerce Checkout Page (With Plugin and Without Plugin)
Table of Contents
- Introduction
- Understand Your Checkout Type First: Classic Checkout vs Block Checkout Explained Simply
- Before You Start: Safety Steps That Prevent Checkout Breaks
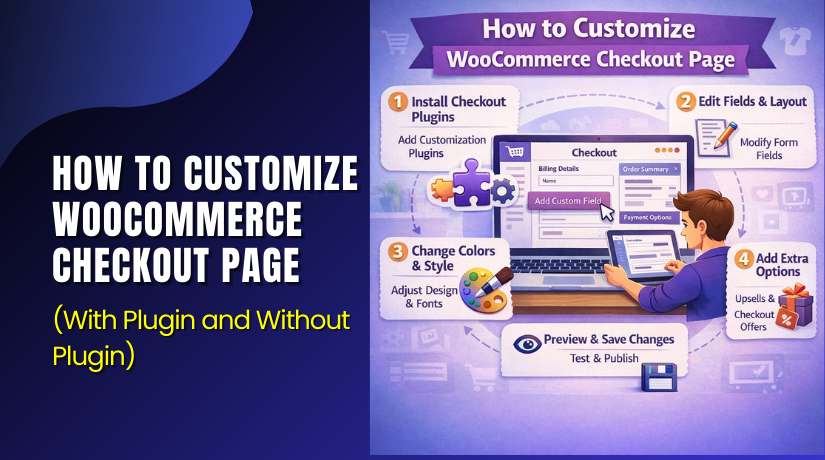
- How Do I Customize the WooCommerce Checkout Page?
- How Do I Customize the WooCommerce Checkout Page Using a Plugin?
- Which Method Should You Use for Checkout Customization
- Conclusion
Introduction
WooCommerce checkout page customization means changing how checkout looks and works. It can include fields, layout, and the steps customers follow. A clean checkout helps customers finish orders faster and with less doubt. It can also reduce errors when users enter details. Many store owners want to customize WooCommerce checkout page for better sales. Some want quick changes using a plugin and settings. Others want control without adding another plugin. Many also plan a clean code approach later, if needed.
This guide focuses on plugins, and no plugin methods. It will cover deeper code methods and advanced logic. You will also learn how to handle WooCommerce checkout page settings safely. You will understand what is possible on your checkout type. You will also know what changes may break payments or shipping.
Understand Your Checkout Type First: Classic Checkout vs Block Checkout Explained Simply
Before you start any WooCommerce checkout customization, confirm your checkout type. WooCommerce now supports two checkout systems on many sites. The first is Classic Checkout, which uses the old layout. The second is Block Checkout, which uses blocks in the editor. Your checkout type decides what tools will work correctly. It also decides what kind of WooCommerce checkout page edit is possible. You should confirm this first to avoid wasted effort.
Classic Checkout Type: The Shortcode Based Checkout Used For Years
Classic checkout usually uses the shortcode on one page. The checkout page often contains [woocommerce_checkout] in content. Themes and add-ons support this checkout style widely. Many checkout field tools also target classic checkout. Most layout moves happen with hooks and template files. Even without code, classic checkout offers some settings control. Most “checkout field editor” plugins work well with classic checkout. If your store is older, you likely use classic checkout. Many tutorials still assume this checkout type today.
Block Checkout Type: The New Checkout Block Used In WordPress Editor
Block checkout uses WooCommerce blocks in the page editor. The checkout page contains a Checkout block, not a shortcode. Many parts of the layout are controlled by the block system. Some classic checkout methods may not work on blocks. Some field editors also behave differently with block checkout. You may still style blocks using theme and site settings. You can also adjust spacing and layout using block options. Block checkout is common on newer WooCommerce installs today. It is also common when using full site editing themes.
How To Quickly Confirm Your Checkout Type On Your Website
You can confirm your checkout type in a few minutes. Use your WordPress dashboard and check the checkout page content. Follow these simple checks and note what you find.
- Go to WordPress Dashboard → Pages → All Pages.
- Open the page named “Checkout” for editing.
- If you see a shortcode, it is Classic Checkout.
- If you see a Checkout block, it is Block Checkout.
- If you see both, remove the one not needed.
You should also confirm WooCommerce is using that page properly. This check helps avoid wrong WooCommerce checkout page settings later.
Before You Start: Safety Steps That Prevent Checkout Breaks
Checkout is the most important page in your store. Small mistakes can stop orders and lose sales quickly. So, start with safety steps and a clean plan. This section keeps your changes safe and reversible. It also makes your WooCommerce checkout customization easier to test.
Take A Full Backup Before Any WooCommerce Checkout Page Edit
Backup protects you if checkout breaks after a change. You need a full backup of files and database. Many hosts offer backup tools inside the control panel. Some security plugins also provide backup features. If your host supports daily backups, confirm it is working. Also download one backup copy to your computer. If checkout breaks, you can restore and continue safely.
Use A Staging Site So Customers Are Not Affected
A staging site is a private copy of your website. You can test changes without affecting real customers. Many hosting dashboards offer one click staging features. If not, you can clone the site using a safe method. Make all checkout tests on staging before live changes. This is especially important for payment gateway tests. It also helps you test shipping rules and tax rules. A staging site makes checkout changes less stressful.
Use A Child Theme If You Plan Any Theme Level Changes
A child theme is needed for safe theme changes. It helps you keep custom changes during theme updates. Even “no plugin” checkout work can touch theme files. Template overrides also belong in a child theme folder. If you edit the main theme, updates can erase changes. So, prepare a child theme before template work. This step supports long term WooCommerce checkout page customization.
Keep A Simple Test Product And Test Checkout Scenario Ready
Checkout testing is easier with one test product. Use a low cost test item with simple shipping needs. Create a test coupon if you use coupons on checkout. Also create a free shipping method for testing quickly. Keep one test address for local and one for outside. This helps test taxes and shipping rate changes. It also helps confirm field changes do not block orders.
Note Your Current Checkout Fields And Flow For Easy Rollback
Before changing checkout, note the current setup. List the fields you show in billing and shipping. Note if you require phone and company fields. Note if you show order notes or not. Note your payment methods and shipping methods. Take screenshots of the checkout layout for reference. This makes rollback quick if you need it. It also helps compare improvements after changes.
How to Customize the WooCommerce Checkout Page Without Plugin?
Step 1: Check your checkout type first


- Go to Dashboard → Pages → Checkout → Edit.
- Shortcode = Classic checkout.
- Checkout block = Block checkout.
Step 2: Use WooCommerce checkout page settings to simplify
- Go to WooCommerce → Settings → Accounts & Privacy.
- Enable Guest checkout if you want faster checkout.
- Allow optional account creation if you want.
Step 3: Edit the checkout page layout (Block checkout only)
- Open Pages → Checkout → Edit.
- Click the Checkout block and adjust available options.
- Add a short trust note above the block.
Step 4: Improve checkout design using theme styling
- Use Appearance → Customize or Appearance → Editor.
- Improve button style and spacing for easy reading.
- Check mobile view and fix spacing if needed.
Step 5: Test checkout after every small change
- Place one test order and confirm it completes.
- Confirm order email and admin order details show fine.
The no plugin method is best for a lightweight store setup. It reduces extra load and keeps checkout more clean. You can still adjust layout with blocks and improve styling. You can also use WooCommerce checkout page settings to simplify steps. This method works great for basic improvements and clean design.
However, it can be limited for deep field changes. If you need full field control, you may need code later. Still, for many stores, no plugin changes are enough. Keep your edits small, test often, and avoid risky changes. This keeps your WooCommerce checkout customization safe and long lasting.
How Do I Customize the WooCommerce Checkout Page Using a Plugin?
Step 1: Pick one checkout plugin that matches your goal
- Go to Dashboard → Plugins → Add New.
- Search for a checkout field editor plugin.
- Check it supports your WooCommerce version.
- Check it supports your checkout type.
Step 2: Install and activate the plugin
- Click Install Now → Click Activate.
- Clear cache if your site uses caching.
- This helps your new checkout changes show correctly.
Step 3: Open the plugin checkout settings
- Go to WooCommerce → Settings → Checkout or Payments.
- Or open the plugin menu under WooCommerce.
- You will see options for fields and layout changes.
Step 4: Edit checkout fields in the plugin
- Remove fields you do not need.
- Rename labels to simple words.
- Reorder fields using drag-and-drop.
- Mark only important fields as required.
Step 5: Test checkout and publish changes
- Place a test order as guest and logged user.
- Test shipping, coupons, and one payment method.
- If all works, repeat changes on live site.
The no plugin method is best for a lightweight store setup. It reduces extra load and keeps checkout more clean. You can still adjust layout with blocks and improve styling. You can also use WooCommerce checkout page settings to simplify steps. This method works great for basic improvements and clean design.
However, it can be limited for deep field changes. If you need full field control, you may need code later. Still, for many stores, no plugin changes are enough. Keep your edits small, test often, and avoid risky changes. This keeps your WooCommerce checkout customization safe and long lasting.
Which Method Should You Use for Checkout Customization
Choose the Plugin Method When You Want Speed and Easy Control
Use a plugin when you want quick field edits. Use it when you want drag and drop ordering. Use it when you want fast layout tweaks without code. This is often the best path for beginners. It also helps when your team changes fields often. Keep one checkout plugin only to avoid conflicts. Keep checkout fields minimal for faster form completion. This method fits most small stores doing steady sales.
Choose the No-Plugin Method When You Want a Clean and Lightweight Store
Use no-plugin methods when you want fewer moving parts. Use block editor options when you use checkout blocks. Use theme styling for better spacing and mobile clarity. Use WooCommerce checkout page settings to reduce friction. This method is great for simple checkout improvements. It keeps your site lighter and easier to manage. It is limited for deep field edits on many setups.
Conclusion
WooCommerce checkout page customization can improve your checkout flow and order success. A clean checkout helps buyers complete payment with less confusion. If you want quick and simple changes, use a plugin method. It makes WooCommerce checkout page edit easy with field control and layout options. If you want a lighter setup, customize without a plugin. You can use WooCommerce checkout page settings, block editor options, and theme styling.
If you need full control, programmatic changes are the best choice. You can remove fields, add custom fields, and save data properly. Always start with small changes and test after each update. Keep only fields that support billing, shipping, and real order needs. A simple checkout is usually the best checkout for conversions. Use the method that fits your skills and store goals best.


