How to Print Labels from WooCommerce
Table of Contents
- Introduction
- What Are Print Labels in WooCommerce?
- What Types of Labels Can You Print from WooCommerce for Orders and Shipping
- Important Things to Check Before Printing Labels from WooCommerce
- How to Print Shipping Labels from WooCommerce (Step by Step Process)
- Common Problems When Printing Labels from WooCommerce and How to Fix Them Properly
- Conclusion
Introduction
Running an online store means handling orders fast and correctly. That is why many owners want to print labels from WooCommerce without extra steps. Labels help you pack orders faster and send them correctly. They also reduce manual work during busy sales periods. When your process stays simple, your team makes fewer shipping mistakes. Customers also get orders on time and in better condition. In many stores, WooCommerce shipping labels become part of daily work. They support smooth management of packing, shipping, and delivery. If you ship many products each week, labels save time. They also make your workflow cleaner and easier to manage. In this guide, you will learn what print labels mean in WooCommerce. You will also learn which label types you can use.
What Are Print Labels in WooCommerce?
Print labels in WooCommerce are printable details linked to orders. These labels show important information needed during packing and shipping. They may include customer names, shipping addresses, product details, or order data. Some labels also include barcodes, tracking numbers, and return information. Store owners use these labels to organize orders more clearly. Without labels, packing teams may mix products or shipments. That can create delays, wrong deliveries, and unhappy customers.
When you print WooCommerce shipping labels, you make order handling more professional. You also improve speed across your order fulfillment process. Many stores use a WooCommerce label printing plugin for this work. A plugin can help generate labels with fewer manual steps. It can also connect your store with shipping carriers. That makes it easier to generate shipping labels WooCommerce store owners need daily.
It is also important to understand that order details and labels are different. Order details stay inside WooCommerce for store management use. Labels turn that information into a printable format for shipping or packing. This is why labels are useful for warehouses, packing desks, and delivery teams. They turn order data into something practical and ready to use. Good labels improve accuracy, save time, and support better order control.
What Types of Labels Can You Print from WooCommerce for Orders and Shipping
WooCommerce supports several label types for different store needs. Each label serves a different role in your daily workflow. Some help with delivery, while others support packing or stock control. Understanding each type helps you choose the right printing method.
Shipping Labels: The Main Label Used for Delivering WooCommerce Orders
Shipping labels are the most common labels in online stores. They are attached to packages before courier pickup or delivery. These labels usually include the customer name and full address. They may also show the sender address and tracking details. In many cases, they include barcodes for quick scanning. This is the label most users mean when they say WooCommerce shipping labels. If you want to print WooCommerce shipping labels, this is usually your first step. Shipping labels are important because they guide the package to the right destination. They also help carriers process parcels faster during transit. When labels are clear, delivery issues happen less often. This makes them essential for stores with regular shipping needs.
Address Labels: A Simple Way to Show Sender and Receiver Details Clearly
Address labels focus mainly on location and contact details. They usually show the sender and receiver information clearly. These labels are helpful for manual shipping processes. Some small stores still prepare shipments without full carrier automation. In those cases, address labels support clean and correct package handling. They are also useful when staff need quick visual checking. A proper address label reduces errors during packing and dispatch. It keeps each order easier to identify before shipment.
Return Labels: Useful Labels That Make Product Returns Easier for Customers
Return labels help customers send products back when needed. These labels are often included inside the shipment box. Some stores generate them only after a return request. A return label usually contains the return address and shipping data. It may also include a barcode or carrier details. Return labels make the return process simpler and more professional. They save time for both customers and support teams. They also reduce confusion during return approval and item receiving. For stores with frequent returns, these labels improve the full shopping experience.
Product Labels: Helpful Labels for Product Names, SKUs, and Stock Handling
Product labels are used inside the warehouse or stock area. They often show the product name, SKU, barcode, or short description. These labels help staff identify items quickly during picking. They are useful when a store sells many similar products. Clear product labels reduce confusion and improve stock handling speed. Many large stores print product labels WooCommerce data can already support. This helps with shelf organization and internal tracking. Product labels are not always used for delivery. Still, they are very useful for store operations and inventory control.
Packing or Order Labels: Useful Labels That Help Staff Match Orders Correctly
Packing or order labels are used during the packing stage. These labels help staff match the right items to each order. They may include order numbers, item names, quantities, and notes. Some stores call them WooCommerce order labels because they stay linked to each order. They are often placed on the package or packing slip. Packing labels help teams work faster during busy shipping periods. They are especially useful when multiple orders look similar. They also help reduce packing mistakes before final sealing. When used correctly, they support a cleaner and more accurate workflow.
Important Things to Check Before Printing Labels from WooCommerce
Before you print labels from WooCommerce, check a few basic details first. This step helps you avoid shipping delays and label errors later. Even a small mistake can create delivery problems or returned orders. Good checking also helps your team work faster during busy hours. Whether you use manual tools or a WooCommerce label printing plugin, preparation matters. Clean data leads to better labels and fewer customer complaints. If you want to generate shipping labels WooCommerce can use correctly, start here.
Check That Your WooCommerce Store Details Are Complete and Correct
Your store details must be correct before label printing begins. Start with the business name, address, and contact information. These details may appear on your shipping and return labels. If the sender address is wrong, returns may go elsewhere. That can create delays and support problems for your store. Open your WooCommerce settings and review all business information carefully. Make sure your country, city, ZIP code, and phone details are right. This step is very important for WooCommerce shipping labels and return labels. Many shipping tools pull store details directly from these settings. If the details are old, every printed label may carry errors. A correct store profile helps print WooCommerce shipping labels more accurately. It also keeps your shipping process more professional and trusted.
Verify That Customer Shipping Information Is Clear Before Printing Any Label
Customer details should always be checked before printing the label. Look at the customer name, full address, and postal code. Check the city, state, and country fields very carefully. Missing flat numbers or wrong ZIP codes can stop delivery. Some customers also enter short or unclear address lines. That creates problems for carriers and warehouse staff later. Before you print labels from WooCommerce, review every shipping field once. Edit the order if anything looks incomplete or incorrect. This is one of the easiest ways to reduce failed deliveries. Good address checking improves the quality of WooCommerce order labels. It also helps carriers scan and deliver packages without confusion. Clean shipping details make your label printing process safer and faster.
Review Product Shipping Data Like Weight Dimensions and Shipping Class
Product shipping data must match the real item being shipped. This includes weight, length, width, and height details. Many plugins and carriers use this data for label creation. If the values are wrong, shipping costs may also become wrong. That can affect label generation and carrier approval at checkout. A WooCommerce label printing plugin may need package data to work correctly. If your store sells many items, review these values often. Also check the shipping class if your store uses one. Shipping classes help assign the right shipping rules to products. Wrong data can cause failed rates or incorrect labels. This is especially important when you generate shipping labels WooCommerce orders need automatically. Accurate product data supports better pricing and cleaner shipping output. It also helps print product labels WooCommerce teams use in warehouses.
Confirm That Your Shipping Method and Carrier Setup Are Working Properly
Your shipping method must be active and properly configured. If you use a carrier, check that connection too. Many stores connect USPS, UPS, FedEx, or DHL accounts. Others use platform tools or third-party shipping services. No matter the method, the setup must work smoothly. Open the plugin or shipping settings and review the connection. Check login details, account status, and shipping service options. If the carrier account fails, labels may not generate correctly. This can stop your team from processing paid orders. It can also create errors when trying to print WooCommerce shipping labels. Make sure the selected shipping method matches the order needs. Also confirm that live rates or label tools are enabled properly. A stable shipping setup keeps WooCommerce shipping labels accurate and ready.
Check That Label Format Matches Your Printer and Paper Type
The label format must match your printer before you print. This part is often missed by store owners during setup. Different printers support different label sizes and paper types. Some stores use thermal printers for faster daily label work. Others use normal printers with sticker or A4 label sheets. Both options work, but the format must match exactly. If the size is wrong, the label may print off-center. The barcode may blur or the address may look cut. That creates scanning and delivery problems for carriers. Before using any WooCommerce label printing plugin, check supported formats carefully. Then match those settings with your printer and label paper. This helps you print labels from WooCommerce with better clarity. It also keeps WooCommerce order labels neat, readable, and easy to scan.
Always Print One Test Label Before Starting Bulk Label Printing
A test print can save time, paper, and shipping trouble. Never start bulk printing without checking one sample first. Open a real order and print one trial label. Then check the alignment, size, barcode, and address placement. Make sure the text is sharp and fully visible. Also check whether the paper feeds correctly through the printer. This quick step helps you catch setup errors early. It is especially useful after plugin changes or printer updates. If you print WooCommerce shipping labels in bulk, testing becomes even more important. One bad setting can ruin many labels in minutes. A test label confirms that your setup is working correctly. It also helps generate shipping labels WooCommerce stores can use confidently every day.
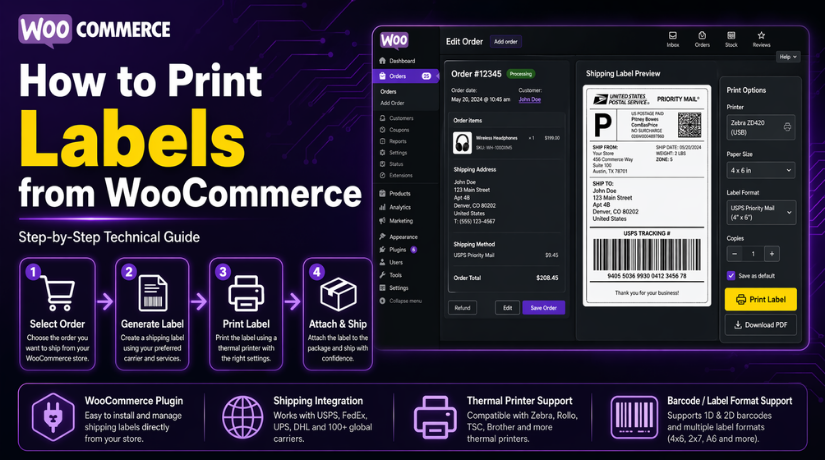
How to Print Shipping Labels from WooCommerce (Step by Step Process)
Printing shipping labels from WooCommerce becomes easy when your setup is ready. You do not need to follow a complex process every time. You only need the right plugin, correct order details, and working printer settings. Once these parts are ready, you can print labels from WooCommerce in a smooth way. The steps below explain the process clearly for daily store use.
Step 1: Choose the Right Shipping Label Method for Your WooCommerce Store


- Decide how you want to create shipping labels.
- Use WooCommerce Shipping for basic shipping needs.
- Use a WooCommerce label printing plugin for more features.
- Choose based on your order volume and carrier needs.
- A simple setup works for small stores.
- Automation works better for stores with many orders.
- The right method helps you generate shipping labels in WooCommerce more easily.
Step 2: Install and Activate a WooCommerce Shipping Label Plugin
- Go to your WordPress dashboard.
- Open Plugins and click Add New.
- Search for the shipping label plugin you want.
- Upload the ZIP file if it is a premium plugin.
- Click Install and then Activate.
- Open the plugin settings after activation.
- Review the basic setup options carefully.
- Add shipping origin, label size, and package type.
- This step prepares your store to print WooCommerce shipping labels correctly.
Step 3: Connect Your Shipping Carrier Account Correctly
- Open the plugin settings page.
- Find the carrier connection section.
- Choose your shipping carrier.
- Add account details, API keys, or login data.
- Connect USPS, UPS, FedEx, DHL, or another carrier.
- Make sure the account is active.
- Check that the carrier supports label generation.
- Save the settings after connection.
- A correct connection helps create WooCommerce shipping labels without errors.
Step 4: Configure Shipping and Label Printing Settings
- Review all shipping settings carefully.
- Select the correct package type.
- Choose your preferred shipping service.
- Set the correct label paper size.
- Select the right print format.
- Use 4×6 format for thermal printers if needed.
- Use A4 format for regular printers if needed.
- Check the return address details.
- Confirm shipping origin and packaging settings.
- Good settings keep your labels clear and readable.
Step 5: Open the WooCommerce Order You Want to Ship
- Go to WooCommerce and open Orders.
- Find the order ready for shipping.
- Open the order details page.
- Check the customer name carefully.
- Review the full shipping address.
- Check postcode, city, and country.
- Confirm the selected shipping method.
- Review the ordered products.
- Check package weight if required.
- Confirm the payment status.
- Correct order details help you avoid shipping mistakes.
Step 6: Generate the Shipping Label from the Order Page
- Look for the label option inside the order page.
- The button may say Create Label.
- It may also say Print Label or Generate Shipment.
- Click that option.
- Review shipment details again.
- Check package size and shipping service.
- Add insurance if needed.
- Confirm all details before the final step.
- Click the generate button.
- The plugin will create the shipping label for that order.
Step 7: Download and Print the Shipping Label Properly
- Download the label file after generation.
- Most plugins provide the label as a PDF.
- Open the file on your computer.
- Select the correct printer.
- Check the paper size carefully.
- Check the print scale before printing.
- Do not allow automatic resizing.
- Use actual size when possible.
- Print the label clearly.
- This helps print WooCommerce shipping labels in a scannable format.
Step 8: Attach the Printed Label to the Package Carefully
- Place the label on a flat side of the package.
- Keep the label fully visible.
- Do not fold it over edges or corners.
- Keep the barcode area smooth.
- Make sure the barcode is easy to scan.
- Remove old labels from reused boxes.
- Keep only one shipping label on each parcel.
- Place packing notes separately if needed.
- A clear label helps the carrier process the package faster.
Step 9: Test the Process Before Using Bulk Label Printing
- Print one sample label first.
- Check the label size.
- Review alignment and spacing.
- Make sure the barcode is clear.
- Check the address layout.
- Confirm the printer supports the chosen label format.
- Fix any issue before bulk printing starts.
- A test print saves time and paper.
- It also helps prevent shipping errors.
Step 10: Use Bulk Label Printing When Your Order Volume Grows
- Use bulk printing when you handle many orders daily.
- Select multiple orders together.
- Generate several labels in one action.
- Save time during order fulfillment.
- Keep the shipping workflow more organized.
- Make sure all selected orders have complete shipping details.
- Check addresses before printing in bulk.
- Bulk printing works best after testing the setup first.
Printing shipping labels from WooCommerce becomes much easier after proper setup. When you follow each step in order, the process stays clean and fast. A good plugin, correct order data, and clear print settings make a big difference. This is the best way to print WooCommerce shipping labels without creating avoidable shipping problems.
Common Problems When Printing Labels from WooCommerce and How to Fix Them Properly
Even a good setup can face problems during label printing. These issues can slow shipping and create order mistakes. The good news is that most problems are easy to fix. You only need to check the right area step by step. If you print labels from WooCommerce often, knowing these issues will help. It will also keep your shipping process faster and more reliable.
Shipping Labels Are Not Generating from WooCommerce Orders
One common issue is that the label does not generate. You click the button, but nothing happens after that. In some cases, the plugin shows an error message on screen. This problem often happens because the carrier account is not connected. It can also happen when package weight or address data is missing. Some tools also fail when the order status is not correct. First, open the order and review all shipping details carefully. Then check the plugin connection with the selected carrier. Make sure API keys, login details, and account status are correct. Also confirm the product weight and dimensions are available. If you use a WooCommerce label printing plugin, update it once. After that, try to generate shipping labels WooCommerce order by order. A clean setup usually fixes this problem quickly.
Wrong Customer Address Is Showing on the Printed Shipping Label
Sometimes the label prints, but the address is wrong. This creates delivery delays and failed shipment attempts later. Most of the time, the customer entered incomplete details at checkout. In other cases, the store owner edited the order incorrectly. Some plugins may also pull old saved data from previous settings. Start by opening the order and checking the address fields. Review the name, street, city, postcode, and country carefully. Fix anything that looks incomplete or incorrect before printing again. Also confirm that the shipping address is different from billing only when needed. This simple review helps print WooCommerce shipping labels more accurately. Correct address data also improves the quality of WooCommerce order labels. A small check here can prevent a large problem later.
Incorrect Label Size Is Causing Cut Content or Bad Print Layout
Another common issue is the wrong label size during printing. The content may look too small, too large, or cut off. Sometimes the barcode prints partly outside the label area. This usually happens when printer settings and plugin format do not match. For example, the plugin may use 4×6 format by default. But your printer may be set to A4 paper size. Open the plugin settings and check the selected label format. Then open your printer settings and match the same size. Also disable automatic page scaling before printing the label. Use actual size whenever possible for better output. This helps print labels from WooCommerce in a clean layout. It also keeps WooCommerce shipping labels readable for carrier scanning.
Printer Alignment Problems Are Making Labels Hard to Use
In some cases, the label size is correct, but alignment is wrong. The text may shift left, right, or lower than expected. This makes the label look unprofessional and hard to scan. Thermal printers can show this problem when calibration is missing. Standard printers may show it when label sheets are loaded badly. Start by printing one test label before full use. Then check the paper feed and alignment settings on the printer. If you use a thermal printer, run printer calibration once. If you use sticker sheets, load them straight and evenly. Also review the margin settings inside the print window. This step helps print WooCommerce shipping labels more clearly. A well-aligned label improves delivery speed and reduces scanning issues.
Carrier Account Is Not Syncing with the Plugin Properly
Sometimes the plugin is active, but the carrier account does not sync. This can stop label generation, rate display, or shipment updates. The issue often comes from expired credentials or API changes. It can also happen when the carrier account is under review. First, open the plugin settings and reconnect the account. Re-enter the API key, password, or account number carefully. Then test the connection again from the plugin dashboard. If the plugin offers a debug mode, use that feature. It may show the exact reason for the failure. Also check whether your carrier supports the selected shipping region. A working carrier connection is required for WooCommerce shipping labels. Without it, you cannot generate shipping labels WooCommerce stores need daily. Keeping the carrier account active prevents many printing issues.
Bulk Printing Is Failing for Multiple WooCommerce Orders
Bulk printing saves time, but it can fail in some cases. One order with missing details can stop the full action. Some plugins may skip invalid orders without showing a clear reason. This creates confusion when you print many labels together. Start by checking whether all selected orders are ready to ship. Review address fields, package data, and payment status together. Remove any incomplete order from the bulk print group. Then try printing a small batch first instead of many. This makes it easier to find the problem order. Bulk printing works better after a test print is successful. Once the setup is stable, bulk tools can print labels from WooCommerce much faster. They are especially useful for stores with daily shipment volume.
Label Files Download Properly but Still Do Not Print Correctly
Sometimes the label file downloads without any issue. But the actual print result still looks wrong or unclear. The barcode may blur, or the text may look too light. This usually happens because of print scale or low printer quality. Open the downloaded PDF and check the print settings carefully. Select the correct paper size and disable fit-to-page options. Increase print quality if your printer supports that option. Also check whether the paper type matches your printer model. Cheap label paper can also reduce barcode clarity. If the label still looks poor, test another PDF viewer once. Clear files are important when you print WooCommerce shipping labels for carriers. A sharp label reduces rejection during scanning and pickup.
Conclusion
Printing labels should never feel difficult in a WooCommerce store. Once your settings are correct, the process becomes simple and smooth. You only need the right tool, correct order data, and proper printer setup. From basic shipping labels to WooCommerce order labels, every label has value. They help your team pack faster and ship orders correctly. They also reduce mistakes during busy order processing hours. When you print labels from WooCommerce the right way, daily work improves. Good label printing supports faster delivery and better customer satisfaction. It also makes your store look more organized and professional.
If you are facing label printing issues, expert help can save time. WooHelpDesk can help with full WooCommerce shipping label setup. The team can assist with plugin installation and carrier connection. They can also help fix print size, address, and sync issues. Whether you want to print WooCommerce shipping labels daily or in bulk, the support team can guide you properly. If your current WooCommerce label printing plugin is not working well, WooHelpDesk can review the full setup and help improve it. This includes help for shipping tools, order settings, and printer issues. If you want to generate shipping labels WooCommerce can handle smoothly, WooHelpDesk is a reliable support option for your store.


