How to Connect Gelato with WooCommerce: Step By Step Guide for Beginners
Table of Contents
- Introduction
- What Is Gelato and How Does It Work with WooCommerce?
- Things You Need Before Connecting Gelato with WooCommerce the Right Way
- How to Connect Gelato with WooCommerce Step by Step in the Right Way
- Common Problems When Connecting Gelato with WooCommerce and How to Fix Them
- Conclusion
Introduction
Selling custom products online is easier than before. Many store owners now use print on demand services. Gelato is one of the popular platforms in this space. WooCommerce is also a trusted solution for WordPress stores. When both tools work together, store management becomes smoother. This setup helps you sell custom items without keeping stock. It also reduces manual work in daily order handling. That is why many users want Gelato WooCommerce Integration for their store. If you plan to integrate Gelato with WooCommerce, this guide will help you understand the basics. In this article, you will learn what Gelato is, how it works with WooCommerce, and whether this connection is the right choice for your business.
What Is Gelato and How Does It Work with WooCommerce?
Gelato is a print on demand platform for online sellers. It helps you create and sell custom printed products. These products can include shirts, mugs, posters, and more. You do not need to print or store them yourself. Gelato handles printing after the customer places an order. It also manages packing and delivery through its network. This makes it a useful option for growing stores.
WooCommerce is a WordPress plugin for building online shops. It helps you list products, accept payments, and manage orders. Many businesses use WooCommerce because it is flexible and simple. When you use Gelato WooCommerce integration, both platforms work as one system. You create or sync products through Gelato and show them in WooCommerce. A customer visits your store and places an order. That order then moves to Gelato for printing and fulfillment.
After that, the item is packed and shipped to the buyer. This process makes WooCommerce print on demand Gelato setup useful for beginners and growing brands. It saves time and helps store owners avoid inventory stress. The Gelato plugin WooCommerce users install also supports smoother connection between both platforms. In simple words, WooCommerce helps you sell, and Gelato helps you fulfill those sales.
Does Gelato Work with WooCommerce?
Yes, Gelato does work with WooCommerce. This is why many sellers choose this setup. If you want to connect Gelato to WooCommerce, the platform supports that workflow. It allows store owners to manage print on demand products more easily. After the connection, you can link products with your WooCommerce store. You can also manage orders in a more automated way. This helps reduce manual tasks and daily confusion. Many new sellers prefer this setup because it feels practical. It is especially helpful for custom product businesses.
The full Gelato WooCommerce Integration supports a smooth selling process when set up correctly. It helps store owners sell without handling printing work themselves. This is one of the main reasons users want to integrate Gelato with WooCommerce from the beginning. If your goal is to build a custom product store, this connection can be a smart step. It gives your WordPress website the power to sell, process, and fulfill print on demand orders with less effort.
Why Should You Connect Gelato with WooCommerce?
If you sell custom products online, this setup can help. It gives your store more flexibility and less manual work. Many sellers now choose Gelato WooCommerce Integration for this reason. It helps you manage products, orders, and fulfillment in one flow. When you connect Gelato to WooCommerce, your store becomes easier to run. This is useful for both new sellers and growing businesses. Below are the main reasons why this setup is worth using.
Sell Print on Demand Products Without Keeping Stock
One big benefit is that you do not need inventory. You can sell products without buying bulk items first. This lowers your starting cost and reduces product storage problems. It also removes the risk of unsold stock in hand. With WooCommerce print on demand Gelato, products are made after purchase. This means you only fulfill what customers actually order. It is a smart model for stores with limited budgets. It also helps sellers test new product ideas more safely.
Make Order Fulfillment More Automatic and Less Stressful
Manual order handling takes time and creates more mistakes. That is where this setup becomes very helpful. After customers place orders on your website, the process moves faster. The connected system helps send fulfillment details more smoothly. This reduces daily work for the store owner. When you integrate Gelato with WooCommerce, you save time on repeated tasks. That time can be used for product growth and marketing. Automation also helps improve order handling consistency across your store.
Manage Your Online Store More Easily from One Main Place
WooCommerce already gives you strong control over your online store. You can manage products, payments, and customer orders from WordPress. When Gelato is added, fulfillment becomes part of a smoother system. This creates a better workflow for store owners. The Gelato plugin WooCommerce users install helps support this process. You do not need to jump between too many tools daily. This makes the store easier to manage, especially for beginners. A simple workflow helps reduce confusion and improves daily productivity.
Use Global Fulfillment Support for Wider Product Delivery
Shipping from one location can slow down international orders. Gelato helps solve that problem through a global production network. This allows products to be printed closer to many customers. As a result, delivery can become faster and more efficient. It can also improve the buying experience for global customers. This is another strong reason to choose Gelato WooCommerce integration for your store. Better fulfillment support helps your business serve more locations with less effort. It also supports growth when your store starts getting wider reach.
Save Time on Daily Store Tasks and Repeated Work
Running an online store includes many repeated tasks every day. Product setup, order checks, and shipping updates take real time. A connected system helps reduce some of this daily pressure. That is why many sellers want to connect Gelato to WooCommerce early. It helps streamline important store actions in one process. When fewer tasks are handled manually, mistakes also become less common. This gives store owners a cleaner and more organized work routine. Saving time daily can make a big difference over months.
Give Customers a Better Buying and Delivery Experience
Customers expect smooth ordering and reliable product delivery. A well-connected store can support both of these expectations better. When products are handled through a trusted fulfillment system, the experience improves. Orders move through the process with less delay and confusion. That helps build trust in your online store. When you integrate Gelato with WooCommerce, you create a better system behind the scenes. Customers may not see the setup, but they feel the result. A better experience can lead to stronger reviews and repeat orders.
Things You Need Before Connecting Gelato with WooCommerce the Right Way
Before starting the setup, you need a few basic things ready. Preparing these first will save time during the connection process. It will also reduce setup errors later. Many users face issues because they skip these basics. So, it is better to prepare everything in advance.
A WordPress Website That Is Ready for Store Setup
WooCommerce works on WordPress, so your website must use WordPress first. It should be active and working correctly before setup starts. You also need access to the admin dashboard. This is where you will install plugins and manage settings. A stable website gives a better base for integration. If your website is broken or incomplete, setup problems may happen. So, make sure your store website is ready before moving ahead.
WooCommerce Installed and Properly Active on Your Website
You cannot use this setup without WooCommerce installed first. WooCommerce is the main shopping system for your WordPress store. It manages products, checkout, payments, and order details. Gelato connects with this store system to support fulfillment. So WooCommerce must be active and properly configured. Basic store settings should also be completed before integration begins. This includes currency, shipping zones, and other important settings. A ready WooCommerce store helps the connection work more smoothly.
A Gelato Account for Product and Fulfillment Management
You also need an active Gelato account before starting setup. This account is used to create and manage print products. It also handles printing and order fulfillment after customer purchases. Without this account, the integration process cannot move forward. Make sure you can log in without issues. It is better to complete your account setup early. This helps avoid delay during the actual connection process. A ready account makes Gelato WooCommerce Integration much easier.
Admin Access to Install and Configure the Needed Plugin
To set up the connection, you need admin access. This is required for plugin installation and store changes. Without admin rights, you may not open key settings areas. You may also fail to activate the required plugin. The Gelato plugin WooCommerce stores use must be installed correctly. That step needs proper access inside the dashboard. So, check your role before starting the setup. Full access will make the process faster and smoother.
Basic Store Settings Should Be Completed Before Integration
A half-ready store can create setup and syncing issues later. That is why basic settings should be completed first. Your store name, currency, and payment options should already be set. Shipping settings should also be reviewed before the connection begins. Product pages and checkout pages should work properly too. These small details help the integration run better. When you connect Gelato to WooCommerce, the store should already have a strong base. Good preparation always makes technical setup easier.


Updated Plugins and a Stable Website Environment Help More
Old plugins can create conflicts during integration steps. A slow or unstable website can also cause setup errors. So, update WordPress, WooCommerce, and other major plugins first. This helps reduce common compatibility issues during setup. A stable hosting setup is also helpful here. It keeps your dashboard responsive while you complete the connection. If your site is full of errors, fix those first. A clean setup environment supports a smoother integration process.
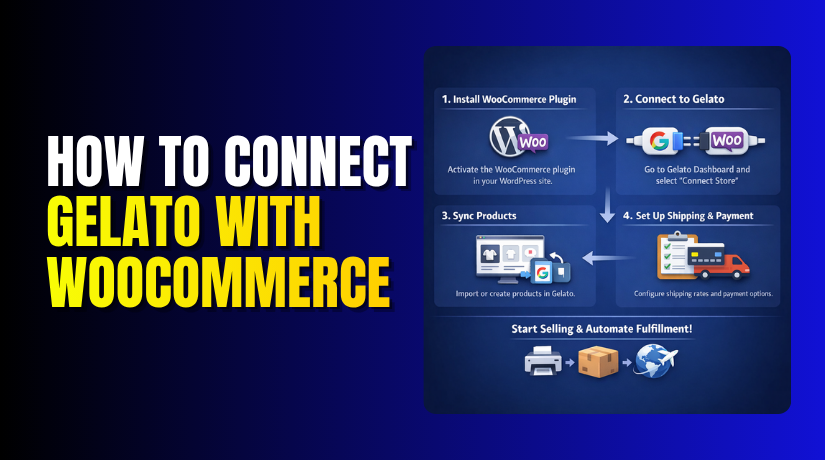
How to Connect Gelato with WooCommerce Step by Step in the Right Way
Now let us look at the actual setup process clearly. This is the main part most users want to understand first. If your store basics are already ready, the process becomes easier. You just need to follow each step in order. When done correctly, Gelato WooCommerce Integration can help your store run more smoothly. Below is the full process to connect Gelato to WooCommerce without confusion.
Step 1: Log In to Your WordPress Dashboard First
- Start by logging in to your WordPress admin area.
- This is where all setup steps will begin. Use an admin account for full access to plugins and settings. If you do not have admin access, some options may not appear.
- Once you log in, open the main dashboard carefully.
- Check that WooCommerce is already active on your website.
- This step gives you the base needed before setup starts. A proper login is the first step to integrate Gelato with WooCommerce.
Step 2: Install the Gelato Plugin on Your WooCommerce Store
- After logging in, go to the Plugins section in WordPress.
- Click on Add New to search for the required plugin.
- In the search box, type Gelato and review the results.
- Look for the official Gelato plugin WooCommerce stores use for integration.
- Once you find it, click Install Now to begin setup. Wait for the plugin to finish downloading and installing fully.
- Do not close the page while installation is in progress. This plugin is required to start the connection process correctly.
Step 3: Activate the Gelato Plugin After Installation Ends
- After installation, click the Activate button right away.
- This will enable the plugin on your WordPress website.
- Once activated, Gelato options should appear inside the dashboard menu. If nothing appears, refresh the page and check again carefully.
- Plugin activation is important because setup cannot continue without it.
- This step makes the integration tool live in your store. It prepares the website for the next connection stage.
- A successful plugin setup supports better Gelato WooCommerce integration later.
Step 4: Open the Gelato Section from the WordPress Dashboard
- Now look for the Gelato option in the admin menu.
- Click it to open the plugin setup area. This section is where the connection process will begin fully.
- You may see a welcome screen or account connection option. Read the details shown on the page before moving ahead.
- Make sure your WooCommerce store is still active and working.
- This page is the main control area for integration setup.
- From here, you can move forward to connect Gelato to WooCommerce properly.
Step 5: Sign In to Your Gelato Account to Continue Setup
- The next step is signing in to your Gelato account. If you already have an account, enter your login details.
- If not, create one first and then come back. Use the same account you want for product and order handling.
- Make sure you log in with the correct email and password.
- If login fails, check your account details again carefully.
- This account will link your store with Gelato services.
- It is a required step in Gelato WooCommerce Integration.
Step 6: Authorize the Connection Between Both Platforms
- After signing in, Gelato will ask for permission to connect. This is a normal step during the setup process.
- Read the access request and allow the needed permissions. These permissions help Gelato communicate with your WooCommerce store. Without approval, the connection will not finish successfully.
- Click the confirm or authorize button to continue. Wait a few moments while both systems complete the link.
- This step is where you officially integrate Gelato with WooCommerce.
Step 7: Confirm That Your WooCommerce Store Is Connected Properly
- Once the connection is complete, check the plugin status page.
- It should show that your store is now connected.
- Some setups may also show account details or store status.
- Review the information to make sure everything looks correct. If there is an error, do not ignore it.
- It is better to fix setup issues before adding products. A confirmed connection means the main integration is now complete.
- At this stage, you have successfully set up Gelato WooCommerce integration.
Step 8: Start Adding or Syncing Products to Your Store
- After connection, you can begin adding products through Gelato. You may create new print on demand items from the platform.
- These products can then be linked to your WooCommerce store.
- Review product details, images, pricing, and variant options carefully.
- Make sure the titles and descriptions fit your store style.
- This step is important for a clean product presentation. It also helps customers understand what they are buying.
- This is where WooCommerce print on demand Gelato becomes useful in real selling.
Step 9: Test the Setup Before Making the Store Fully Live
- Before going live, always test the store setup first. This helps you catch problems before real customers place orders.
- Check product pages, cart flow, checkout, and order creation. Make sure the product moves correctly through the system.
- Also review shipping details and basic order handling. A quick test can save many future support issues.
- It also helps confirm that you properly connect Gelato to WooCommerce without hidden errors.
- Testing is a smart final step before starting real sales.
The setup process is not too hard when done in order. First, log in and install the required plugin properly. Then activate it and open the Gelato setup area. After that, sign in and approve the store connection. Once connected, add products and test the full flow.
Common Problems When Connecting Gelato with WooCommerce and How to Fix Them
Even a simple setup can show errors sometimes. This does not always mean something is badly broken. In many cases, the issue is small and fixable. You just need to check the setup step by step. If you want a smooth Gelato WooCommerce Integration, it is important to know these common issues. Below are some problems users often face when they try to connect Gelato to WooCommerce.
The Gelato Plugin Does Not Install on the Website
Sometimes the plugin does not install as expected. This can happen because of low server limits or plugin conflicts. In some cases, WordPress permissions also block installation. First, check if your WordPress version is updated. Then check whether WooCommerce is active on the site. Also review if other plugins are causing conflict during installation. If needed, deactivate extra plugins for a short test. The Gelato plugin WooCommerce users need should install on a healthy setup. A clean website environment usually helps solve this issue faster.
The Store Does Not Connect Properly After Plugin Setup
Sometimes the plugin installs, but the store does not connect. This usually happens during the account linking stage. The page may freeze, fail, or return an error message. First, refresh the dashboard and try the process again. Then check your internet connection and browser session. Also make sure your WooCommerce store is working correctly. If your store has broken settings, connection may fail. To integrate Gelato with WooCommerce, the store must be stable first. A basic store health check can often solve this issue.
Login or Authorization Errors Appear During the Connection Process
Some users face login issues while linking the Gelato account. In other cases, the permission approval page does not finish. This can happen because of wrong login details or expired sessions. Start by signing out and signing in again carefully. Check your Gelato account email and password once more. Then repeat the authorization step from the plugin area. Also clear browser cache if the same page keeps loading. These simple actions often solve access problems. A proper login is required for successful Gelato WooCommerce integration.
Products Are Not Syncing Correctly Between Gelato and WooCommerce
A connected store may still show product syncing problems. For example, products may not appear in WooCommerce correctly. Sometimes variants, images, or pricing do not update as expected. This can happen if product mapping was not completed properly. It may also happen because of plugin conflicts or setup gaps. Check product details carefully inside both platforms. Make sure all required fields are filled correctly. When you use WooCommerce print on demand Gelato, product sync is very important. Testing one product first is always a smart step.
Orders Are Not Reaching Gelato After Customers Place Them
This is one of the biggest problems store owners worry about. A customer places an order, but Gelato does not receive it. This can happen because of connection problems or order setting issues. First, check whether the store is still connected. Then review WooCommerce order status and plugin activity. Sometimes test orders help identify where the issue starts. Also check whether the product was linked properly to Gelato. If the product setup is incomplete, the order flow may break. A complete Gelato WooCommerce Integration needs both product and order flow working well.
Shipping or Fulfillment Settings Create Problems Later
Sometimes the connection works, but the shipping setup causes confusion. Customers may see wrong shipping details or missing fulfillment options. This often happens when store settings are incomplete. Review your WooCommerce shipping zones and shipping methods first. Then compare them with your Gelato product setup. Make sure delivery settings match your target regions correctly. If shipping is not configured well, customer experience can suffer. This is why you should test the full order journey early. When you connect Gelato to WooCommerce, the shipping setup also needs careful review.
Plugin Conflict or Website Cache Causes Setup Problems
Some websites use many plugins, optimization tools, or heavy caching. These tools can sometimes block or delay plugin actions. As a result, setup pages may not load correctly. Products may also fail to sync in real time. Start by clearing website cache and browser cache fully. Then test the process again in a clean browser window. You can also disable extra plugins for quick testing. If the issue disappears, a conflict is likely causing the problem. This is a common issue during Gelato WooCommerce integration on busy websites.
Conclusion
Connecting Gelato with WooCommerce is a smart move for many stores. It helps you sell custom products with less manual work. It also supports a better print on demand workflow. When the setup is done correctly, store management becomes easier. You can handle products, orders, and fulfillment in a smoother way. That is why many businesses now integrate Gelato with WooCommerce. The process is not very hard if you follow each step carefully. You just need the right setup, the right plugin, and a stable store. Once everything is connected, your store becomes more ready for print on demand growth. If you want to connect Gelato to WooCommerce, this guide gives you a solid starting point.
Need help with Gelato WooCommerce Integration on your website? WooHelpDesk can help you set up the connection correctly. We can also fix plugin errors, product sync issues, and order flow problems. If your store is not working as expected, our team can check it for you. We also help with full WooCommerce print on demand Gelato setup support. If you want expert help to integrate Gelato with WooCommerce, contact WooHelpDesk and get your store running smoothly.


