How to Bulk Import or Upload Products in WooCommerce (Step-by-Step Guide)
Table of Contents
- Introduction
- Why Many Store Owners Need to Bulk Import Products in WooCommerce
- Important Things to Check Before Bulk Importing Products in WooCommerce
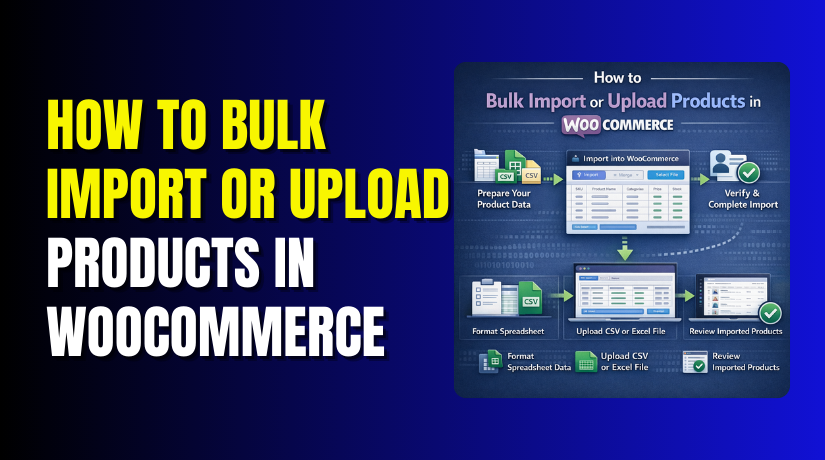
- How the Bulk Product Upload Process Works in WooCommerce
- How to Bulk Import Products in WooCommerce Using a Plugin (Step By Step Guide)
- Common Problems During WooCommerce Product Import and Fixes
- Conclusion
Introduction
Managing a WooCommerce store becomes harder when product numbers grow. Adding each item one by one takes too much time. It also increases the chance of small data mistakes. That is why many store owners choose to bulk import products WooCommerce stores need every day. This method helps you add many items faster. It also keeps your store setup more organized. A proper WooCommerce product import process is useful for small and large stores.
It saves effort and makes product management easier. If you want to upload products in WooCommerce without wasting time, bulk upload is a smart option. In most cases, store owners use a CSV file for this work. That is why WooCommerce CSV product import is one of the most common methods today. It helps you move product data in a simple format. You can add names, prices, stock, images, and categories together.
This guide will help you understand the process in a clear way. You will learn when bulk upload helps most. You will also learn the right way to prepare before starting. Whether you want to import products to WooCommerce for a new shop or update an old catalog, this method can make your work much easier.
Why Many Store Owners Need to Bulk Import Products in WooCommerce
There are many reasons why store owners use WooCommerce bulk upload products methods. The biggest reason is saving time during store setup. If you have ten products, manual entry may still work. But if you have hundreds of items, the process becomes slow. A WooCommerce bulk product upload helps you add many products together. This is very useful during a new store launch.
It is also useful when moving from another platform. Many businesses switch from Shopify, Magento, or custom stores. In that case, they need to import products to WooCommerce quickly and correctly. Bulk upload also helps when suppliers share product lists in CSV files. You can edit the file and then start the import. This makes WooCommerce import products CSV work much smoother. Another common reason is product updates. Sometimes prices, stock, or descriptions change for many items.
Editing each product one by one takes extra time. A bulk upload makes these updates easier to manage. It also reduces repeated manual work. Many stores use this method for seasonal products, wholesale catalogs, or large inventories. A good WooCommerce product import process helps keep product data clean and consistent. This is why bulk upload is not only faster. It is also a better way to manage growing stores.
Important Things to Check Before Bulk Importing Products in WooCommerce
Take a Full Backup of Your WooCommerce Store First
Before you start any WooCommerce product import, create a full website backup. This step keeps your store safe if anything goes wrong during the upload. If the file has wrong data, you can restore the old version quickly. A backup protects products, images, customer data, and store settings. This is one of the most important checks before you bulk import products WooCommerce stores need.
Make Sure WooCommerce and Related Plugins Are Updated
An outdated setup can create import problems. Before you upload products in WooCommerce, check that WooCommerce is updated. Also review related plugins that affect products, categories, stock, or images. Old versions may cause mapping errors or failed imports. A clean and updated setup gives better results. It also makes the WooCommerce CSV product import process smoother and more stable.
Prepare Your CSV File in the Correct Format
Your CSV file should be clean and properly arranged. This file is the base of your WooCommerce import products CSV process. Each column should have the correct heading and matching value. Product name, SKU, price, stock, and category must be placed correctly. If the file is messy, the import may fail or place data in the wrong fields. A proper file saves time and reduces mistakes.
Check Product Names, SKU, Prices, and Stock Details Carefully
Before you begin the WooCommerce bulk upload products process, review all main product details. Product names should be clear and complete. SKU values should be unique for each item. Prices should be correct and stock values should match your real inventory. Wrong details can create confusion after import. This check helps your WooCommerce bulk product upload stay accurate and organized.
Confirm That Product Categories and Tags Are Ready
Categories help keep your store structured and easy to browse. Before you import products to WooCommerce, make sure category names are correct in the CSV file. If category names are wrong, products may go into the wrong section. The same check should be done for tags if you use them. Clean category data makes your store easier to manage after the import is complete.
Make Sure Product Image URLs Are Correct and Working
Images are an important part of every product listing. If image links are broken, product photos may not appear after the WooCommerce product import. Check that all image URLs open correctly in a browser before uploading. The image files should also be live and accessible. This small check helps you avoid missing product images after you upload products in WooCommerce.
Check the Product Type Before Starting the Import
WooCommerce supports different product types like simple and variable products. Before you bulk import products WooCommerce stores require, confirm which type each product uses. Simple products need basic fields. Variable products need extra fields like attributes and variation details. If product type data is wrong, the import may not work as expected. This step is very important for a clean upload.
Test the Import with a Small Sample File First
Do not start with your full catalog right away. First, test the process with a few sample products. This helps you check mapping, image links, categories, and other important fields. A small test can show errors before they affect your full store. This is one of the safest ways to handle a WooCommerce CSV product import. It helps you fix problems early and import with more confidence.
How the Bulk Product Upload Process Works in WooCommerce
Step 1: Go to the Products Section in WooCommerce
- First, log in to your WordPress admin panel.
- After that, open the Products section from the left menu.
- This is the main area where all store products are managed.
- If you want to upload products in WooCommerce, this is where the process starts. You will also find the import option here.
Step 2: Click the Import Button
- Inside the Products page, click the Import button at the top.
- WooCommerce gives this built-in option for product uploads.
- This tool is mainly used for WooCommerce CSV product import tasks.
- It helps store owners add many items in one process.
- This saves time when compared with manual product entry.
Step 3: Upload Your Product CSV File
- After clicking Import, you will see the upload screen.
- Here, choose the CSV file from your computer.
- This file should contain your product details in the correct format.
- A clean file makes the WooCommerce product import process easier.
- If the file has errors, your data may not upload correctly.
Step 4: Select Extra Import Options if Needed
- WooCommerce may show extra options before the next step.
- For example, you may choose whether to update existing products.
- You may also decide if the file uses the same column order.
- These settings help control how you import products to WooCommerce.
- Choose the correct options based on your product data.
Step 5: Map CSV Columns with WooCommerce Product Fields
- Next, WooCommerce reads your file and opens the mapping screen.
- Here, you match CSV columns with WooCommerce product fields.
- For example, the name column should match the product name.
- The SKU column should match SKU.
- This is one of the most important parts of WooCommerce import products CSV work.
- Wrong mapping can place data in the wrong fields.
Step 6: Review the Field Mapping Carefully
- Before moving ahead, check every mapped field properly.
- Make sure prices, stock, categories, descriptions, and image URLs are linked correctly. A quick review can stop many import mistakes.
- This step is very important during WooCommerce bulk upload products work.
- Clean mapping gives better results after upload.
Step 7: Run the Product Import Process
- Once mapping is checked, click the button to start the import.
- WooCommerce will now read the CSV file and create products.
- The system may take a few seconds or more.
- This depends on file size and server speed.
- During this stage, the WooCommerce bulk product upload process is active.
Step 8: Wait for the Import to Complete
- Do not close the page while the upload is running.
- WooCommerce needs time to process all product rows.
- If your file is large, the process may take longer.
- When complete, WooCommerce will show a success message.
- This means the basic step to bulk import products WooCommerce stores use is finished.
Step 9: Review the Imported Products in Your Store
- After import, return to the Products page and check the results.
- Open a few products and review the details.
- Make sure names, prices, stock, categories, and images are correct.
- This final check helps confirm your WooCommerce product import worked properly.
- It also helps you spot errors early.
Step 10: Fix Errors and Re-Import if Needed
- If you find missing or wrong data, edit the CSV file first.
- Then run the import again with corrected values.
- Many store owners do this when handling a large catalog.
- A second upload can fix issues in your WooCommerce CSV product import process.
- This step helps keep product data clean and accurate.
How to Bulk Import Products in WooCommerce Using a Plugin (Step By Step Guide)
Step 1: Choose a Product Import Plugin for WooCommerce
- First, select a plugin that supports bulk product import.
- Many plugins are made for WooCommerce bulk upload products tasks.
- Some support simple products only, while others support variations, images, and custom fields.
- Choose a plugin based on your store needs.
- A good plugin makes the import process easier and more flexible.
Step 2: Install and Activate the Plugin
- After choosing the plugin, install it from your WordPress dashboard.
- Go to Plugins > Add New and search for the plugin name.
- Then click Install Now and activate it.
- Once active, the plugin will add its own import settings.
- This is the next step to upload products in WooCommerce using a plugin.
Step 3: Prepare Your Product CSV File Properly


- Before starting the import, make sure your CSV file is ready.
- The file should contain correct product data in the right columns.
- Add fields like product name, SKU, price, stock, category, and image URL.
- If you want to import products to WooCommerce without errors, the file should be clean and complete.
- A proper file improves import success.
Step 4: Open the Import Tool Inside the Plugin
- Now go to the import section added by the plugin.
- Most plugins place this option under WooCommerce, Products, or their own menu.
- Open the import tool and start a new import.
- This screen is where the WooCommerce product import process begins.
- The layout may change by plugin, but the steps are usually similar.
Step 5: Upload the CSV File into the Plugin
- Next, upload your product CSV file from your computer.
- Some plugins also allow file links or remote file imports.
- Once the file is uploaded, the plugin reads the product data.
- This step is a core part of the WooCommerce CSV product import process.
- Make sure you upload the correct and latest file version.
Step 6: Select Product Import Type
- Many plugins ask what kind of data you want to import.
Choose products as the import type. - Some plugins may also ask if you want to add new products or update existing ones.
- Select the correct option based on your goal.
- This helps control the full WooCommerce bulk product upload process more accurately.
Step 7: Map CSV Columns with WooCommerce Product Fields
- After file upload, the plugin will show a field mapping screen.
- Here, you match each CSV column with the correct WooCommerce product field.
- For example, map title with product name, stock with inventory, and image link with product image.
- This step is very important in WooCommerce import products CSV work.
- Wrong mapping can create wrong product data.
Step 8: Match Advanced Fields if Your Products Need Them
- If your store uses variable products, attributes, tags, or custom fields, map them carefully.
- Many plugins support advanced data better than the default importer.
- This is why plugins are useful for complex stores.
- A correct setup here helps you bulk import products WooCommerce stores with better control.
- It also reduces missing or broken product details.
Step 9: Run a Small Test Import First
- Before importing the full file, test with a few product rows.
- Many plugins allow sample imports or limited test runs.
- This helps you check if mapping and data format are correct.
- A small test can save a lot of cleanup work later.
- This is a smart step before a full WooCommerce bulk upload products process.
Step 10: Start the Full Product Import
- Once the test works well, start the full import.
- The plugin will now read the file and create or update products.
- Depending on file size, this may take some time.
- During this step, the WooCommerce product import process is running in the background or on the same screen.
- Do not close the page unless the plugin allows it.
Step 11: Review Imported Products Carefully
- After the import finishes, check the uploaded products in your store.
- Review names, prices, stock, categories, images, and product types.
- Open a few product pages and confirm everything looks correct.
- This check helps confirm your upload products in the WooCommerce process worked properly.
- It also helps you catch issues early.
Step 12: Fix Errors and Re-Import If Needed
- If you find any problem, edit the CSV file and correct the wrong data.
- Then run the import again for those products.
- Many plugins support update-based imports, which makes corrections easier.
- This final step helps keep your WooCommerce CSV product import process clean and accurate.
- It also makes future imports easier to manage.
Common Problems During WooCommerce Product Import and Fixes
CSV File Is Not Uploading Properly
One common problem is that the CSV file does not upload at all. This usually happens when the file format is wrong or the file contains broken data. In some cases, extra symbols or blank rows also cause issues. Before starting the WooCommerce CSV product import, save the file again in proper CSV format. Also remove unwanted spaces, special characters, and empty lines.
Product Data Goes into the Wrong Fields
Sometimes product names, prices, stock, or descriptions appear in the wrong place. This happens when the file columns are mapped incorrectly during import. Even one wrong match can affect many products. During the WooCommerce product import process, always review the mapping screen carefully. Make sure every CSV column matches the correct WooCommerce field before running the import.
Product Images Do Not Show After Import
Missing images are a very common issue during product upload. This usually happens when image URLs are broken, private, or typed incorrectly. WooCommerce can only import images from valid and public links. Before you upload products in WooCommerce, open the image URLs in your browser and test them. If the image opens correctly, it is more likely to import successfully.
Categories Are Not Assigned Correctly
Some imported products appear without categories or in the wrong category. This problem happens when category names in the CSV file do not match the names used in WooCommerce. In some cases, the category format is also incorrect. Before you import products to WooCommerce, check that category names are written clearly and exactly. This helps keep your store structure clean after import.
Duplicate Products Are Created
Duplicate products often appear when SKU values are missing or repeated. This can also happen when the importer is set to create new items instead of updating old ones. Duplicate products make the store messy and confusing. To avoid this during a WooCommerce bulk product upload, always use unique SKU values. Also choose the correct import option if you want to update existing products.
Price, Stock, or SKU Values Are Missing
Sometimes products import successfully, but important fields stay empty. This often affects price, stock level, SKU, or short description. In most cases, the reason is wrong field mapping or missing values inside the CSV file. Before you bulk import products WooCommerce stores, review all key columns in the file. Then check the mapping carefully during the upload process.
Variable Products Do Not Work Correctly
Variable products need more data than simple products. They require attributes, variation values, parent product settings, and proper structure. If one part is missing, the product may not work correctly after import. This is a common issue during WooCommerce import products CSV tasks. If you are importing variable products, check the CSV format very carefully and test a few items first.
Import Process Stops or Times Out
Large product files sometimes stop during import. This may happen because of server limits, memory issues, or file size problems. When this happens, only part of the data may upload. To fix this, split the file into smaller parts and import them one by one. If your WooCommerce bulk upload products process often fails, using a plugin may also help handle large files better.
Imported Products Do Not Appear on the Store Frontend
In some cases, the import finishes, but the products do not show on the website. This may happen because product status is set incorrectly, visibility settings are wrong, or categories are missing. It can also happen due to cache issues. After the WooCommerce product import, open a few products and check their status. Make sure they are published and visible in the correct catalog settings.
Existing Products Are Not Updating Properly
Some store owners want to update old products through CSV, but the changes do not apply. This usually happens when the matching field is missing, especially the SKU or ID. Without proper matching, WooCommerce may create new products instead of updating old ones. Before you import products to WooCommerce, make sure your file includes the correct unique product identifier for updates.
Conclusion
Bulk product upload makes store management much easier in WooCommerce. It helps you save time, reduce manual work, and handle large product catalogs in a better way. Whether you use the default CSV importer or a plugin, the process becomes simple when your file is clean and your product data is prepared correctly.
A well-planned WooCommerce product import also helps prevent errors like missing prices, broken images, duplicate products, and wrong category mapping. If you want to bulk import products from WooCommerce stores without confusion, always start with proper checks, correct field mapping, and a small test import. Once everything looks right, you can move ahead with full confidence.
If you are facing issues with WooCommerce CSV product import, product mapping, image upload errors, variable product import, or plugin-based setup, WooHelpDesk is here to help. Our team can support you with product CSV fixes, bulk upload setup, import troubleshooting, and complete WooCommerce product management support. Contact WooHelpDesk today and make your WooCommerce bulk upload products process smoother, faster, and safer.


