How to Set Up Shipping Method for a Specific Product in WooCommerce (Step-by-Step)
Table of Contents
- Introduction
- Can WooCommerce Set Shipping per Product Without Extra Tools?
- Before You Start: Key Terms You Must Know for Product Shipping
- How to Set a Shipping Method for a Specific Product in WooCommerce (Easy Way)
- How to Set a Shipping Method for a Specific Product in WooCommerce (Using Plugin)
- Common Problems and Fixes During Set a Shipping Method
- Conclusion
Introduction
Many stores sell items that need different shipping handling. Some products are heavy, fragile, or need special packing. This is where WooCommerce product-specific shipping becomes very useful. You may want a higher rate for bulky items. You may want limited delivery options for restricted items. You may also want a clean checkout with fewer choices. Many store owners search for WooCommerce shipping by product solutions. They want better control without confusing customers at checkout. In this guide, you will learn the correct way to plan it. You will also learn what WooCommerce can do by default.
Product-level shipping control usually means two things in practice. First, you want a different cost for one product. Second, you want different shipping options for one product. The first goal is easier with WooCommerce shipping classes. The second goal often needs extra WooCommerce shipping rules. We will start with clear basics before setup steps. That makes the next parts easy and mistake free.
Can WooCommerce Set Shipping per Product Without Extra Tools?
Yes, but only in a specific way by default. WooCommerce does not directly assign a shipping method per product. You cannot say, “This product uses only Flat Rate.” WooCommerce works using zones, methods, and class-based costs. This is why WooCommerce shipping method per product feels confusing. Still, you can control product shipping costs very well. You do this using WooCommerce shipping classes and class costs. This covers many common store needs very smoothly.
Default WooCommerce is best when your goal is pricing control. For example, you can add extra cost for heavy items. You can also reduce cost for light items in bulk. This is the cleanest way for WooCommerce shipping by product pricing. You create shipping classes and set class costs in methods. Then you assign those classes to the correct products. Many stores never need more than this simple setup.
You may need a plugin when you want strict method control. For example, you want “Local Pickup only” for one product. Or you want “Free Shipping only” for one product. You may also want to hide other methods automatically. That level of control is closer to a WooCommerce custom shipping method. It is also useful when cart rules must change by product. In those cases, rules-based plugins handle the logic better.
So the short answer is simple and practical. WooCommerce can price shipping per product using classes. WooCommerce cannot force a method per product by default. If you need forcing, you use a plugin approach later. The next section explains the key words you must know.
Before You Start: Key Terms You Must Know for Product Shipping
Understanding these terms saves hours during shipping setup. It also helps you build correct WooCommerce shipping rules. When you know the system, your store stays stable. You also avoid checkout errors and missing methods.
Shipping Zone: Where Your Shipping Settings Apply
A shipping zone is based on the customer location. You can create zones for countries, states, or pin codes. WooCommerce checks zones from top to bottom order. The first matching zone becomes active for that customer. Each zone has its own shipping methods and settings. This is why zones control what customers can select. If a zone is wrong, methods may not appear.
Shipping Method: What Shipping Option Customers See at Checkout
A shipping method is the option shown in the cart. Common methods include Flat Rate and Free Shipping. Local Pickup is also a method in WooCommerce shipping settings. Each method has its own rules and cost fields. Methods are added inside a shipping zone only. Customers see methods from the active zone during checkout. Methods do not attach to products directly by default.
Shipping Class: The Best Way to Control Shipping Cost by Product
A shipping class is a label you assign to products. It groups products that share similar shipping needs. For example, “Heavy” and “Fragile” are common class names. WooCommerce shipping classes are used inside shipping methods settings. You can set different costs for each shipping class. This is the core tool for product pricing control. Many guides call this WooCommerce shipping method per product, indirectly. In practice, it is “shipping cost per product group.”
Shipping Rate or Shipping Cost: The Final Amount the Customer Pays
The shipping rate is the final shipping amount shown. It can be fixed, like a simple flat amount. It can also be mixed with class costs and base costs. Some stores use tax on shipping based on settings. Your goal is to make rates clear and fair. Wrong rates reduce trust and increase support tickets. Correct rates increase conversions and reduce checkout dropoffs.
Cart Rules: Why One Product Can Change the Whole Shipping Result
WooCommerce calculates shipping for the whole cart together. This is important for WooCommerce product-specific shipping planning. If two products need different handling, rules may combine. Shipping class costs can add up depending on settings. Some plugins can split packages by product rules. Without a plugin, shipping stays as one combined decision. This is why method forcing is not simple by default. It is also why testing mixed carts matters later.
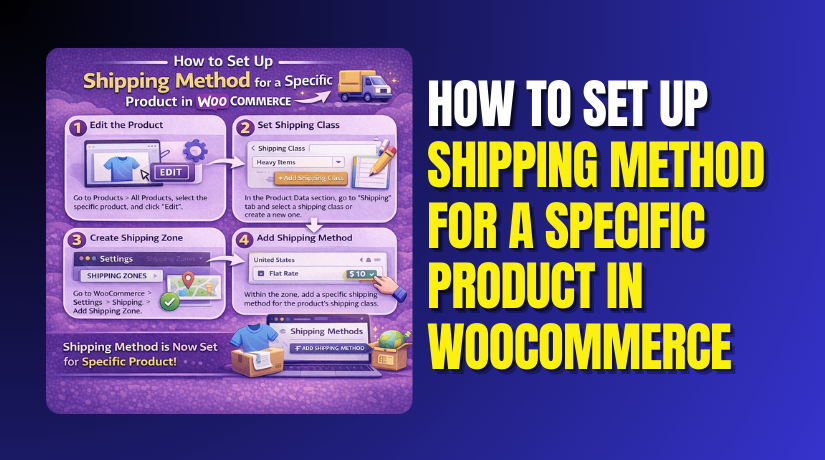
How to Set a Shipping Method for a Specific Product in WooCommerce (Easy Way)
This method works best when you need product-based shipping costs. It uses WooCommerce shipping classes for clean control. It supports WooCommerce product-specific shipping without extra tools. It also keeps checkout simple for most store owners.
Step 1: Create a Shipping Zone That Matches Your Delivery Area
- Go to WordPress dashboard and open WooCommerce settings.
- Click Shipping and then open Shipping Zones section.
- Click Add zone or edit an existing shipping zone.
- Select countries, states, or pin codes for this zone.
- Keep zone locations accurate to avoid wrong method display.
- Save changes to store the shipping zone settings.
Step 2: Add and Configure a Shipping Method Inside That Zone
- Open the same shipping zone you created or edited.
- Click Add shipping method inside the zone settings.
- Select Flat rate as your main shipping method option.
- Add a clear method title customers understand quickly.
- Set base cost if you want a minimum shipping charge.
- Leave base cost blank if class costs handle everything.
- Save changes to apply the shipping method in zone.
Step 3: Create a Shipping Class for That Specific Product
- Go to WooCommerce settings and open Shipping section.
- Click the Shipping Classes tab at the top area.
- Click Add shipping class to create a new class.
- Name it like Heavy Item, Fragile Item, or Oversized.
- Add a simple slug for internal tracking if needed.
- Save the class to enable WooCommerce shipping classes.
Step 4: Assign the Shipping Class to the Specific Product


- Go to Products and open the product edit screen.
- Scroll to Product data and open the Shipping tab.
- Find the Shipping class dropdown in that same tab.
- Select the class you created for this special product.
- Update the product to save the new class setting.
- This is Assign shipping class to product WooCommerce correctly.
Step 5: Set Class-Based Costs Inside Your Flat Rate Method
- Go to WooCommerce settings and open Shipping Zones again.
- Edit the correct zone and open the Flat rate method.
- Find the section for shipping class cost fields.
- Enter cost for the class you created for this product.
- Keep other class costs blank if not needed right now.
- Review “No shipping class cost” for non-class products.
- Save changes to apply WooCommerce shipping rules correctly.
What You Can and Can’t Do Without a Plugin
- You can set product-based shipping costs using classes.
- You can control WooCommerce shipping method per product pricing.
- You cannot force only one method for one product.
- You cannot hide other methods without a plugin.
- For strict control, use WooCommerce custom shipping method tools.
How to Set a Shipping Method for a Specific Product in WooCommerce (Using Plugin)
This method is best for strict WooCommerce shipping by product control. It helps when you must force one method per product. It also helps when you must hide other checkout options. It supports advanced WooCommerce shipping rules with clean logic.
Step 1: Pick a Conditional Shipping Plugin That Supports Product Rules
- Choose a plugin that supports WooCommerce shipping by product rules.
- Ensure it can enable one method for selected products.
- Ensure it can hide other methods when rules match.
- Check it supports zones, classes, and cart based conditions.
- This avoids checkout conflicts and keeps rules easy to manage.
Step 2: Install and Activate the Plugin in WordPress
- Go to Plugins and click Add New in dashboard.
- Search your plugin name and click Install Now.
- Click Activate and open the plugin settings page.
- Keep WooCommerce updated for better shipping rule compatibility.
Step 3: Create a New Shipping Rule for the Specific Product
- Open the plugin rule builder or conditions settings area.
- Click Add New Rule to start product shipping setup.
- Select Product as the main condition type for rule.
- Choose the exact product you want to control at checkout.
- This creates WooCommerce product-specific shipping logic for that item.
Step 4: Select the Allowed Shipping Method for That Product
- In the same rule, open the Actions or Methods section.
- Select the allowed shipping method for this product condition.
- Choose Flat Rate, Free Shipping, or Local Pickup as needed.
- This works like a WooCommerce custom shipping method behavior.
Step 5: Hide or Disable All Other Shipping Methods
- Enable the option to hide other methods for rule match.
- Disable Flat Rate when you want Local Pickup only.
- Disable Free Shipping when you want paid delivery only.
- Save the rule and confirm method list shows only allowed option.
Step 6: Add Extra Conditions When Needed for Better Control
- Add Shipping Zone condition if location should change the method.
- Add cart subtotal condition if free shipping needs a limit.
- Add weight or quantity conditions for heavy items or bundles.
- Use WooCommerce shipping classes when many products share rules.
- Also Assign shipping class to product WooCommerce for grouped control.
Step 7: Save, Clear Cache, and Test the Checkout Flow
- Save the rule and keep it enabled for live checkout.
- Clear cache if you use a caching plugin or server cache.
- Add the product alone and check available shipping methods.
- Add another product and confirm WooCommerce shipping rules behavior.
- Test with two addresses to confirm zone conditions work correctly.
When You Should Use a Plugin
- You want only one method for a specific product.
- You want to hide other methods for that product.
- You want Local Pickup only for a specific product.
- You want Free Shipping only for a specific product.
- You want rules based on product, class, or category.
- You want rules based on weight, quantity, or subtotal.
- You want better control than WooCommerce shipping classes.
- You want a WooCommerce custom shipping method style setup.
What to Look for in a Plugin (Checklist)
- It supports WooCommerce shipping method per product rules.
- It can enable shipping methods by selected products.
- It can disable shipping methods by selected products.
- It can hide methods when conditions match the cart.
- It supports WooCommerce shipping classes in rule conditions.
- It supports product categories in rule conditions.
- It supports weight, quantity, and cart total rules.
- It supports AND and OR logic in WooCommerce shipping rules.
- It works with your theme and checkout page layout.
- It has recent updates and good support history.
Common Problems and Fixes During Set a Shipping Method
- These fixes solve most WooCommerce shipping rules issues fast.
- Use them before changing plugins or editing code.
- Small setting mistakes cause most shipping problems.
Shipping Method Is Not Showing at Checkout
- Check shipping zone order in WooCommerce settings first.
- Ensure the customer address matches the correct shipping zone.
- Confirm at least one shipping method is added in zone.
- Check if the method requires coupons or minimum totals.
- Disable conflicting shipping plugins and test again.
Wrong Shipping Rate Is Applied
- Verify Flat Rate settings and base cost fields again.
- Recheck your WooCommerce shipping classes cost values.
- Confirm the product has the correct class assigned.
- This is Assign shipping class to product WooCommerce validation.
- Test with only one product to isolate the issue.
Shipping Class Cost Is Not Applying
- Confirm the product is saved after class selection.
- Confirm the Flat Rate method includes that class cost.
- Review “No shipping class cost” field for wrong values.
- Check if another shipping method is overriding the cost.
- Re-test after clearing cache and refreshing checkout.
Free Shipping Appears When It Should Not
- Check Free Shipping method requirements in the zone.
- Verify coupon requirement and minimum total requirement settings.
- Remove coupons and test again for correct behavior.
- Check plugin rules if using WooCommerce custom shipping method logic.
Local Pickup Shows in the Wrong Zone
- Confirm Local Pickup is added only in correct zones.
- Check zone match order and location coverage settings.
- Remove Local Pickup from zones where it should not appear.
- Re-test using a fresh address and cleared cache.
Shipping Rules Fail After Adding a Plugin
- Disable one plugin at a time and test shipping again.
- Check the plugin rule priority and rule order settings.
- Ensure the plugin supports your WooCommerce version.
- Confirm it works with your theme and checkout builder.
Conclusion
WooCommerce product-specific shipping becomes easy when you follow the right method. For simple needs, use WooCommerce shipping classes and set class costs in zones. This gives clean WooCommerce shipping by product control without extra tools. If you must force or hide methods per product, a plugin works better. It helps you build strong WooCommerce shipping rules and acts like a WooCommerce custom shipping method setup. Always test with single items, mixed carts, and different zones. This keeps your WooCommerce shipping method per product results accurate and stable.
If you want expert help setting this up correctly, contact Woohelpdesk today. We can configure product shipping rules, fix checkout issues, and optimize shipping settings for better sales.


