What Are WooCommerce Default Pages And How to Create & Regenerate WooCommerce Default Pages?
Table of Contents
- Introduction
- What are the WooCommerce Default Pages?
- What are the Key Features of WooCommerce Default Pages?
- What are the Benefits of WooCommerce Default Pages?
- What are the Types of WooCommerce Default Pages?
- What Are The Common WooCommerce Default Page Problems That Must Be Fixed?
- How to Create Default WooCommerce Pages Step by Step?
- How to Regenerate Default WooCommerce Pages?
- Final Verdict
Introduction
WooCommerce is powerful, but it needs correct core pages. These pages control your shop flow and checkout path. WooCommerce creates these pages automatically during setup. But pages can get deleted, changed, or mismatched later. This causes cart errors, checkout issues, and broken account links.
A clean WooCommerce page setup prevents most store problems early. It also improves user trust and conversion rates. Search engines also prefer clean site structure and navigation. That is why WooCommerce essential pages matter for SEO.
In this guide, you will learn how these pages work. You will also learn how to fix missing page issues safely. We will cover WooCommerce default pages in full detail. We will also cover the Create WooCommerce default pages steps later. We will also cover Regenerate WooCommerce default pages methods later.
What are the WooCommerce Default Pages?
WooCommerce default pages are the core pages WooCommerce uses. These pages power store browsing, cart, checkout, and accounts. WooCommerce links these pages inside its settings. It also adds shortcodes or block templates for content. Each page has a specific job in the shopping process. If one page breaks, the flow becomes incomplete.
What makes a page “default” in WooCommerce?
A default page is a page WooCommerce expects to exist. WooCommerce can function only when these pages are set. It stores page IDs in WooCommerce settings fields. It uses these page IDs to route users correctly. It also uses endpoints for checkout and account sections.
Where WooCommerce stores default page assignments?
WooCommerce stores page mapping inside the Advanced settings tab. The page selection fields sit under Page setup options. These fields connect your Shop, Cart, Checkout, and Account pages. If the page is deleted, the mapping becomes empty. If the slug changes, some links may fail.
How WooCommerce uses default pages in the buying journey?
These pages form a clean purchase path for users. The Shop page lists products and category filters. The Cart page shows items and totals before checkout. The Checkout page collects billing and shipping details. The My Account page supports login and order history. Without these pages, orders cannot complete smoothly.
Common reasons WooCommerce default pages go missing?
- Default pages can disappear due to accidental deletion.
- Some themes replace templates and remove shortcode content.
- Some page builders overwrite content during edits.
- Some migration tools fail to import required pages.
- Some staging pushes can remove page IDs accidentally. Plugin conflicts can also break page display.
What are the Key Features of WooCommerce Default Pages?
WooCommerce pages are more than simple content pages. They support dynamic content and real-time updates. They connect to user sessions, cart cookies, and checkout security. They also integrate with shipping, taxes, and payment gateways. These are key WooCommerce essential pages features you must understand.
1. Dynamic content rendering
These pages show content based on user actions. The Cart page updates totals when quantities change. The Checkout page updates shipping when address changes. The Account page changes content after login status changes. This dynamic behavior is controlled by WooCommerce templates. It also uses blocks, shortcodes, and endpoints.
2. Shortcodes or blocks for layout control
Older WooCommerce setups used shortcodes inside pages. Modern WooCommerce supports Cart and Checkout blocks. Both methods work, but mixing can create display issues. Shortcodes include cart, checkout, and account shortcodes. Blocks offer a more visual editor experience. Your theme and plugins affect which method is best.
3. Secure checkout endpoints and nonce handling
Checkout uses secure form handling and validation. WooCommerce uses nonces to prevent fake requests. It also validates addresses, shipping, and payment details. If the Checkout page content is removed, forms fail. If endpoints are blocked, payments may not complete. This is why Checkout must stay clean.
4. Account endpoints for orders and downloads
My Account is not one simple page. It includes endpoints like orders, downloads, and addresses. WooCommerce adds these endpoints automatically to URLs. This enables clean navigation without creating many pages. If permalinks break, these endpoints may show 404 errors.
5. Theme template compatibility
WooCommerce pages rely on theme templates for display. A good theme supports WooCommerce templates properly. Some themes override templates and cause layout conflicts. Some page builders wrap content and break blocks. Template compatibility impacts speed and user experience.
6. Works with SEO structure and internal linking
WooCommerce page setup supports strong internal linking. Shop connects to categories, tags, and product pages. Cart connects to checkout and coupon flows. Account connects to orders and reordering actions. Search engines value clear linking and crawl paths. Clean structure supports better indexing and sitelinks.
What are the Benefits of WooCommerce Default Pages?
WooCommerce works best when core pages are correct. These pages guide users through the buying journey. They reduce confusion and increase completed orders. A proper WooCommerce page setup also reduces support tickets. It prevents errors like broken checkout and missing carts. It also improves site structure for search engines. These benefits make WooCommerce default pages critical for every store.
1. Smooth customer shopping flow
Customers follow a predictable store path every time. They browse products, add items, and view the cart. They move to checkout without broken links. They complete payment without form issues. They then access orders inside the account area. This smooth flow reduces drop-offs and improves trust.
2. Fewer checkout and payment errors
Most payment issues start from broken checkout content. Missing blocks or shortcodes can break the flow. Wrong page mapping can redirect customers incorrectly. Proper default pages keep checkout fields visible and valid. Payment gateways also rely on stable checkout endpoints. A clean setup protects your order conversion rate.
3. Better user accounts and repeat sales
The My Account page supports repeat purchases strongly. Customers can view old orders and reorder quickly. They can update addresses for future orders easily. They can manage downloads for digital products. They can save time during repeat checkouts. This builds loyalty and improves lifetime value.
4. Stronger SEO structure and internal linking
Search engines like clear site structure and navigation. The Shop page acts like a product discovery hub. Category pages link naturally from the shop listing. Product pages link back to related products and categories. Cart and checkout pages usually stay noindex for safety. But their links still support user paths and sessions. A clean structure improves crawl efficiency and user engagement signals.
5. Faster troubleshooting and maintenance
Default pages follow a known WooCommerce standard. That makes troubleshooting easier for your team. You can quickly compare your pages with WooCommerce defaults. You can spot missing blocks or remove shortcodes fast. You can restore pages without rebuilding everything. That saves time during urgent store outages.
6. Better theme and plugin compatibility
Most WooCommerce plugins assume default pages exist. Shipping plugins connect to checkout and cart reliably. Coupon plugins depend on cart and checkout fields. Subscription plugins depend on account endpoints and order views. When pages are correct, plugins behave predictably. This reduces conflicts and layout break issues.
What are the Types of WooCommerce Default Pages?
WooCommerce includes a set of core pages by design. Some are required and some are optional. The required pages power the store purchase flow. The optional pages support compliance and messaging. Knowing page types helps in WooCommerce page setup. It also helps when you create WooCommerce default pages manually.
1. Shop page
The Shop page displays product listings by default. It can show sorting, filters, and pagination options. It supports category browsing and product search links. It is also the main archive page for products. Some themes add sidebar filters automatically here.
Important details you must know
- WooCommerce assigns the Shop page in settings.
- It is usually titled “Shop” and uses product archives.
- You should not place cart or checkout content here.
- You can customize layout with a compatible theme.
2. Cart page
The Cart page shows items the customer selected. It supports quantity changes and item removal. It shows totals, coupon fields, and shipping estimates. It links directly to checkout for final purchase. Cart is a key conversion page for most stores.
Important details you must know
- Cart must include the Cart block or shortcode.
- Coupon plugins often add features here.
- Many stores keep carts accessible in the header.
- You should avoid heavy builders on this page.
3. Checkout page
The Checkout page collects customer details for the order. It shows billing, shipping, and payment sections. It validates fields before creating the order. It also supports shipping method selection when required. Checkout is the most sensitive WooCommerce page.
Important details you must know
- Checkout must use Checkout block or shortcode.
- Payment plugins rely on a stable checkout URL.
- The checkout form must not be removed by edits.
- Some caching settings must exclude checkout pages.
4. My Account page
The My Account page supports login and customer management. It shows orders, addresses, and account details. It also supports downloads for digital products. It uses endpoints for sub-sections without extra pages.
Important details you must know
- The account page must include My Account block or shortcode.
- Endpoints require correct permalink settings.
- It supports password reset and login flows.
- It is key for subscriptions and memberships.
5. Order Received page
This page shows after a successful checkout. It confirms the order and shows order details. It also shows payment status and customer notes. WooCommerce generates this view using checkout endpoints. Many users call it the Thank You page.
Important details you must know
- It is not always a standalone page.
- It depends on checkout endpoint routing.
- Payment plugins redirect here after completion.
- You can customize content carefully with hooks.
6. Terms and Conditions page
This page supports store legal compliance. WooCommerce can show a checkbox on checkout. The checkbox links to this terms page. Customers can review terms before placing orders. It reduces disputes and chargeback arguments later.
Important details you must know
- You set this page inside WooCommerce settings.
- It is optional but strongly recommended.
- It supports checkout checkbox display features.
- Keep terms readable and updated regularly.
7. Privacy Policy page
This page supports data protection and privacy rules. WordPress can generate a base privacy template. WooCommerce can link to the privacy policy automatically. This improves compliance and customer trust signals.
Important details you must know
- WordPress provides privacy page tools.
- WooCommerce can reference privacy policy on forms.
- It is recommended for email and account forms.
- It builds trust for new customer signups.
What Are The Common WooCommerce Default Page Problems That Must Be Fixed?
Before you create or rebuild pages, check common problems. These issues cause broken carts and failed checkouts. Fixing them early makes page creation easier later. It also protects your current orders and customer sessions.
1. WooCommerce pages exist, but mapping is missing
This happens after migration or plugin reset events. Pages still exist in WordPress pages list. But WooCommerce settings show blank page fields. The store then cannot route cart and checkout correctly. Users may land on 404 pages or empty screens.
How to detect it
- The cart icon opens a wrong page or 404 error.
- The checkout button redirects to the homepage unexpectedly.
- My Account shows login but no endpoints work.
- WooCommerce settings show empty Page setup fields.
How to fix it
- Reassign pages in WooCommerce settings manually.
- Save permalinks once to refresh endpoints.
- Confirm the page content has a block or shortcode.
- Test add to cart and checkout with a test product.
2. Page content is removed by a page builder
Some builders replace shortcode content during edits. Some builders add layout wrappers that break blocks. Checkout fields may not render or may show partially. Cart totals may not update correctly after changes.
How to detect it
- The cart shows a blank area where items should show.
- Checkout loads but the payment section is missing.
- My Account shows raw shortcode text on the page.
- Block editor shows missing WooCommerce block warnings.
How to fix it
- Restore the WooCommerce block or shortcode inside content.
- Avoid heavy builder templates on checkout and cart.
- Use a default page template for these pages.
- Clear cache and test again in an incognito window.
3. Permalink settings break endpoints
WooCommerce uses endpoints for account and checkout flows. If permalinks are plain, endpoints can break. Some security plugins also block endpoint URLs sometimes. This can cause order received and account tabs to fail.
How to detect it


- My Account tabs open 404 or redirect unexpectedly.
- Order received page shows 404 after payment.
- URLs look wrong and include query strings heavily.
- Changing themes suddenly breaks account navigation.
How to fix it
- Use Post name permalink structure usually.
- Save permalinks once to flush rewrite rules.
- Disable conflicting redirection rules and retest.
- Check endpoint settings inside WooCommerce advanced tab.
4. Caching breaks cart and checkout updates
Some caching tools cache cart and checkout pages wrongly. This can freeze totals and show wrong shipping results. It can also show another user’s cart in rare cases. This is dangerous for customer trust and privacy.
How to detect it
- Cart totals do not change after quantity updates.
- Checkout shipping does not update after address change.
- Coupons apply but totals stay unchanged on screen.
- Different browsers show different cart contents oddly.
How to fix it
- Exclude cart, checkout, and account pages from caching.
- Exclude WooCommerce cookies from caching rules.
- Disable page cache temporarily during troubleshooting.
- Purge cache and test with fresh sessions again.
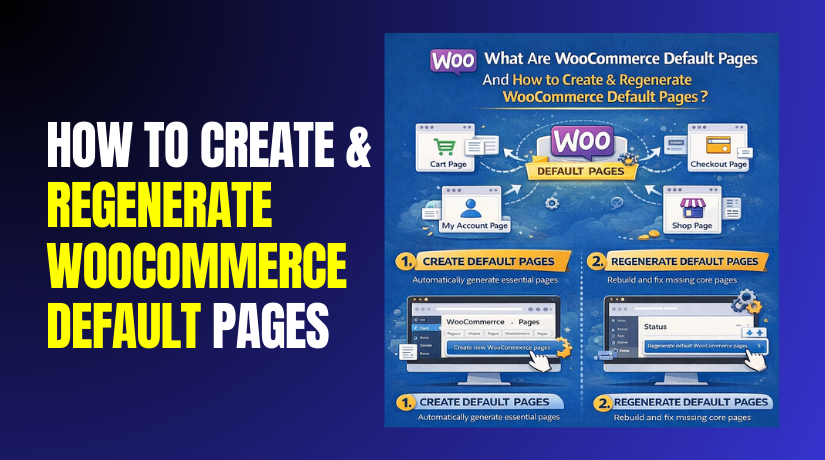
How to Create Default WooCommerce Pages Step by Step?
Follow these steps to Create WooCommerce default pages safely. Use the arrow paths to reach each setting fast. Keep each page simple for a stable WooCommerce page setup.
Step 1: Confirm WooCommerce is installed and active
WordPress Dashboard → Plugins → Installed Plugins → WooCommerce → Activate
- Open the Plugins page and find WooCommerce.
- Activate WooCommerce if it is inactive.
- Update WooCommerce to the latest stable version.
- Confirm your theme supports WooCommerce pages properly.
If WooCommerce is inactive, store pages will not work. Updates ensure blocks, templates, and endpoints load correctly. A compatible theme prevents layout issues on cart and checkout pages. This step reduces most basic setup problems early.
Step 2: Use the WooCommerce setup wizard when available
WordPress Dashboard → WooCommerce → Home → Setup tasks
- Open WooCommerce Home in your admin panel.
- Look for setup prompts and recommended tasks.
- Choose the option to create store pages automatically.
- Finish setup and confirm pages were created
The setup wizard is the safest method for new stores. It creates all WooCommerce default pages automatically. It also adds correct blocks and settings mappings. This reduces manual mistakes and saves setup time.
Step 3: Create pages manually if the wizard is not available
WordPress Dashboard → Pages → Add New
- Create a new page named Shop and publish it.
- Create a new page named Cart and publish it.
- Create a new page named Checkout and publish it.
- Create a new page named My Account and publish it.
- Keep slugs clean like /shop, /cart, /checkout, /my-account.
Manual creation is useful when pages are deleted or damaged. Standard page names help your team identify pages quickly. Clean slugs keep payment redirects and user links stable. Avoid changing these slugs later to prevent broken checkout paths.
Step 4: Add correct WooCommerce blocks or shortcodes
Your pages will stay blank without content elements. Choose blocks for modern WooCommerce sites. Choose shortcodes for classic setups and older themes.
Option A: Use WooCommerce blocks
WordPress Dashboard → Pages → All Pages → Edit Cart or Checkout → Block Editor
- Open Cart page and insert the Cart
- Open the Checkout page and insert the Checkout
- Open My Account page and insert the My Account
- Update each page after inserting the blocks.
Blocks render a clean cart and checkout layout automatically. They show totals, shipping, and payment sections properly. Blocks also reduce shortcode formatting errors. Keep checkout pages free from heavy design sections.
Option B: Use WooCommerce shortcodes
WordPress Dashboard → Pages → All Pages → Edit Cart or Checkout → Content Editor
- Add [woocommerce_cart] inside the Cart page content.
- Add [woocommerce_checkout] inside the Checkout page content.
- Add [woocommerce_my_account] inside the My Account page content.
- Keep the shortcode alone in the content area always.
- Update each page after adding the shortcode.
Shortcodes are stable and work with most themes. They render WooCommerce layouts without extra styling issues. Do not place shortcodes inside complex builder sections. This prevents missing fields and broken form layouts.
Step 5: Assign pages in WooCommerce page setup settings
Creating pages is not enough for WooCommerce. You must map pages inside settings for correct routing.
WordPress Dashboard → WooCommerce → Settings → Advanced → Page setup
- Select the Shop page in the Shop page field.
- Select the Cart page in the Cart page field.
- Select the Checkout page in the Checkout page field.
- Select the My Account page in the Account page field.
- Click Save changes and confirm fields are not empty.
WooCommerce uses these selected pages to run core store actions. If a field is empty, links may redirect wrongly. Mapping fixes most missing cart and checkout issues. This step completes your WooCommerce page setup.
Step 6: Set permalinks to support endpoints
Endpoints power account tabs and order confirmation URLs. Saving permalinks refreshes rewrite rules automatically.
WordPress Dashboard → Settings → Permalinks → Post name → Save Changes
- Open Permalinks settings in WordPress.
- Select Post name for clean URLs usually.
- Click Save Changes even if it was already selected.
This flushes rewrite rules and refreshes endpoints. It fixes many 404 errors on account sections. It also supports cleaner URLs for SEO. This step is important after migrations and theme changes.
Step 7: Test each default page like a customer
Testing confirms your pages work end to end. It also confirms mapping, blocks, and endpoints are correct.
Website Frontend → Shop → Add to cart → Cart → Proceed to checkout → Place order → My Account
- Add a product to cart and open the Cart
- Confirm cart items, totals, and coupon fields appear.
- Proceed to Checkout and confirm billing fields load.
- Confirm shipping and payment methods show correctly.
- Place a test order and check the order received view.
- Log in and confirm My Account tabs open correctly.
Cart testing confirms the cart page is rendering properly. Checkout testing confirms the most sensitive page is stable. Order received testing confirms redirects and payment return URLs work. My Account testing confirms endpoints and permalinks are correct.
How to Regenerate Default WooCommerce Pages?
Regeneration is needed when pages are missing or broken. It is also needed when page mapping becomes empty. A clean regeneration restores your WooCommerce default pages safely. It also protects your WooCommerce page setup from checkout errors. Use the methods below in the same order for best results.
Method 1: Restore deleted pages from Trash first
This method is safest because it restores your original pages. It also keeps existing SEO URLs and internal links stable.
WordPress Dashboard → Pages → All Pages → Trash
- Open Trash and search for Cart or Checkout pages.
- Select the missing pages and click Restore.
- Open each restored page and confirm content exists.
- Confirm slugs did not change after the restore.
Trash restore brings back the exact pages you had earlier. This avoids creating duplicate pages with new URLs. You should still check the page content after restoration. Some editors may have stripped blocks or shortcodes earlier.
Method 2: Use the built-in tool to create missing pages
This is the fastest way to Regenerate WooCommerce default pages. The tool creates missing pages without overwriting existing ones.
WordPress Dashboard → WooCommerce → Status → Tools → Create default WooCommerce pages → Create pages
- Open WooCommerce Status and switch to Tools tab.
- Scroll down to Create default WooCommerce pages section.
- Click Create pages and wait for the success message.
- Go to Pages and confirm new pages were created.
The Tools tab contains system actions for WooCommerce maintenance. The create pages tool generates missing core store pages. It typically creates Shop, Cart, Checkout, and My Account. It is perfect when pages are never generated during setup.
Method 3: Reassign pages inside WooCommerce page setup
Sometimes pages exist, but WooCommerce is not linked to them. Reassigning fixes routing and button redirects immediately.
WordPress Dashboard → WooCommerce → Settings → Advanced → Page setup
- Select the correct Shop page from the dropdown field.
- Select the correct Cart page from the dropdown field.
- Select the correct Checkout page from the dropdown field.
- Select the correct My Account page from the dropdown field.
- Click Save changes and refresh your storefront pages.
WooCommerce stores page IDs and uses them for routing. If a field is empty, links can break suddenly. If the wrong page is selected, redirects can misbehave. This step is core for WooCommerce page setup stability.
Method 4: Rebuild the pages manually when needed
If tools fail, manual rebuild is reliable and controlled. This method helps when your theme removes page content.
WordPress Dashboard → Pages → Add New
- Create pages named Shop, Cart, Checkout, My Account.
- Publish each page and keep slugs clean and short.
- Add blocks or shortcodes for cart, checkout, account.
- Map these pages inside WooCommerce advanced page setup.
- Save permalinks to refresh endpoints and rewrites.
Manual creation works when automatic tools are blocked or disabled. Clean slugs reduce checkout redirect issues with payment gateways. Blocks and shortcodes ensure the page renders store content. Mapping ensures WooCommerce can find these pages again. Permalinks refresh fixes most endpoint related 404 errors.
Method 5: Fix endpoints by resaving permalinks
Account tabs and order confirmation depend on endpoints. If endpoints break, regeneration may seem incomplete.
WordPress Dashboard → Settings → Permalinks → Post name → Save Changes
- Open permalinks settings and select Post name structure.
- Click Save Changes even if it was already selected.
- Open My Account page and test orders endpoint again.
- Place a test order and confirm the order received loads.
Saving permalinks flushes rewrite rules in WordPress. This refresh often fixes account tab 404 problems quickly. It also fixes order received routes after payment redirects. This step is essential after migrations and theme changes.
Method 6: Clear WooCommerce template cache when layouts look wrong
Sometimes the page exists but renders old templates. Clearing template cache fixes stale templates after theme edits.
WordPress Dashboard → WooCommerce → Status → Tools → Clear template cache
- Open WooCommerce Status and go to the Tools tab.
- Find the template cache reset tool on the list.
- Run the reset tool and clear your site cache too.
- Reload cart and checkout pages in an incognito window.
WooCommerce templates can cache theme template versions sometimes. After theme updates, the layout can render incorrectly. Resetting the template cache forces WooCommerce to reload templates. This can fix missing sections on cart and checkout quickly.
Final Verdict
WooCommerce default pages are the backbone of your store flow. They control browsing, cart actions, checkout completion, and accounts. A clean WooCommerce page setup prevents most store errors early. It also improves customer trust and conversion rates over time. If pages are missing, use the Tools regenerate option first. Then reassign pages inside advanced settings for stable routing.
To Create WooCommerce default pages, keep the process simple and standard. Use blocks or shortcodes, then map pages correctly. To Regenerate WooCommerce default pages, use the built-in create pages tool. Then fix endpoints using permalinks and test the full checkout flow. When these pages stay stable, your store performs better. Your SEO structure also stays clean and predictable for Google.
Have questions before starting with WooCommerce & WordPress? Get support here at WooHelpDesk.


