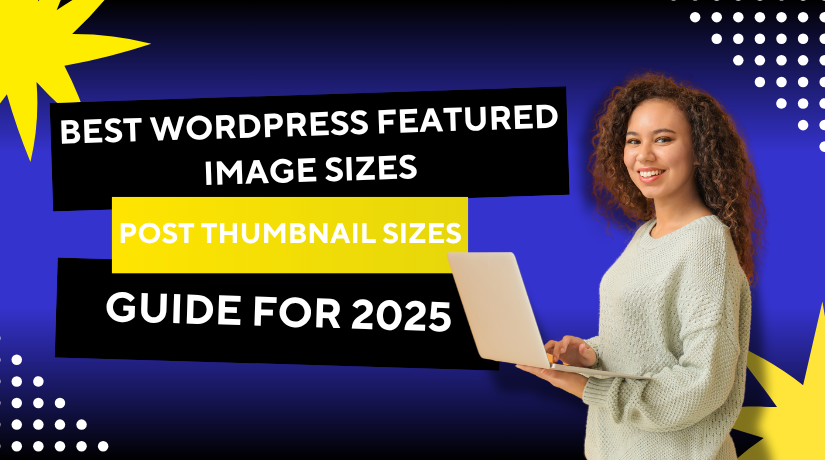
Best WordPress Featured Image Sizes & Post Thumbnail Sizes Guide for 2025
Introduction
Choosing the right WordPress featured image size is more important than ever in 2025. The first thing visitors see on your website is frequently a prominent image. It appears in blog posts, homepage sections, and on social media when shared. If the size is wrong, it can look stretched, blurry, or poorly cropped.
A perfect featured image boosts clicks and keeps your site looking sharp. It also has a significant impact on page speed and SEO. The correct image size can therefore improve your blog’s Google ranking.
Since more people are browsing on mobile devices, image sizing needs to be responsive as well. A wrongly sized image can ruin the layout and slow down your site. You should therefore be aware of the ideal featured picture size for WordPress in 2025.
This guide will help you:
- Select the ideal image sizes for every kind of screen.
- Understand default WordPress thumbnail sizes
- Avoid common sizing and SEO mistakes
- Use smart tools to manage image quality
You’ll understand precisely how to arrange, optimize, and size each featured image at the end. Let’s begin with the fundamentals.
What Is a WordPress Featured Image?
The primary image displayed with your blog article is called a featured image. It shows up:
- At the top of blog posts
- In blog archives and search pages
- On social media previews
- In email newsletters (if enabled)
In WordPress, it may also be referred to as a post thumbnail. Both mean the same thing.
WordPress lets you set a featured image for each post. You upload it while editing the post in the right sidebar. It doesn’t appear inside the content unless added manually.
Using the correct size ensures your post looks clean, loads fast, and stands out.
Understanding WordPress Default Image Sizes in 2025
When you upload an image in WordPress, it doesn’t stay in one size. The same image is automatically created in numerous versions by WordPress. These sizes are used in different areas of your website. Knowing what they are helps you plan better and avoid design issues.
In 2025, WordPress still creates these four default image sizes:
- Thumbnail 150 x 150 pixels (square)
- Medium Up to 300 x 300 pixels
- Large Up to 1024 x 1024 pixels
- Full Original image size uploaded by you
These sizes are created to fit your theme layout, widgets, and content areas.
For example:
- Thumbnail is often used in galleries and widgets
- Medium may appear in blog content
- Large is used in full-width post layouts
- The original image you upload is full size.
These sizes are set by default, but you can change them. Go to your WordPress dashboard and click:
Settings > Media
There, you’ll see options to update width and height for each size.
Also, keep in mind that themes and plugins can add custom image sizes. For instance, your theme may define a special size for blog cards or sliders. These won’t appear in the media settings but are used by your site layout.
You can use plugins such as these to view these additional sizes:
- Simple Image Sizes
- Regenerate Thumbnails
These tools show all image sizes used on your site. They also help you regenerate images when size settings are changed.
Understanding these WordPress post thumbnail sizes helps avoid stretching, cropping, or slow page loading.
Why Choosing the Right Featured Image Size Matters
Choosing the right WordPress featured image size isn’t just about looks. Performance, user experience, and SEO are other important considerations. The first thing visitors see when they arrive at your blog is your featured image. It’s also what shows on search pages, category archives, and social media previews.
An image that is too small could look pixelated or fuzzy. It can slow down your website and irritate mobile users if it’s too big. Also, badly cropped images make your posts look unprofessional.
In 2025, image-heavy websites must be mobile-friendly, fast, and visually clean. Because of this, it is more important than ever to get the size right from the beginning.
Recommended Featured Image Sizes for 2025
There is no single “perfect” size for all sites. But based on testing, theme support, and current trends, here are the most reliable sizes:
- 1200 x 628 pixels
This is the most recommended size in 2025. It fits perfectly for blogs, featured sections, and social media sharing. Social media sites such as Facebook and LinkedIn show it without cropping. - 1600 x 900 pixels
Ideal for retina displays and full-width layouts. This size ensures your image looks sharp on high-resolution screens. - 768 x 432 pixels
A great size for mobile-first themes or side-by-side blog layouts. This format balances clarity and speed. - 1024 x 576 pixels
Best for general blog posts. It’s not too large, not too small — making it a safe default.
Try to maintain a 16:9 aspect ratio wherever you can. It’s the most compatible ratio across devices and platforms. It also avoids awkward cropping in most themes.
How Different WordPress Themes Handle Image Sizes
The way featured photos appear is greatly influenced by your WordPress theme. Some themes crop or resize images automatically. Others may stretch the image to fill a space, which causes quality loss.
Let’s look at a few popular themes in 2025 and their image behavior:
- Astra Theme
This theme favors 1200 x 675 px images. It works great with card-style blog grids and full-width headers. - GeneratePress
Uses flexible layouts. Best results come from images sized at 1200 x 900 px. - OceanWP
Often displays featured images in sliders and grid blocks. 1280 x 720 px images work well here. - Divi by Elegant Themes
Divi is highly customizable. A size like 1080 x 566 px provides excellent clarity across modules. - Neve Theme
Fast and mobile-friendly. Featured images look best at 1170 x 658 px for blog post lists.
Each theme may also have additional image settings. Before making a final decision, it’s a good idea to test image sizes in preview mode.
Tips to Pick the Best Size for Your Site
To ensure that your featured photos load quickly and look crisp:
- Stick to one consistent image size across all posts
- Keep image width between 1200px and 1600px
- Use JPEG format for photography and WebP for lighter files
- Avoid uploading massive image files (over 300 KB if possible)
- Crop your images manually before uploading to avoid WordPress auto-cropping
If you’re not sure what your theme uses, check your homepage blog layout. Upload a test post and see how the image fits across devices.
The performance, appearance, and SEO of your website can all be significantly improved by using the ideal featured picture size for WordPress.
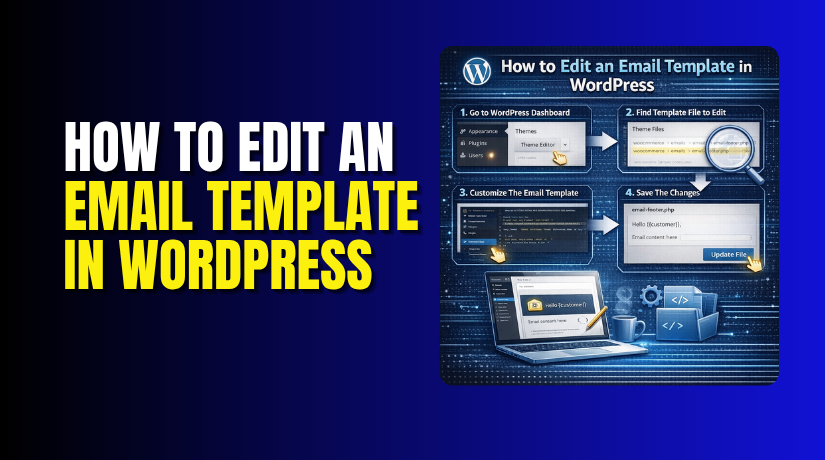
How to Set or Change Featured Image Sizes in WordPress
Not all WordPress themes use the same image sizes. That’s why your featured image may not look right on your blog layout. It could appear stretched, cut off, or too large. The good news is you can easily set or change your WordPress featured image size to match your needs.
Why You May Need to Adjust Image Sizes
WordPress comes with default image sizes, but they may not suit your design. Your theme might use a different layout that crops images awkwardly. Or maybe your featured images look too large or load too slowly.
In that case, adjusting your WordPress post thumbnail size is a smart step. It helps you gain full control over how your images appear across your website.
Change Image Sizes from WordPress Settings
One of the easiest ways to adjust image sizes is through the dashboard. Here’s how to do it:
- Go to your WordPress dashboard
- Navigate to Settings > Media
- You’ll see three default sizes: Thumbnail, Medium, and Large
- You can set your own pixel width and height for each
- Click Save Changes when done
These sizes apply to new images only. Images already uploaded won’t be affected.
Use Code to Add Custom Image Sizes
You can use code to create custom picture sizes if you’d want greater control. This is helpful for developers or advanced users.
Here’s a simple method:
- Open your theme’s functions.php file
- Add this line of code:
add_image_size(‘custom-featured’, 1200, 628, true);
- The last true value enables hard cropping
- Save the file
- Use the custom size in templates or plugins
This adds a new image size named custom-featured that fits your layout.
Regenerate Images After Changing Sizes
Changing image size settings doesn’t automatically fix your old images. WordPress only applies the new sizes to images uploaded after the change. To make your existing images fit the new size, you must regenerate them.
There are two popular plugins that help with this:
- Regenerate Thumbnails
This plugin is easy to use and widely trusted. It scans your media library and creates new image sizes based on your updated settings or theme. It doesn’t delete original files, so it’s safe to use. Just install it, go to Tools > Regenerate Thumbnails, and click the regenerate button.
- Force Regenerate Thumbnails
This plugin works similarly but offers more control. It deletes old image sizes before generating new ones. This helps save storage space. Use it if you’re replacing many images or cleaning up your site. After installation, go to Tools > Force Regenerate Thumbnails, and follow the prompts.
Both plugins are free and beginner-friendly. They help keep your featured images consistent and sharp without manual work.
Featured Image SEO Tips for 2025
Your WordPress featured image doesn’t just improve the look of your post. Here are some crucial pointers to raise the SEO of your featured image: A well-optimized image can help your page load faster, improve rankings, and get more clicks from search engines and social media.


Here are some important tips to improve your featured image SEO:
- Use the Right File Format
Selecting the appropriate file format is important. It impacts speed as well as quality.
- Use JPEG for photographs and colorful images
- Use PNG for graphics or images with transparency
- Use WebP for modern, fast-loading images (recommended in 2025)
WebP files appear crisp even if they are smaller in size. Most WordPress themes and browsers now support them.
- Compress Images Before Uploading
Large image files slow down your page. This affects both user experience and SEO scores. Always compress your images before uploading them to WordPress.
You can use free tools like:
- TinyPNG
- ImageOptim
- ShortPixel
Or install a plugin like Smush or Imagify to automate compression inside WordPress.
- Add Descriptive File Names
Give your picture file a relevant new name before uploading. Don’t use names like IMG_1234.jpg. Instead, use descriptive names with keywords. For example:
✅ wordpress-featured-image-size-2025.jpg
❌ image1.jpg
This helps Google understand your content and boosts image search rankings.
- Use Proper Alt Text
For screen readers and search engines, alt text provides a description of the image. It improves accessibility and also supports SEO.
Write short, clear alt text that includes your focus keyword. For example:
- “Best WordPress featured image size for blogs in 2025”
Avoid stuffing keywords. Just describe the image naturally.
- Set Image Dimensions Manually
In your theme or post editor, set width and height for images. This avoids layout shifts during page loading. A stable layout improves Core Web Vitals, which are part of Google’s ranking factors.
Common Mistakes to Avoid with Featured Images
Many WordPress users, including experienced bloggers and developers, make simple but costly mistakes with featured images. These errors can harm your SEO efforts, slow down your website, and destroy the layout of your blog. Avoiding them will improve your website’s appearance, loading speed, and search visibility.
Let’s look at the most typical problems and solutions.
- Using Images That Are Too Large
This is among the most common issues. High-resolution photos taken using a camera or from stock picture websites are frequently uploaded. These files are often 3000–5000 pixels wide and several megabytes in size. They may look great, but they significantly slow down your website.
Large images increase page load time and affect your Core Web Vitals. This can lead to lower search rankings and a poor user experience.
How to fix it:
- Resize images before uploading
- Stick to a width of 1200–1600 pixels for featured images
- Utilize tools such as TinyPNG or ShortPixel to compress images.
- Ignoring Mobile Optimization
In 2025, about half of all website views will come from mobile devices. If your featured image is not responsive, it may appear cropped, zoomed-in, or stretched on smaller screens.
This not only looks unprofessional but also affects usability and bounce rate.
How to fix it:
- Use a responsive theme that adapts images automatically
- Stick to common aspect ratios like 16:9 or 4:3
- Always preview your blog posts on mobile devices
- Uploading Without Optimization Plugins
Uploading raw images without any optimization plugins is risky. These pictures give your pages more weight that isn’t essential. Even one uncompressed featured image can double your load time.
Images are automatically compressed, metadata is stripped, and even converted to WebP format by plugins like Smush, Imagify, or ShortPixel.
Benefits of using these plugins:
- Improved page speed
- Better Google PageSpeed scores
- Reduced storage usage on your server
- Not Using Alt Text and Descriptive Filenames
Many users skip adding alt text or use generic names like image123.jpg. In addition to harming your SEO, this reduces the usability of your website for screen reader users.
Alt text is a chance to add context to your image. Additionally, it improves the accuracy of how search engines index your information.
Best practices:
- Add relevant alt text that matches your content
- Rename files before upload (e.g., wordpress-featured-image-size-2025.jpg)
- Avoid keyword stuffing; keep it natural
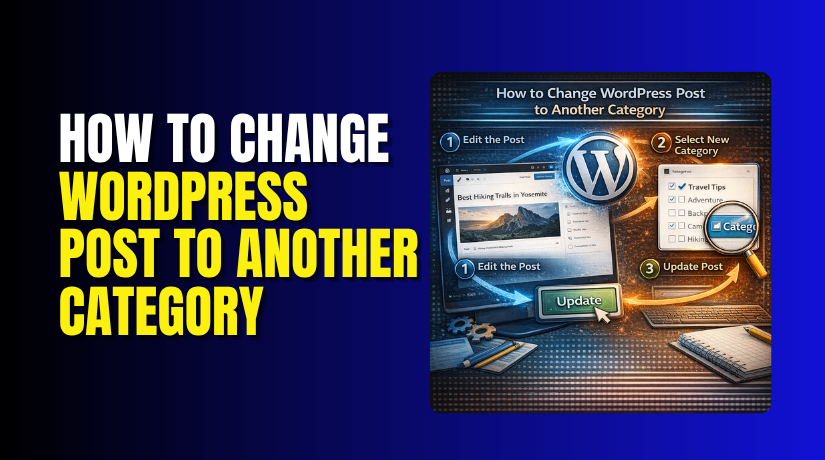
- Inconsistent Image Sizes Across Posts
Using different image sizes in each blog post creates an unbalanced layout. It can cause alignment issues, spacing problems, and an overall messy look.
How to fix it:
- For each featured image, choose a single image size.
- Stick with a consistent aspect ratio
- Use a template or design guide when creating graphics
By avoiding these common mistakes, your featured images will not only look better but also support your SEO goals, improve load times, and create a polished, professional user experience.
Best Tools to Optimize WordPress Featured Images
Optimizing your WordPress featured image size is not just about picking the right dimensions. You also need to ensure the image loads fast, looks clean, and fits well on all devices. Fortunately, a variety of tools are available to help with this process.
A They can help you design, resize, compress, and manage your featured images easily — without needing advanced skills.
- Canva – For Easy Image Design and Resizing
Canva is perfect for creating stunning blog graphics, banners, and featured images. It is a time-saving drag-and-drop tool with pre-made templates.
Why use Canva:
- Create images with exact dimensions like 1200×628 px
- Access to stock photos, icons, and fonts
- Export in JPG, PNG, or WebP formats
- Maintain visual consistency across your posts
Even beginners can use Canva to produce professional-looking images in minutes.
- TinyPNG – For Quick Image Compression
TinyPNG is a free, web-based tool that compresses images without quality loss. It supports both PNG and JPEG files.
Benefits of using TinyPNG:
- Reduces file size up to 70%
- Keeps the visual quality sharp
- Supports batch uploads
- No signup required
Smaller images load faster, which helps with SEO and mobile performance.
- ShortPixel – Advanced Image Optimization Plugin
ShortPixel is a powerful WordPress plugin for image compression and optimization. It works in the background, compressing images as you upload them.
Key features:
- Converts images to WebP or AVIF formats
- Automatically optimizes existing images in bulk
- Offers both lossy and lossless compression
- Reduces image size while preserving quality
It’s a great choice for bloggers, agencies, or any site that publishes content regularly.
- Imagify – One-Click Optimization for WordPress
Imagify is another excellent plugin made for WordPress users. It makes image optimization simple and fast.
Why Imagify works well:
- Integrates directly into your WordPress media library
- Offers multiple compression levels
- Optimizes images on upload or in bulk
- Supports WebP conversion with one click
Imagify is great for users who want clean images and fast pages without any manual work.
Conclusion
Selecting the ideal featured image size for WordPress is crucial for improved SEO, quicker loading times, and better design. In this guide, we’ve covered everything — from ideal image dimensions to tools and SEO tips that help your blog perform better in 2025.
If you need expert help with WordPress image optimization, theme customization, or blog performance, we’re here for you.
👉 Contact our WordPress experts at WooHelpDesk.com or call us at+1 888 602 0119 (US & Canada). We’ll help you build a faster, cleaner, and better-looking WordPress website — with the right featured images that stand out.