How to Set Up Datalayer for WooCommerce with GA4 and GTM
Table of Contents
- Introduction
- Key Benefits of Datalayer for WooCommerce
- Step-by-Step Setup Process for Datalayer for WooCommerce
- Advanced Setup – Server-Side Tracking and Google Ads Integration
- Catalog Feeds and Consent Settings
- Troubleshooting Common Issues
- Conclusion
Introduction
If you run a WooCommerce store, tracking user actions is a must. You need to know what your visitors do—what they view, add to cart, or buy. That’s where the Datalayer for WooCommerce plugin comes in. It makes your store smarter by sending key actions to tools like Google Tag Manager and Google Analytics 4.
This plugin creates a “data layer,” which is a bridge between your store and marketing tools. It helps you track events like product views, purchases, and refunds in real time. This information can then be used to run advertisements, track outcomes, and expand your company.
Its ability to function with both client-side and server-side tracking is what gives it its strength. This means your tracking won’t break, even if your visitors use ad blockers or your checkout happens off-site.
Key Benefits of Datalayer for WooCommerce
Let’s explore some of the main benefits.
Real-Time Customer Behavior Tracking
Datalayer for WooCommerce tracks visitor activity across your store. It records events as they take place in real time. This helps you better understand what users do on your website.
Tracked actions include:
- Product impressions and clicks
- Add to cart and remove from cart
- Start checkout, shipping, and payment selection
- Purchases and refunds
- Internal promotions and wishlist activity
This data is structured and ready to be used in Google Tag Manager.
Easy Google Tag Manager Integration
Setting up tracking normally takes time and technical skill. It’s quick and simple using this plugin. Simply input your GTM ID into the plugin’s configuration. It automatically links Google Tag Manager to your store.
You also get a ready-to-import GTM file. This file contains:
- Tags
- Triggers
- Variables
You don’t need to create these manually. It’s all done for you.
Full Support for Google Analytics 4 (GA4)
The plugin supports Google’s GA4 out of the box. It allows enhanced eCommerce tracking without any coding. You’ll see product views, purchases, and checkout steps in GA4. This helps you measure store performance in detail.
Built-in Server-Side Tracking
Many browsers now block tracking scripts. Some customers use ad blockers. This can lead to missing data. Datalayer for WooCommerce solves this with server-side tracking.
It sends important events like purchases directly from your server. This improves accuracy and keeps your reports clean.
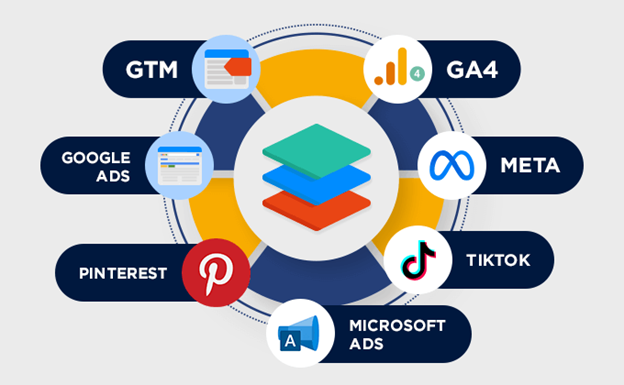
Ad Platform Integration
You can connect your store with many ad platforms:
- Google Ads
- Meta (Facebook & Instagram)
- Pinterest Ads
- TikTok Pixel
- Microsoft Ads
This makes it easier to run conversion-based campaigns and measure success.
Consent Mode and Compliance
The plugin supports Google Consent Mode. You can also enable a popup to collect user tracking consent. This ensures your store follows important privacy rules like GDPR.
Step-by-Step Setup Process for Datalayer for WooCommerce
Setting up Datalayer for WooCommerce is simple if you follow the right steps. You will be guided through the installation and configuration process in this section. We’ll also go over how to install Google Tag Manager and Google Analytics 4.
No coding skills or developer help is required to get started. Everything can be done from your WooCommerce dashboard.
Step 1: Install the Plugin
Downloading the plugin from the official WooCommerce website is the first step.
Here’s how to install it:
- Go to your WordPress dashboard
- Navigate to Plugins > Add New > Upload Plugin
- Upload the ZIP file you downloaded
- Click Install Now and then Activate
After activation, you’ll see a new menu: WooCommerce > Datalayer for WooCommerce
Step 2: Add Your Google Tag Manager ID
Now it’s time to connect your store with Google Tag Manager.
- Go to WooCommerce > Datalayer for WooCommerce

- Find the field for Google Tag Manager ID
- Enter your GTM container ID (format: GTM-XXXXXX)
- Save the settings
This will automatically add GTM to your site.
Step 3: Download and Import GTM Workspace File
To make setup easier, the plugin includes a pre-built GTM workspace.
- In the plugin settings, download the file named GTM-GA4.json
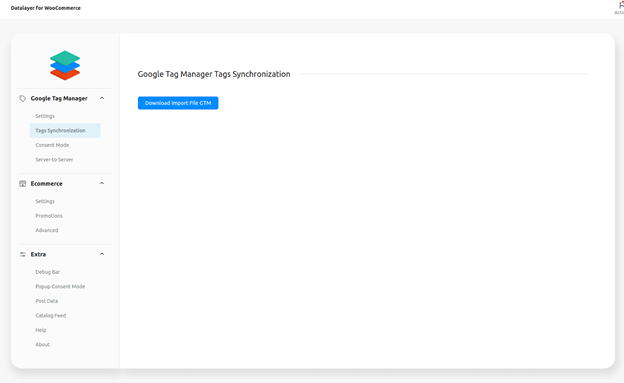
- Go to your Google Tag Manager dashboard
- Select Admin > Import Container
- Upload the file and merge or overwrite existing settings
- Publish the container
This adds all needed tags, triggers, and variables to your GTM account.
Step 4: Set Up Google Analytics 4 (GA4)
You’ll need your GA4 Measurement ID to start tracking events.
To find it:
- Go to Google Analytics > Admin > Data Streams
- Click your website stream
- Copy the Measurement ID (format: G-XXXXXXXXXX)
Then, go back to the plugin settings:
- Paste the ID into the GA4 Measurement ID field
- Enable the toggle for Use GA4 Ecommerce
- Save your settings
This links your WooCommerce data with Google Analytics 4.
Step 5: Choose How Products Are Tracked
You can choose to track products using:
- Product ID
- SKU (stock-keeping unit)
Select your preferred option under Product Items in the plugin settings.
You can also:
- Enable variable products to be tracked as separate items
- Show related products using view_item_list
- Include discounts in tracked product data
These options help improve the accuracy of your reports.


Step 6: Enable and Test Events
The plugin tracks many user actions, such as:
- Add to cart
- Start checkout
- Select shipping or payment
- Complete purchase
To see if they’re working:
- Go to WooCommerce > Datalayer > Extra
- Enable the Debugger Bar
- Visit your site and perform test actions
You’ll see events firing in real-time using the debugger or GTM preview.
Final Tip: Use Consent Mode (Optional)
You can also enable Google Consent Mode from the settings. This helps with privacy compliance.

If you want, you can turn on the plugin’s Popup Consent Mode to collect user permissions.
Once these steps are done, your store is ready. You’ll now be collecting detailed data through Google Tag Manager and GA4 with reliable event tracking.
Advanced Setup – Server-Side Tracking and Google Ads Integration
Client-side tracking is useful, but it’s not always accurate. Ad blockers, browser restrictions, and external payment pages can cause missing data. This is why server-side tracking is important.
With Datalayer for WooCommerce, you can send events directly from your server. This gives you cleaner, more reliable reports.
Enable Server-Side Tracking
To turn on server-side tracking, follow these steps:
- Go to WooCommerce > Datalayer for WooCommerce
- Scroll to the Server-to-Server section
- Enter your GTM Server Container URL
- Add your GA4 Measurement ID
- Enable the following:
- Purchase Event
- Order Pay Event
- Refund Event

These events will now be sent from your server. You can also choose the order status that triggers each event. For example, only trigger purchase when the order status is “Processing.”
This prevents double-counting if the user refreshes the thank-you page.
Import the GTM Server Container File
You’ll need a second GTM workspace for server-side events.
Here’s how to set it up:
- Download the file named GTM-SERVER-SIDE.json from the plugin
- Go to GTM > Admin > Import Container
- Upload the file and publish the container
Your server container will now handle data separately from the web container.
Set Up Google Ads Conversion Tracking
Google Ads tracking works best when paired with server-side events.
In your GTM workspace, use the pre-configured tags. You’ll find these already mapped:
- Purchase
- Add to cart
- Begin checkout
Go to your Google Ads > Tools > Conversions, and create these events:
- Copy the Conversion ID and Conversion Label
- Paste them into the GTM tags for each action
This setup allows better ad tracking and remarketing.
Enable Enhanced Conversions (Optional)
For even more accuracy, you can enable enhanced conversions. This sends user data like email and name to Google Ads.
In GTM:
- Open the Google Ads – Purchase tag
- Enable Include user-provided data
- Map each field (email, phone, etc.) to your data layer
Once configured, key conversions can be more accurately tracked. Server-side tracking makes sure your ads get the credit they deserve, even with browser limits.
Catalog Feeds and Consent Settings
Beyond tracking, Datalayer for WooCommerce also helps with product advertising. It allows you to create catalog feeds for Google Merchant Center and Meta (Facebook and Instagram). These feeds are used in shopping ads and dynamic remarketing.
Generate Product Feeds Easily
Creating a feed is simple and doesn’t require coding. Here’s how:
- Go to WooCommerce > Datalayer > Catalog Feed
- Click Create Feed
- Choose your platform (Google or Meta)
- Click Generate Feed and then View Feed
You can now copy the feed URL and submit it to the ad platform. This keeps your ads up-to-date with your product inventory.
Use Consent Mode for GDPR Compliance
Privacy laws require you to manage tracking consent. This plugin supports Google Consent Mode and has a built-in Popup Consent Mode.
To enable consent features:
- Go to WooCommerce > Datalayer > Consent Mode
- Turn on Google Consent Mode
- (Optional) Enable Popup Consent Mode in the Extra tab
- Choose the popup style and consent types
This makes sure your store is compliant with privacy laws like GDPR and CCPA.
Troubleshooting Common Issues
Even with the right setup, some issues can happen. Here are fixes to common problems:
- Purchase event not firing?
Check if your thank-you page has the required WooCommerce hook: woocommerce_thankyou. - No transactions in GA4?
Some payment gateways don’t return users to your site. Also, ad blockers may stop tracking scripts. - GTM tags not working?
Make sure your GTM ID is added correctly. To test, use GTM’s preview mode or the debugger bar. - Page builders breaking tracking?
Themes using Elementor or Divi may need extra setup. Follow their guides to fix product templates.
Conclusion
Datalayer for WooCommerce is a smart tool for serious tracking. It gives you full control of store data using Google Tag Manager. Every action, from viewing products to making purchases, is meticulously documented.
You can connect it with GA4, Google Ads, Meta, and more. Server-side tracking helps avoid missing data due to ad blockers. Built-in catalog feeds make product ads faster to set up.
Consent features keep your store safe and privacy-compliant. It works smoothly with WooCommerce and supports both basic and advanced setups.
We can assist you with putting this up if you need it. At WooHelpDesk, we solve WooCommerce and WordPress issues every day. Whether it’s tracking, plugins, or speed, we’ve got your back.
Call us today at +1 888 602 0119 (US & Canada) for fast and friendly support.
Run your store smarter. Get the help you need when you need it.