Invoice Payment Option for WooCommerce: The Best Plugin for B2B Payments
Table of Contents
- Introduction
- What Is the Invoice Payment Option for WooCommerce?
- Key Features of the WooCommerce Invoice Payment Plugin
- Use Cases for WooCommerce Invoice Payment Option
- Setup Process for Invoice Payment Option for WooCommerce
- Conditional Rules to Control Invoice Payment Option
- PDF Invoice Generation and Customization
- Custom Email Notifications
- How to Send Payment Links After Order Placement
- Conclusion
Introduction
Running an online store is all about making the buying process easy. For B2B and wholesale customers, paying upfront isn’t always possible. Many businesses need an invoice before they can release payments. This is a common situation in bulk purchases and company orders.
WooCommerce, by default, doesn’t support this kind of payment flow. That’s where the Invoice Payment Option for the WooCommerce plugin comes in. Customers can place orders now and pay later, thanks to this feature. It adds a new payment method at checkout, called “Pay by Invoice” or “Pay Later.”
This is helpful for store owners who deal with:
- Business clients
- Bulk orders
- Custom quote-based pricing
- Repeat wholesale customers
What Is the Invoice Payment Option for WooCommerce?
The Invoice Payment Option for WooCommerce is a powerful plugin by Addify. It adds an extra payment method during the checkout process. Customers can choose to receive an invoice and pay after placing the order.
This gives store owners more flexibility, especially in B2B and wholesale environments. You have control over who and when can view this option. The plugin uses rules to display the invoice method based on:
- User roles like wholesalers or corporate buyers
- Specific products or categories
- Cart value or item quantity
- Customer location (country, state, zip)
- Shipping method
You can also rename the method to match your brand. Common names include:
- Pay by Invoice
- Pay Later
- Invoice Billing
When a customer chooses this method, the order is created without payment. Store owners can then email the invoice or a payment link later. This is helpful for customers who need internal approval before paying.
Additionally, the plugin generates PDF invoices. You can alter the design by selecting from a variety of templates. It supports email notifications for both customers and store admins.
In short, this plugin is built to make WooCommerce invoice payments easier and smarter. It’s perfect for stores that want to offer flexible, professional payment terms to serious buyers.
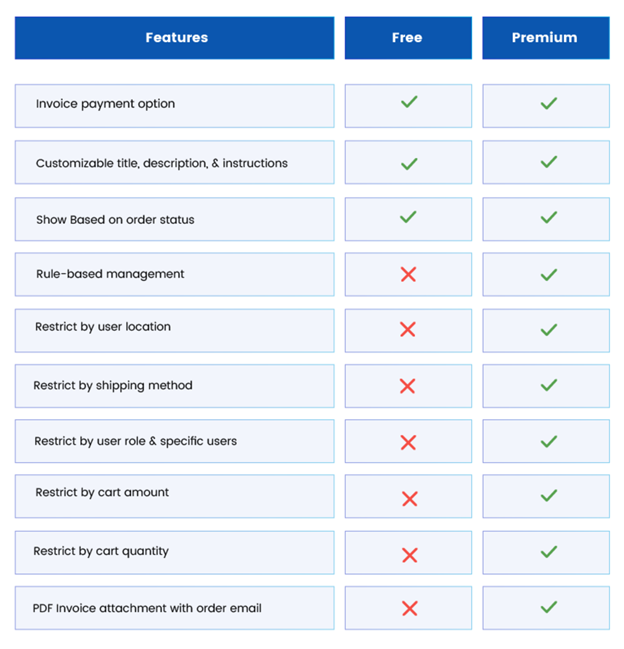
Key Features of the WooCommerce Invoice Payment Plugin
The Invoice Payment Option plugin adds a powerful feature to WooCommerce. It allows you to let customers place an order without paying immediately. Business purchasers who wish to pay later will find this useful.
The plugin generates a new payment method after it is installed. You can rename it to match your store’s needs. Some popular choices are:
- Pay by Invoice
- Pay Later
- Invoice Billing
The title and description that show up on the checkout page can be customized. The plugin also lets you define the default order status for invoice orders. This gives you full control of the payment process.
Another major feature is rule-based visibility. You can show or hide the invoice option based on certain conditions. For example:
- Allow only selected user roles to use it
- Make it available only for specific products or categories
- Set minimum or maximum cart value
- Limit it to certain shipping methods
- Restrict it by customer location (country, state, or zip code)

These rules let you decide who can use the invoice method and when it should appear.
Additionally, a PDF invoice can be immediately attached to the email confirming the order. This makes the buying process more professional. The PDF template can be customized with:
- Your store logo
- Company details
- Invoice title
- Color scheme
- Terms and conditions
- Extra footer notes

The plugin supports separate email notifications for both the customer and admin. These emails are sent only when an invoice-based order is placed. This helps both sides keep track of pending payments.
The option to send a payment link at a later time is another fantastic feature. Following order confirmation, you can resend an order email and transfer the order to “Pending Payment.” There will be a direct payment link in this email.
With all these features, the plugin offers full flexibility and fits perfectly into any WooCommerce B2B or wholesale setup.
Use Cases for WooCommerce Invoice Payment Option
This plugin is designed for store owners who deal with business clients or bulk buyers. Below are some real-world scenarios where it becomes very useful.
- B2B Orders
Many businesses prefer to receive an invoice before making a payment. Corporate purchases typically require an invoice prior to payment approval. With this plugin, you can let these buyers place their orders first. Then, they pay after receiving a payment link or invoice.
- Bulk & Wholesale Orders
Customers placing large orders may hesitate to pay upfront. They might want confirmation or review before committing the money. The invoice payment option gives them that comfort. It helps improve trust and encourages large purchases.
- Trusted Repeat Customers
If you have loyal, returning customers, this feature is perfect. You can offer them a flexible payment method based on their user role. This improves customer satisfaction and boosts long-term business relationships.
- Quotation-Based Sales
Some WooCommerce stores offer customized products or pricing. These stores often share a quote before final billing. The invoice method supports this model. Customers can place an order based on the quote and pay later.
- Institutional or Government Buyers
Government agencies and institutions often need to follow internal procedures. These include approvals, budget reviews, and invoice submissions. Offering a pay-by-invoice option makes it easier for them to do business with you.
This plugin works with a wide range of business models. If your store serves businesses or high-volume buyers, this solution is a must-have. It simplifies payment handling while keeping you in control of your cash flow.
Setup Process for Invoice Payment Option for WooCommerce
Setting up the Invoice Payment Option for WooCommerce plugin is simple. This section will guide you through every step. You don’t need any coding skills to follow this. Just take it one step at a time and your invoice system will be ready in no time.
Step 1: Install and Activate the Plugin
First, go to the official WooCommerce website and buy the plugin. Once the ZIP file has been downloaded, take these actions:
- Go to your WordPress admin dashboard.
- Navigate to Plugins > Add New.
- Click the Upload Plugin button at the top.
- Choose the ZIP file and click Install Now.
- After installation, click Activate.
The plugin is now installed and active on your store.
Step 2: Enable the Invoice Payment Method
You must enable the new payment option after the plugin is operational.
- Go to WooCommerce > Settings > Payments.
- Scroll down to find the Invoice Payment Option in the list.
- Click on Manage next to it.
- Check the box to Enable this payment method.
- Save your changes.
The payment method will now appear at checkout when conditions are met.
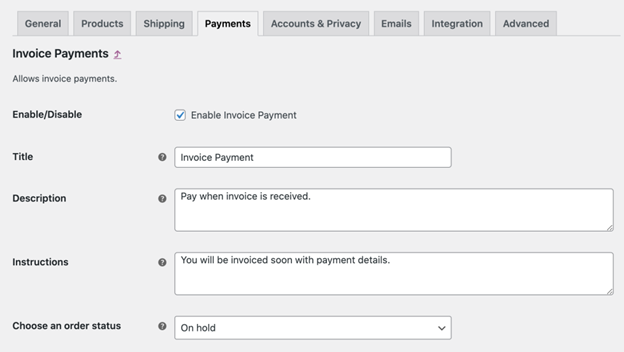
Step 3: Customize the Payment Method
At this point, you can name the technique whatever works best for your company. Common names include:
- Pay by Invoice
- Pay Later
- B2B Invoice Billing
In the Title field, enter the name you want shown at checkout. In the Description field, you can write a short message like:
“You will receive an invoice by email. Payment is due later.”
For orders placed using this technique, you can additionally specify the default order status. Common choices are:
- On Hold
- Pending Payment
This helps you manage unpaid orders clearly.
Step 4: Set Up Invoice Payment Rules
This is where the plugin becomes powerful. You can create rules to control who sees the invoice payment method and when it appears. Go to:
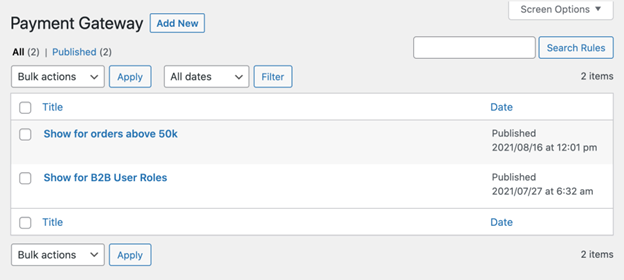
WooCommerce > Settings > Invoice Payment Options
Click Add New Rule to begin.
Each rule allows you to define several conditions:
a. User Roles and Customers
You can show the invoice option only to:
- Wholesalers
- Logged-in users
- Specific customers
- Custom user roles
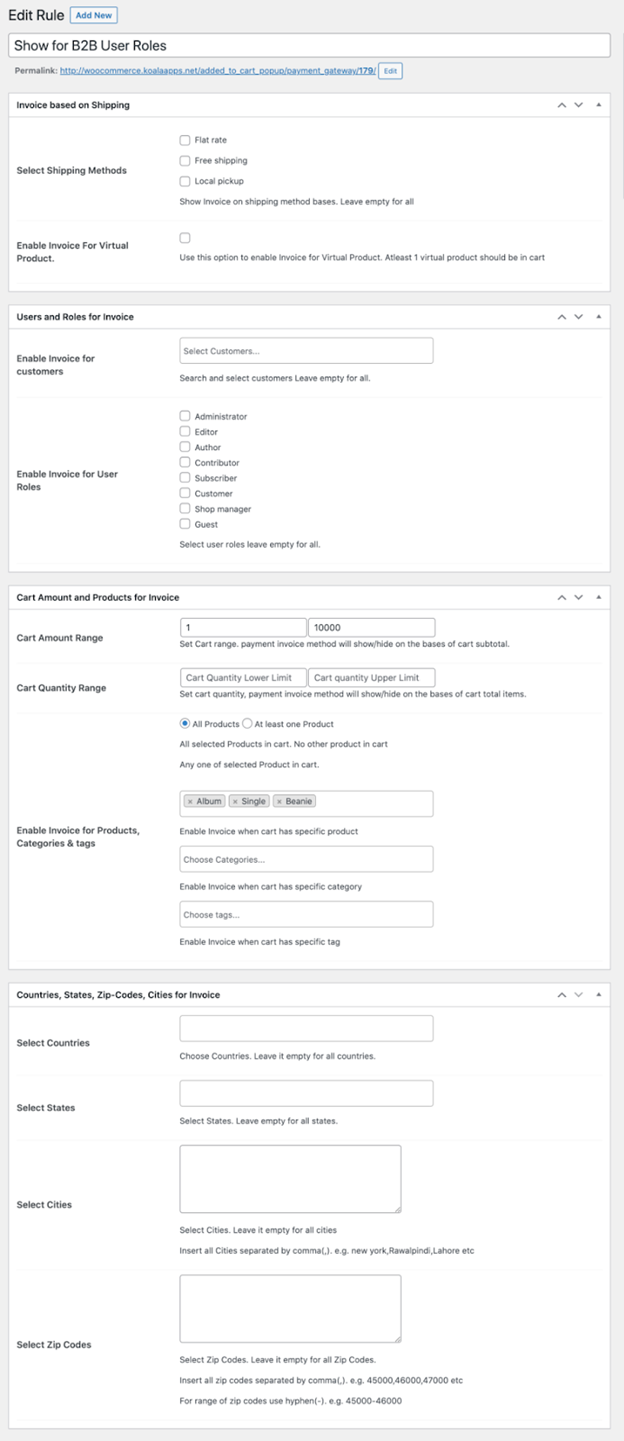
This keeps the method private to trusted buyers.
b. Shipping Methods
Select specific shipping options where invoice payment should be available. For example:


- Freight shipping
- Local pickup
- Custom shipping methods
This adds flexibility based on delivery type.
c. Virtual Products
Choose whether to accept digital product invoice payments. Depending on your business needs, turn the setting on or off.
d. Cart Amount Range
Set a minimum and maximum cart total. The invoice method will appear only if the order total falls within this range.
Example:
- Show if total is between $200 and $5,000
This is useful to control large order risks.
e. Cart Quantity Range
Establish restrictions according to the quantity of goods in the cart.
Example:
- Allow only if item count is over 10
This supports bulk or wholesale logic.
f. Products, Categories, Tags
Choose specific products or categories that qualify for invoice payment. You can also filter by product tags.
This helps target certain items for deferred payments.
g. Location Conditions
You can restrict the invoice method to:
- Countries
- States or provinces
- Cities
- Zip codes or zip code ranges
Example:
- Show invoice payment only for buyers in California
Use comma-separated values or zip ranges like 10000–10200.
After setting your rule, click Save Rule.
Step 5: Enable and Customize PDF Invoices
The plugin lets you send a PDF invoice with the order email. To enable this:
- Go to WooCommerce > Settings > Invoice Payment Options.
- Scroll to the PDF Invoice Settings section.
- Choose one of the three available templates.
Once a template is selected, you can customize:
- Store logo or icon
- Company information
- Invoice title or heading
- PDF color scheme
- Terms and conditions
- Footer notes
These options help match the invoice with your brand.
Step 6: Set Up Email Notifications
The plugin supports separate emails when an order uses the invoice method.
- Go to WooCommerce > Settings > Emails.
- Scroll to:
- Addify Invoice Email for Customer
- Addify Invoice Email for Admin

Each email can be modified to fit your tone. These emails are only triggered for invoice orders. This keeps your communication organized.
Include helpful info in the email such as:
- Payment terms
- Due date
- How to contact your support team
Click Save Changes after editing each template.
Step 7: Send Payment Links Manually (Optional)
Sometimes, you may want to send the payment link after the order is placed.
Here’s how to do that:
- Go to WooCommerce > Orders.
- Open the order placed with invoice payment.
- Change the order status to Pending Payment.
- From the order actions dropdown, choose Email invoice/order details to customer.
- Click the arrow icon to send it.
The customer will get a new email with a payment link included. They can pay using any of your active WooCommerce gateways.
Conditional Rules to Control Invoice Payment Option
Conditional control is one of this plugin’s best features. You decide exactly when and where the invoice payment method appears. This ensures that only the right customers see this option.
These rules can be created in the plugin settings. Each rule lets you set specific conditions. Here’s what you can control:
- User roles and individual customers
Allow invoice payments only for wholesalers, logged-in users, or selected customers. - Shipping methods
Show the option only with specific shipping choices like freight or local pickup. - Virtual products
Enable or disable the option for downloadable or non-physical items. - Cart amount and quantity
Define a minimum and maximum value or quantity to qualify for invoice payments. - Products, categories, or tags
Apply rules to certain items or groups of items. - Location filters
Restrict the method by country, state, city, or even zip codes.
This rule-based system gives you complete control. You can build a secure and professional payment flow that works for your store.
PDF Invoice Generation and Customization
A professional invoice leaves a good impression. The creation and customization of PDF invoices is made simple by this plugin. You can attach them automatically to the order confirmation emails.
You have three templates to choose from. Once selected, you can make the invoice match your brand style.
Here are the elements you can customize:
- Your store’s logo or icon
- Company details like address and phone
- Invoice title or heading
- Color scheme to match your brand
- Terms and conditions for the buyer
- Footer notes for extra instructions
This adds professionalism to your communication. It also helps customers understand payment terms more clearly.
Custom Email Notifications
The plugin also supports separate email notifications for invoice orders. These emails are only sent when a customer uses the invoice payment method. This helps keep communication focused and organized.
There are two types of custom emails you can set:
- Customer Email
Sent to the buyer with order details and the invoice.
Customize it with your message, terms, and contact info. - Admin Email
When an invoice order is placed, it is sent to the admin or store owner.
Helps you stay updated on unpaid orders.
To manage these emails:
- Go to WooCommerce > Settings > Emails.
- Find the two email templates labeled:
- Addify Invoice Email for Customer
- Addify Invoice Email for Admin
- Edit the subject, heading, and content as needed.
This ensures a clean workflow for handling invoice-based orders.
How to Send Payment Links After Order Placement
Some customers may need a payment link after placing an order. The plugin makes this easy to do within WooCommerce.
Follow these steps:
- Go to your WordPress dashboard.
- Click on WooCommerce > Orders.
- Open the order that was placed using the invoice method.
- Change the order status to Pending Payment.
- In the Order Actions dropdown, select:
- Email invoice/order details to customer
- Click the arrow button to send the email.
A secure payment link will be included in this email. Customers can pay through your regular payment gateways.
This is a great way to collect payments after order review or internal approval.
Conclusion
For B2B and wholesale businesses, the WooCommerce plugin’s Invoice Payment Option is essential. It adds a flexible way for customers to buy now and pay later. With smart rules, automated emails, and PDF invoices, it fits smoothly into any professional setup.
Here’s a quick recap of what it offers:
- Add a “Pay by Invoice” option at checkout
- Control who can use it with detailed rules
- Customize everything — from labels to PDF invoices
- Automate communication with separate email alerts
- Send payment links whenever you need
If your WooCommerce store handles large orders, wholesale pricing, or repeat clients, this plugin is a powerful solution. It helps improve trust, increase conversions, and streamline your order process.
Need help setting it up or customizing your WooCommerce site?
Contact WooHelpDesk at +1 888 602 0119 (US & Canada) for expert WooCommerce and WordPress support. We’re here to make your store work smarter — not harder.