How to Set up “Tab Manager for WooCommerce” to Customize Product Pages Easily
Table of Contents
- Introduction & Overview
- Features and Use Cases of Tab Manager for WooCommerce
- Setup and Configuration for Tab Manager for WooCommerce
- Plugin Limitations
- Tips for Better Tab Management
- Conclusion
Introduction & Overview
Managing product pages in WooCommerce can be a challenge. You want to show key product details, but the default tabs are often too limited. That’s where the Tab Manager for WooCommerce comes in.
This plugin helps you take full control of your product page tabs. It lets you add, reorder, remove, and rename tabs — all from your dashboard. You don’t need to touch any code or templates.
With Tab Manager, you can build a better product experience. You can display important info clearly and make your product pages more useful. Want to add shipping policies, size guides, or return details? You can do it with a few clicks.
Let’s break down what makes it helpful:
- Add unlimited tabs to each product
- Use global tabs across many products at once
- Customize tabs for individual products
- Reorder tabs with a drag-and-drop builder
- Make tab content searchable, even with plugins like Relevanssi
The plugin is built for ease of use. You can manage everything from the WooCommerce admin area. It works well with most themes and third-party plugins.
Why does this matter? A clean tab layout improves how shoppers see product info. It boosts trust and may even help SEO. Customers find what they need faster — and that can lead to more sales.
Whether you’re selling clothes, electronics, or event tickets, this tool fits in. If you’re looking to upgrade how your product pages work, Tab Manager for WooCommerce is a smart solution.
Features and Use Cases of Tab Manager for WooCommerce
The Tab Manager for WooCommerce plugin offers flexible ways to display content. It gives you total control over product tabs. With this plugin, you can create better layouts and keep your product pages organized.
Let’s explore the features that make it powerful and easy to use.
Control Over Core Tabs
WooCommerce comes with default tabs like:
- Description
- Additional Information
- Reviews
With Tab Manager, you can manage these core tabs easily. You can:
- Rename the tabs
- Change their order
- Remove them if not needed
All of this is done using a simple drag-and-drop interface. You don’t need to write any code.
Global Tabs for Shared Content
Global tabs let you add the same tab to many products. This is useful when you want to show the same info across your store.
You can also limit global tabs by category. That means you can show certain tabs only on products in selected categories. For example:
- A tab for return policy on clothing
- A tab for safety info on electronics
This helps keep your tabs relevant and clean.

Product-Level Tabs
Sometimes, a product needs a unique tab. Tab Manager lets you create product-level tabs just for one item.
You can override the default layout and add custom tabs. You can also:
- Rearrange the tab order for the product
- Remove any tab from the layout
- Add more tabs for product-specific content
All tabs can include text, images, videos, and shortcodes. This makes it easy to display extra details in a neat way.
Drag-and-Drop Tab Builder
Managing your tabs is simple. The drag-and-drop builder makes it visual and quick. You can reorder tabs just by moving them around.
You can access this tool inside the product edit page or under the Tab Manager menu.
Support for Third-Party Plugin Tabs
Many plugins add their own tabs. Tab Manager detects most of these automatically. You can include them in your layout and even change their order.
However, renaming third-party tabs is not supported. Still, being able to sort and hide them adds a lot of control.
Default Tab Layout for All Products
You can create a default tab layout for your store. This layout applies to every product automatically.
If needed, you can override it on individual products. This gives you both control and flexibility.
Your default layout can include:
- Core tabs
- Global tabs
- Third-party plugin tabs
It helps you save time and keeps your store consistent.
Search Integration
You can make tab content searchable. This means if a customer searches for a word inside a tab, that product can show up.
The plugin works with basic WooCommerce search and the Relevanssi plugin. You can turn this on or off for each tab.

Setup and Configuration for Tab Manager for WooCommerce
The Tab Manager for WooCommerce plugin is easy to set up and manage. In this section, we’ll walk you through the entire process. From installation to creating tabs, every step is covered in detail.
Let’s get started.
Step 1: Install the Plugin
You need to purchase and download the plugin first.
- Log into your WooCommerce.com account.
- Go to the plugin’s page and buy it.
- Download the .zip file to your computer.
Next, install it on your site:
- Go to your WordPress dashboard.
- Navigate to Plugins > Add New > Upload Plugin.
- Upload the ZIP file and click Install Now.
- Once installed, click Activate.
You’ll now see Tab Manager under the WooCommerce menu.
Step 2: Access Tab Manager Settings
There are two ways to manage your tabs:
- On individual product pages (Product Data section).
- In the global Tab Manager menu under WooCommerce > Tab Manager.
The first is useful for product-specific changes. The second is best for managing shared tabs and default layouts.


Step 3: Create Global Tabs
Global tabs are tabs that you can apply to many products. This saves time and keeps your store consistent.
To create a global tab:
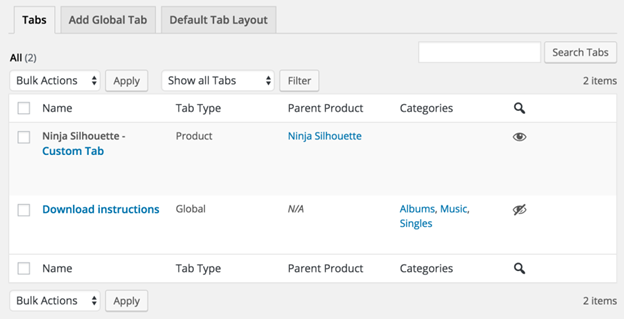
- Go to WooCommerce > Tab Manager > Tabs.
- Click Add Tab.
- Enter a title and the tab content.
- You can use plain text, HTML, or shortcodes.

Optional: You can restrict the tab to show only for selected product categories.
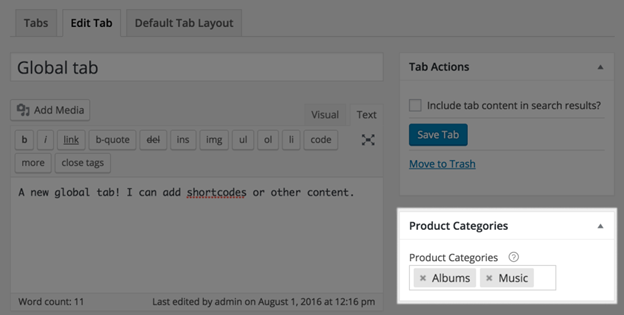
This is helpful if certain info applies to only some product types.
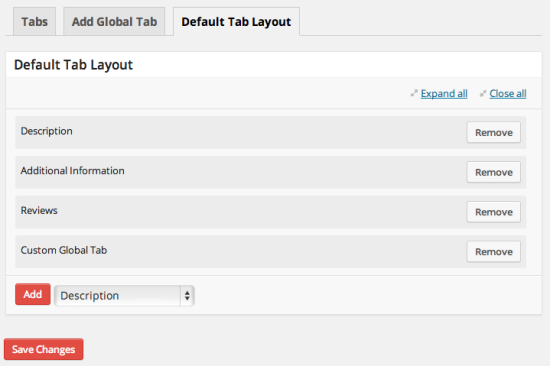
Step 4: Create a Default Tab Layout
The default layout sets the tab order for all products in your store.
To create it:
- Go to WooCommerce > Tab Manager > Default Tab Layout.
- You’ll see the core tabs listed (Description, Additional Info, Reviews).
- You can remove, rename, or reorder these tabs.
- Add your global tabs to the layout using the drag-and-drop builder.
- Save your layout.
This layout will now appear on all product pages unless manually overridden.

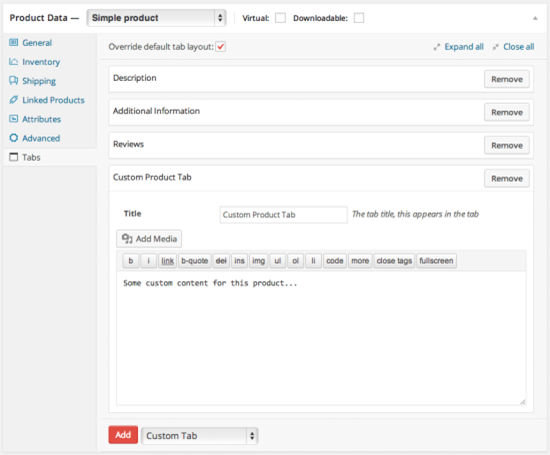
Step 5: Override Tabs for Specific Products
Sometimes, a product needs its own tab layout. For that, you can override the default.
To do this:
- Edit the product you want to change.
- Scroll down to the Product Data section.
- Click the Tabs tab.
- Check the box to override default tab layout.
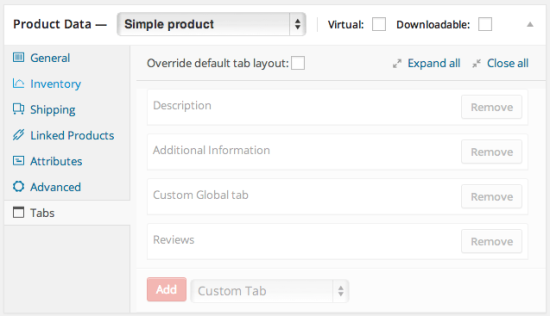
You can now:
- Add new tabs for this product only.
- Rearrange or remove existing tabs.
- Include global tabs if needed.
Click Add Tab, enter the title and content, and save.
These tabs are only for this specific product. They will not affect any others.

Step 6: Edit Tab Content
You can edit the content in two ways:
- Quick Edit in the product page – this uses a basic HTML editor.
- Full Editor in WooCommerce > Tab Manager – here, you get the full visual editor.
If you start by creating a tab in the product edit screen, you can still open it later in the global menu for full editing.
Step 7: Make Tabs Searchable
You can include tab content in your site’s search results. This helps customers find more relevant products.
Product-specific tabs are searchable by default. For global tabs, you can choose whether to include them in search.
To enable search for global tabs:
- Go to WooCommerce > Tab Manager > Tabs.
- Edit the global tab.
- Check the box to make it searchable.
If you’re using the Relevanssi plugin, it will index this content as well. This improves your search accuracy and relevance.
To ensure everything works with Relevanssi:
- Go to WooCommerce > Settings > Products > Tab Manager.
- Click the Run Upgrade button (only needed once).
- This will prepare your tabs for search indexing.
Step 8: Theme and Display Customization (Optional)
You can customize how tabs look on your site through your theme.
To do this:
- Create custom templates in your theme folder.
- Example: To change the design for a tab called “Shipping Info”, create this file: yourtheme/woocommerce/single-product/tabs/content-shipping-info.php
You can also override the default tab layout using: yourtheme/woocommerce/single-product/tabs/content.php
This is optional and best suited for developers or advanced users.
Step 9: Manage Third-Party Plugin Tabs
If other plugins add tabs (e.g., contact forms or review tools), Tab Manager can detect them. These tabs appear in your layout and can be reordered or removed.
However, you cannot rename third-party tabs.
Most plugins are compatible. But if a tab doesn’t show up, check with the plugin developer. They may need to add support using WooCommerce filters.
Step 10: Best Practices for Managing Tabs
- Use global tabs for shared content like shipping or return info.
- Use product tabs for unique product details.
- Keep tab titles short and clear.
- Don’t overload pages with too many tabs.
- Test the mobile display to make sure tabs are readable.
This plugin is very flexible. With the right setup, you’ll create product pages that are clean, helpful, and easy to use.
Plugin Limitations
While the plugin covers most tab needs, there are a few things it doesn’t support.
- Third-party tabs can’t be renamed. You can move or hide them, but not change their titles.
- No built-in import or export tools. Adding tabs in bulk or moving them between sites requires a developer.
- Rich editor not available directly on product pages. When adding custom tabs in product edit mode, you’ll only see a basic HTML editor. For full editing, go to the Tab Manager menu.
- Tabs are not templates. Global tabs show the same content everywhere. You can’t edit them differently on a per-product basis.
Despite these limits, most store owners won’t run into major issues. The plugin still gives a lot more control than the default WooCommerce setup.
Tips for Better Tab Management
Here are some quick tips to keep your tabs organized and helpful:
- Use short, clear tab titles that describe the content.
- Group common info into global tabs to save time.
- Add category filters to show relevant tabs only where needed.
- Avoid adding too many tabs. Keep your layout clean.
- Use shortcodes to embed forms, videos, or other content.
- Test your tabs on desktop and mobile before publishing.
A well-structured tab layout improves product visibility and user experience.
Conclusion
The WooCommerce Tab Manager is a must-have for stores with detailed product info. It helps you keep content neat, easy to find, and engaging for customers.
If you want full control over how tabs work on your store, this plugin is worth it. It’s easy to use, flexible, and built to grow with your business.
Need help setting it up or customizing it for your store?
Contact WooHelpDesk at +1 888 602 0119 (US & Canada) — we’re here to support your success.