How to Set Up Mercado Pago Payment Plugin for WooCommerce
Table of Contents
- Introduction to Mercado Pago for WooCommerce
- Why Choose Mercado Pago for Your WooCommerce Store?
- Checkout Options Available in Mercado Pago WooCommerce Plugin
- Key Benefits of Mercado Pago WooCommerce Integration
- Mercado Pago for Your WooCommerce Installation Guide
- Configuration & Setup Guide
- Customization & Support Guide
- Conclusion
Introduction to Mercado Pago for WooCommerce
Online payments are essential for any eCommerce store. Customers expect fast and secure transactions. Mercado Pago for WooCommerce is a powerful payment solution. It helps store owners accept payments with ease. Latin American enterprises are the target audience for this plugin. It supports multiple payment options, ensuring a smooth checkout process.
This integration provides a safe and reliable payment experience. It offers fraud protection and quick settlements. Whether you sell products or services, Mercado Pago makes payments simple. No technological expertise is needed, and the setup is simple.
Why Choose Mercado Pago for Your WooCommerce Store?
Many online stores struggle with payment security and customer trust. Mercado Pago solves these issues with its secure and user-friendly system. Latin America uses it extensively. Both domestic and foreign payment methods are accepted on the platform.
With Mercado Pago, store owners enjoy instant payouts, reducing cash flow issues. The fraud prevention system ensures that transactions are safe. Customers get a seamless experience with multiple checkout options.
Checkout Options Available in Mercado Pago WooCommerce Plugin
Mercado Pago offers two checkout methods:
-
Transparent Checkout
- Customers stay on your website during checkout.
- No redirects, ensuring a consistent shopping experience.
- Mercado Pago balance, debit cards, and credit cards are supported.
- Store branding remains intact for better customer trust.

-
Checkout Pro
- Customers may be redirected to Mercado Pago’s payment page.
- Allows payments via PayPal (in Brazil & Mexico), offline methods.
- Supports bank transfers and cash payment options (like Boleto, OXXO, etc.).
- Works well for businesses needing extra payment flexibility.

Key Benefits of Mercado Pago WooCommerce Integration
- Easy installation – No coding or technical skills required.
- Same-day payouts – Get paid instantly for completed transactions.
- Multiple payment methods – Digital wallets, debit cards, and credit cards.
- Discounts & installments – Offer promotions and flexible payments.
- Security features – Built-in fraud prevention for safer transactions.
- Currency conversion – Automatic conversion according to the location of the client.
Mercado Pago for Your WooCommerce Installation Guide
Integrating Mercado Pago with WooCommerce is a simple process. There are two methods for installing the plugin: manual and automatic. You can quickly set up the payment gateway with the help of this guide.
A. Automatic Installation (Recommended)
The simplest technique for installing the plugin is the automated procedure. It requires no technical skills. You can complete the process directly from your WordPress dashboard.
Steps to Install Mercado Pago Automatically
Step 1: Open the Plugins Section
- Open your WordPress admin panel and log in.
- Go to Plugins > Add New from there.
Step 2: Search for Mercado Pago Plugin
- Enter “Mercado Pago payments for WooCommerce” in the search bar.
- In the results, locate the official plugin.
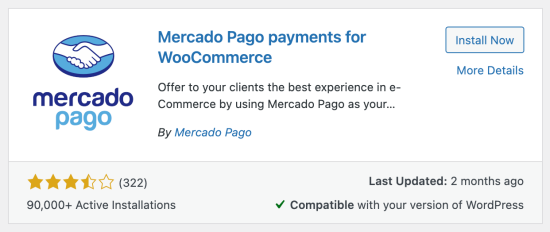
Step 3: Install the Plugin
- Next to the plugin, click the Install Now option.
- Hold off until the installation is finished.
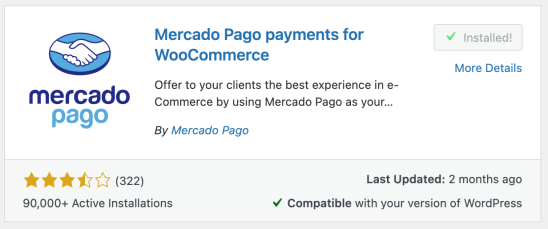
Step 4: Activate the Plugin
- Click Activate after the installation is complete.
- You can now set up the plugin.
This method is quick and simple. You can now configure Mercado Pago in your WooCommerce store.
B. Manual Installation
Installing it manually is an option if the automatic way fails. The plugin files must be downloaded and uploaded in order to accomplish this.
Steps to Install Mercado Pago Manually
Step 1: Download the Plugin
- Visit the WooCommerce Marketplace.
- Download the Mercado Pago plugin ZIP file to your computer.
Step 2: Upload the Plugin to WordPress
- Open your WordPress admin panel and log in.
- Go to Plugins > Add New from there.
- At the top, click Upload Plugin.
- Click Install Now after selecting the ZIP file.
Step 3: Activate the Plugin
- Click Activate after installation.
- The plugin is now added to your WooCommerce store.
If you want manual control over installations, this way can be helpful.
Configuration & Setup Guide
After installing the Mercado Pago WooCommerce plugin, the next step is configuration. This ensures that your store can accept payments smoothly. You need to connect your Mercado Pago account, add API credentials, and customize payment settings.
Follow this guide to set up Mercado Pago step by step.
A. Connecting Your Mercado Pago Account
To accept payments, you must link your Mercado Pago account with WooCommerce. This allows your store to process transactions securely.


Step 1: Create a Mercado Pago Seller Account
- Visit the website of Mercado Pago.
- Choose Business Account after clicking Sign Up.
- Complete the registration by entering your company’s information.
- Integration of your account is now possible.

Step 2: Get Your API Credentials
- Log in to your Mercado Pago account.
- Go to Developers > Credentials.
- Make a copy of your access token and public key.
- Your store is the only one with these credentials.
B. Setting Up the Payment Gateway in WooCommerce
You must set up the Mercado Pago payment settings after obtaining the credentials.
Step 1: Open Payment Settings
- Access your WordPress dashboard.
- Navigate to WooCommerce > Settings > Payments.
- Find Mercado Pago and click Manage.
Step 2: Enter API Credentials
- Paste the Public Key and Access Token.
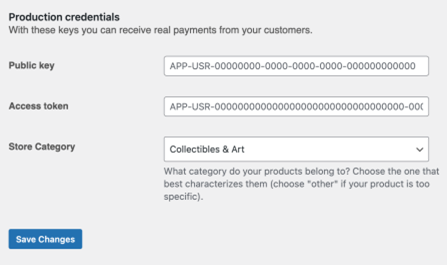
- Save the changes to connect Mercado Pago.
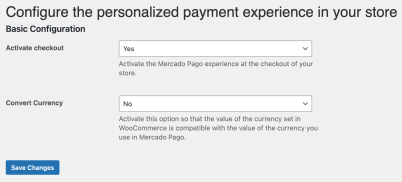
Step 3: Choose a Checkout Type
- Choose Checkout Pro or Transparent Checkout.
- Customers stay on your website thanks to Transparent Checkout.
- Checkout Pro redirects them to Mercado Pago’s page.
Step 4: Enable Payment Methods
- Choose which payment options to offer customers.
- Enable credit cards, debit cards, PayPal (Brazil & Mexico), and offline payments.
- Save changes to apply your settings.
C. Customizing Checkout Settings
You can customize checkout settings to improve the user experience.
Step 1: Enable Installments & Discounts
- Go to Payment Preferences in the plugin settings.
- Allow customers to pay in installments.
- Set up discounts and promo codes for special offers.
Step 2: Adjust Security Settings
- Enable fraud detection tools for safe transactions.
- Activate automatic payment rejection for high-risk transactions.
Step 3: Configure Currency & Language
- Mercado Pago automatically converts currency based on location.
- Set the preferred language for your customers.
D. Testing & Going Live
Test the checkout procedure before allowing actual payments.
Step 1: Enable Sandbox Mode
- In WooCommerce > Settings > Payments, enable Sandbox Mode.
- Use test credentials from Mercado Pago’s developer portal.
- Complete a test purchase using a dummy card.
Step 2: Check Payment Processing
- Ensure the order appears in WooCommerce orders.
- Verify that Mercado Pago receives the payment request.
Step 3: Switch to Live Mode
- Once testing is successful, disable Sandbox Mode.
- Use your live API credentials to start real transactions.
Customization & Support Guide
After configuring Mercado Pago for WooCommerce, you may want to customize settings. This helps create a better checkout experience and match your store’s branding. Additionally, knowing where to get support is important for troubleshooting issues.
A. Customizing Mercado Pago Checkout Settings
A seamless purchasing experience is guaranteed when the checkout procedure is personalized. You can modify settings to enhance usability and increase conversions.
- Adjust Checkout Appearance
- Go to WooCommerce > Settings > Payments > Mercado Pago.
- Choose between Transparent Checkout or Checkout Pro.
- Transparent Checkout keeps users on your site.
- Checkout Pro redirects users to Mercado Pago’s payment page.
- Enable or Disable Payment Methods
- In WooCommerce > Payment Settings, select payment methods to offer.
- Enable credit cards, debit cards, PayPal, and offline payments.
- Disable methods that are not relevant to your store.
- Set Up Installments & Discounts
- If possible, let clients pay in installments.
- Offer discount coupons during checkout.
- Customize discount rules in WooCommerce settings.
- Configure Fraud Protection & Security
- Enable automatic fraud detection in Mercado Pago settings.
- Set up automatic payment rejection for high-risk transactions.
- To protect client information, use an SSL certificate.
B. Troubleshooting & Getting Support
If you face any issues, there are multiple support options available.
- Official WooCommerce Documentation
- The Mercado Pago documentation provides setup guides.
- Look for answers to often encountered issues and error messages.
- WooCommerce Support Team
- If the issue is plugin-related, contact WooCommerce Support.
- Make a ticket and include a thorough description of the issue.
- Mercado Pago Developer Site
- Visit the Mercado Pago Developer Portal.
- Access API documentation and advanced troubleshooting guides.
- Community Forums & Help Centers
- Join WooCommerce and Mercado Pago user forums.
- Search for existing discussions or ask questions.
Conclusion
Customizing Mercado Pago settings helps improve the checkout experience. You can enable secure transactions, set up discounts, and adjust payment options. If you face issues, official support channels are available.
If you still need help, WooHelpDesk is here to assist you. Our experts can troubleshoot and resolve any Mercado Pago issues.
This completes our Mercado Pago WooCommerce setup guide. Your store is now prepared to take payments without any issues!