WooCommerce REST API Guide: How to Use and Integrate It Step by Step
Table of Contents
- Introduction
- What Is WooCommerce REST API and What Can It Do
- Why You Should Use WooCommerce REST API?
- WooCommerce REST API Basics: Understand Endpoints, Methods, And Secure Access
- Before You Start Requirements Checklist: Prepare Your Store For API Work
- How To Integrate WooCommerce REST API (Step By Step)
- Common Errors And Fixes: Solve WooCommerce REST API Issues Fast
- Conclusion
Introduction
Many WooCommerce stores need data outside the admin dashboard today. You may want orders in your CRM system. You may want products inside a mobile app. You may want stock synced with another platform quickly. That is where WooCommerce REST API integration becomes very helpful. This guide explains how to use WooCommerce REST API in a clear way. You will learn the core terms and the real purpose. You will also learn what to prepare before coding. This part focuses on the basics and the value. The next parts will cover setup and real API calls.
What Is WooCommerce REST API and What Can It Do
WooCommerce REST API is a secure way to access store data. It lets other apps talk with your WooCommerce website. You can fetch product lists and product details easily. You can read orders, customers, and coupon information too. You can also create or update data using API calls. This works by sending requests and receiving JSON responses. The API uses endpoints like products, orders, and customers.
Most integrations use the /wp-json/wc/v3/ path for requests. You follow the WooCommerce API documentation to choose endpoints correctly. You also follow rules for request fields and response formats. This makes the API predictable and safe for integrations.
Why You Should Use WooCommerce REST API?
Automate Repeated Store Tasks And Save Daily Time
Manual work slows down every growing WooCommerce store quickly. The API helps you automate repeat actions in minutes. You can sync orders, products, and customers without extra steps. This makes WooCommerce REST API integration useful for daily operations. You also reduce mistakes caused by manual copy and paste.
Sync WooCommerce Data With CRM, ERP, And Other Tools
Many stores use external tools for leads and accounting. The API helps you send WooCommerce data to those systems. You can push customer details into your CRM automatically. You can sync invoices and stock with an ERP tool too. This is a practical How to use WooCommerce REST API use case.
Build Custom Dashboards And Real-Time Reports
Default WooCommerce reports may not match your business needs. With the API, you can pull live data anytime. You can build dashboards for sales, refunds, and top products. You can filter results by date, status, or customer. This approach follows the WooCommerce API documentation correctly.
Create A Mobile App That Shows Products And Orders
Many brands want a mobile app for better customer experience. The API can provide product lists and product pages easily. It can also show order history inside the app. This makes your store feel faster and more modern. A good WooCommerce API tutorial often starts with this use case.
Connect Shipping, Tracking, And Delivery Systems Faster
Shipping tools need order data to create labels and tracking. The API can send order details to shipping providers. It can also update tracking info back into WooCommerce. This improves delivery updates and reduces support tickets. You can build this with secure WooCommerce API authentication.
Create Orders From External Checkout Or Sales Channels
Some stores sell through marketplaces or offline channels too. The API can create WooCommerce orders from those systems. You can also update payments and order status automatically. This keeps your store data clean and consistent. It is a strong reason to use WooCommerce REST API.
Improve Security With Controlled Access And Permissions
The API uses keys and permission levels for safe access. You can allow read-only access for reporting tools easily. You can allow write access only for trusted integrations. This reduces risk and protects customer information. Always follow WooCommerce API authentication best practices here.
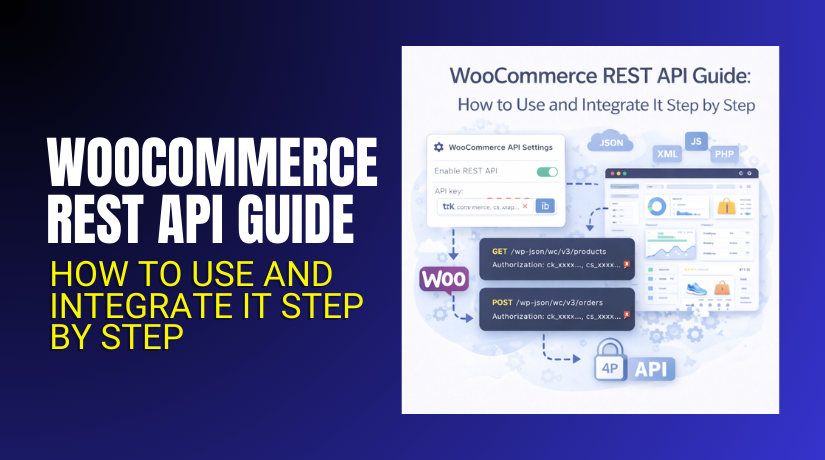
WooCommerce REST API Basics: Understand Endpoints, Methods, And Secure Access
WooCommerce REST API Base URL And Version Path Explained
WooCommerce REST API uses a fixed base URL structure. Most stores use the v3 API version today. The common path is yourdomain.com/wp-json/wc/v3/. This path helps apps reach WooCommerce endpoints correctly. You should confirm permalinks are enabled for clean access. Always verify the exact version in WooCommerce API documentation.
WooCommerce REST API Endpoints And What They Return
Endpoints are like doors to specific WooCommerce data areas. Products endpoint returns product lists and single product data. Orders endpoint returns orders, statuses, and payment details. Customers endpoint returns user and billing shipping details. Coupons endpoint returns active coupon rules and limits. You choose endpoints based on your integration goal. This is the first step in How to use WooCommerce REST API safely.
HTTP Methods Used In WooCommerce API Requests
WooCommerce API uses common REST methods for actions. GET is used to fetch data from the store. POST is used to create new data like orders. PUT is used to update existing records like product stock. DELETE is used to remove records if permissions allow it. Each method must match the endpoint action rules. A good WooCommerce API tutorial explains these with examples later.
WooCommerce API Authentication And Key Based Access
API access is protected using consumer key and secret. This setup is called WooCommerce API authentication in guides. You generate keys inside WooCommerce REST API settings. Keys work like login credentials for your integration system. You must keep them private and never share them publicly. Use server-side storage for safe key handling always.
API Permissions: Read, Write, And Read Or Write Access
WooCommerce API keys come with permission levels for safety. Read permission allows viewing data without changing anything. Write permission allows creating and editing store data. Read or Write allows both, but needs strong protection. Always choose the lowest permission your integration needs. This best practice is clearly noted in WooCommerce API documentation.
JSON Format Used For Requests And Responses
WooCommerce REST API sends and receives data in JSON. JSON is a clean format with keys and values. Your request body must match the endpoint field rules. The API response will also return JSON with status codes. This makes debugging and logging much easier. Most WooCommerce REST API integration tools expect JSON by default.
Pagination And Limits When Fetching Large Data
Large stores can have thousands of products and orders. WooCommerce API returns data in pages to reduce load. You can control page size using per_page and page parameters. This keeps responses fast and avoids server timeouts. You should also fetch only what you need each time. This tip is important in every WooCommerce API tutorial.
Filtering And Searching Data Using Query Parameters
WooCommerce API supports filters for faster and cleaner results. You can filter orders by status like processing or completed. You can search products by keyword, SKU, or category IDs. You can filter by date using after and before parameters. This reduces data and improves integration speed a lot. Always follow filter rules from WooCommerce API documentation.
Status Codes And What They Mean In WooCommerce API
Every API response includes a status code for result meaning. 200 means your request worked and returned data. 201 means data was created successfully using POST. 400 means the request data was invalid or missing. 401 means authentication failed due to wrong keys. Understanding these helps in How to use WooCommerce REST API correctly.
Before You Start Requirements Checklist: Prepare Your Store For API Work
Confirm WooCommerce Is Installed And Updated Properly
Your WooCommerce plugin must be active on your WordPress site. Use a stable version to avoid breaking changes later. Update WordPress and WooCommerce to the latest stable release. This keeps endpoints consistent with WooCommerce API documentation.
Make Sure HTTPS And SSL Are Working On Your Website
HTTPS is required for safe data transfer in most cases. Your SSL certificate must be valid and not expired. Check your site loads with https without warnings. Secure HTTPS helps protect WooCommerce API authentication keys.
Verify Permalinks And REST API Access Are Enabled
WooCommerce REST API needs WordPress permalinks enabled. Go to Settings and select a permalink structure. Then confirm the REST API routes respond correctly. This prevents endpoint errors during WooCommerce REST API integration.


Ensure You Have Admin Access To Generate API Keys
You need an admin user role to create REST API keys. You also need access to WooCommerce settings and tools. Without this, you cannot complete How to use WooCommerce REST API setup.
Decide What Data You Need And Which Endpoints Fit
Plan what you want to read or update via API. Choose endpoints like products, orders, customers, or coupons. Write down the required fields for each endpoint. This step reduces confusion during your WooCommerce API tutorial workflow.
Pick A Safe Place To Store Keys And Secrets
Never store API keys inside public code files. Use server environment variables or secure config storage. Restrict access to only trusted team members. This protects your WooCommerce API authentication setup.
Install A Tool For Testing API Calls Before Coding
Use Postman to test endpoints with real responses. You can also use cURL from your server terminal. Testing first avoids wasted development time later. It also helps you follow WooCommerce API documentation correctly.
Use A Staging Site For Testing If Your Store Is Live
A staging site is safer than testing on production. You can create test orders and test products safely. You avoid customer impact and accidental data edits. This is a best practice for WooCommerce REST API integration.
How To Integrate WooCommerce REST API (Step By Step)
A clean integration starts with the right setup and safe testing. You should first generate keys and test endpoints properly. This keeps your store secure and avoids broken API calls later. Follow these steps in the same order for best results.
Step 1: Locate REST API Settings Inside WooCommerce
- Open your WordPress admin dashboard and log in.
- Go to WooCommerce from the left side menu.
- Click Settings inside the WooCommerce section.
- Open the Advanced tab from the top menu.
- Click REST API to view API keys and access.
- This is the starting point for How to use WooCommerce REST API.
Step 2: Create WooCommerce REST API Keys With Correct Permissions
- Click Add Key to create a new API key.
- Enter a clear description for easy future reference.
- Select the user who will own this API access.
- Choose permission level: Read, Write, or Read/Write.
- Click Generate API Key to create the credentials.
- Copy the Consumer Key and Consumer Secret safely.
- Store keys securely for safe WooCommerce API authentication.
Step 3: Build Your First Endpoint URL For Testing
- Start with your website domain and REST API base path.
- Use this format: https://yourdomain.com/wp-json/wc/v3/
- Add the endpoint you need, like products or orders.
- Example: https://yourdomain.com/wp-json/wc/v3/products
- Add filters when needed, like per_page or status.
- Follow the correct format from WooCommerce API documentation.
Step 4: Test API Calls In Postman Before Writing Code
- Open Postman and create a new request.
- Select the method like GET for fetching data.
- Paste your endpoint URL in the request field.
- Add your key and secret using Postman authorization settings.
- Click Send and review the JSON response data.
- Confirm the call works before WooCommerce REST API integration coding.
Step 5: Connect The API From Your System In A Secure Way
- Choose your integration method based on your project needs.
- Use PHP if you are building inside WordPress plugins.
- Use Node.js if you are building an external service.
- Use a secure backend proxy for React frontends.
- Never expose API keys in frontend code for safety.
- This keeps WooCommerce API authentication secure always.
Step 6: Build A Simple Real Workflow Using The API
- Decide one practical goal for your first live integration.
- Example: sync products to another tool automatically.
- Example: create an order from an external system.
- Example: update order status after shipping updates.
- Keep the first workflow small and easy to test.
- This fits a clear WooCommerce API tutorial process.
Step 7: Add Error Handling And Safe Logging
- Check response status codes for every API call.
- Handle common errors like 401, 400, and 404 quickly.
- Use retries for temporary failures like timeouts.
- Log errors without saving the consumer secret anywhere.
- Add limits to prevent too many calls at once.
- This improves long-term WooCommerce REST API integration stability.
Once these steps are complete, your integration is ready for real use. You can now build advanced workflows using reliable endpoints. Always follow WooCommerce API documentation when adding new features. This keeps your API system stable, safe, and easy to maintain.
Common Errors And Fixes: Solve WooCommerce REST API Issues Fast
401 Unauthorized Error: Keys Or Authentication Not Working
This error means the API cannot verify your access. First, confirm your Consumer Key and Secret are correct. Then confirm the key has the right permission level. Read-only keys cannot create or update any data. Also confirm HTTPS is enabled on your site for secure calls. Follow WooCommerce API authentication steps as shown in WooCommerce API documentation.
403 Forbidden Error: Access Blocked By Role Or Security Rules
This error means your request reached the server but got blocked. Check the WordPress user linked with your API keys. That user must have enough rights for the endpoint action. Some security plugins block REST API requests by default. Temporarily disable blocking rules and test again with Postman. This issue is common during WooCommerce REST API integration work.
404 Not Found Error: Wrong Endpoint Or Incorrect API Version
This error means the endpoint URL is not correct. Confirm your base path includes wp-json and wc and the version. Many sites fail due to missing permalinks or wrong rewrite rules. Try opening the base route in a browser to confirm access. Also verify you are using wc/v3 and not wc/v2. Use the correct path from WooCommerce API documentation.
400 Bad Request Error: Payload Fields Or JSON Format Problems
This error means your request data is invalid or incomplete. Check your JSON body format and remove trailing commas. Confirm required fields exist for the endpoint action you used. For example, creating products needs a proper name field. Updating stock needs correct stock fields and product IDs. Use a clean request sample from a WooCommerce API tutorial reference. This improves How to use WooCommerce REST API without failures.
429 Too Many Requests Error: Rate Limits Or Too Many Calls
This error happens when you send requests too quickly. Reduce the number of calls and use batching where possible. Use pagination instead of pulling everything in one request. Add small delays between requests when syncing large data. Also cache repeated reads to reduce API traffic. These steps keep WooCommerce REST API integration stable.
Timeout Or Connection Error: Server, Firewall, Or Hosting Restrictions
This issue happens when the API call never completes. Check if your hosting blocks external API requests or limits resources. Some firewalls block unknown IPs or certain request headers. Test the same request from your hosting server to confirm. Also check if the store is slow due to high load. Fix performance before scaling your integration setup.
Data Not Updating Issue: Caching, Wrong IDs, Or Permission Limits
Sometimes calls work but data does not change as expected. Confirm you are using the correct product or order ID. Variation IDs differ from parent product IDs in many cases. Clear cache plugins and server cache after update calls. Also confirm your key has write access for update methods. This is a common issue in WooCommerce API authentication setups.
Conclusion
Now you understand the core parts of the WooCommerce REST API. You learned how endpoints, methods, and JSON work together. You also learned common errors and how to fix them fast. Use WooCommerce API documentation as your main reference source. Start small with one endpoint and one workflow first. Then expand your WooCommerce REST API integration as your needs grow. If you follow this approach, How to use WooCommerce REST API becomes simple.
🚀 Need Help Using the WooCommerce REST API?
Whether you’re setting up your first API integration or fixing an error, WooHelpDesk is here to help.
💬 Live chat with our WooCommerce experts
📞 Prefer a quick call? We’ve got phone support too!
👉 Contact Us Now — Get real support, real fast.