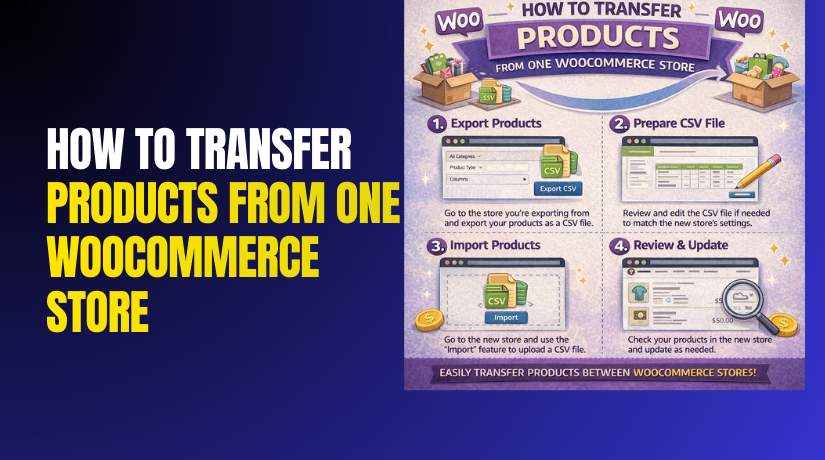
How to Transfer Products From One WooCommerce Store to Another Easily (Complete Guide)
Table of Contents
- Introduction
- What Usually Transfers Easily During WooCommerce Product Migration
- Quick Prep Checklist Before You Start the WooCommerce Product Transfer
- List Of Method to Transfer Products From One WooCommerce Store to Another
- Which Method Should You Choose for WooCommerce Product Transfer
- Conclusion
Introduction
When you transfer products from one WooCommerce to another, you copy product data safely. This process is also called WooCommerce product migration in many guides. Your goal is to shift product pages from one store to another. You may want a new domain, new theme, or new setup. You may also want a fresh store with clean data.
Many store owners need a WooCommerce product transfer during redesign work. Some owners do it after hosting changes or team changes. The safest plan is to pick a method and prepare first. This reduces errors and prevents missing products later. You can move WooCommerce products with free or paid options. You can also use WooCommerce export import products workflows for quick results.
What Usually Transfers Easily During WooCommerce Product Migration
Most WooCommerce transfers can move core product details smoothly. Product titles, short descriptions, and full descriptions transfer well. Product prices and sale prices usually transfer without issues. Stock status and stock quantity often transfer correctly too. Simple products usually import with fewer issues and conflicts.
Variable products can also transfer with the right structure. Variation options and variation pricing can transfer if mapped well. Categories and tags often transfer if included in the data. Global attributes can transfer if created in the new store. Product shipping classes may also transfer if you include them. This is why planning a WooCommerce product transfer is important.
Quick Prep Checklist Before You Start the WooCommerce Product Transfer
Create a Full Backup of Both Stores Before Any WooCommerce Export Import Products Step
Backup is the first step before you touch product data. Take a full database backup on the old store. Take a full wp-content backup with uploads and plugins. Also take a full backup of the new store too.
This helps you roll back if something goes wrong. Backups protect you from broken imports and missing images. They also help if products duplicate after import. A backup makes WooCommerce export import products work much safer. Never skip this step, even for small product lists.
Decide Exactly What You Want to Move WooCommerce Products Without Confusion
Write down what you want to transfer before exporting. Decide if you will move simple products only. Decide if you will move variable products with all variations. Decide if you will move categories, tags, and product attributes. Decide if you will move shipping classes and tax classes.
Decide if you will move product images and galleries. Decide if you will move downloadable files and links. Decide if you will move product status like draft or publish. This clarity prevents missing fields during WooCommerce product transfer. It also reduces rework after you finish the import.
Clean Your Product Data to Prevent Errors During WooCommerce Product Migration
Clean data imports faster and with fewer surprises. First, check your SKUs for duplicates and empty fields. Duplicate SKUs can cause wrong updates during import. Next, review category names and remove near-duplicate ones. Keep category names consistent across the old store. Then check attribute names and keep them clean and simple.
Remove unused attributes that do not help product filters. Also remove empty products with no price or stock. If you use images, confirm they load on the old site. Broken image links often stay broken after migration. This cleanup step makes WooCommerce product migration smoother. It also helps you transfer products from one WooCommerce to another with fewer issues.
List Of Method to Transfer Products From One WooCommerce Store to Another
You can transfer products from one WooCommerce to another in a few safe ways. The best method depends on your store size and data type. Some stores have simple products with basic fields only. Other stores have variations, custom fields, and many images. For this reason, you should choose a method carefully. In this guide, we will cover the top three options.
Method one uses the built-in WooCommerce export import products tool. Method two uses WP All Export and WP All Import plugins. Method three uses the WooCommerce REST API for advanced needs. Each method supports WooCommerce product migration in a different way. Each one helps you move WooCommerce products with better control and fewer errors.
Method 1: Using WooCommerce Built-In CSV Export and Import for Product Transfer
This method is best for small to medium product catalogs. It is simple and built inside WooCommerce by default. It works well when you want a fast WooCommerce product transfer. It also fits basic WooCommerce product migration needs without coding. You can move WooCommerce products using one export file and one import. This method is also the base of WooCommerce export import products workflows. You still must check the results after the import is complete. You can repeat the process if you need a clean retry.
Step 1: Export Products From Your Old WooCommerce Store Using CSV
- Go to the WordPress Dashboard on the old store.
- Click Products and then click All Products.
- Click the Export button on the top area.
- Choose to export all products or selected products.
- Select columns like SKU, price, stock, and images.
- Also select categories, tags, and attributes columns.
- Click Generate CSV and download the file.
- Save the CSV in a known folder on your computer.
- Keep the file name simple and easy to find.
Step 2: Review and Prepare the Exported CSV File Before Import
- Open the CSV in Excel or Google Sheets.
- Check product names and confirm nothing looks cut off.
- Check SKUs and remove duplicate SKU values if needed.
- Confirm product types show simple or variable correctly.
- Check categories and tags for clean naming and spelling.
- Confirm image URLs are complete and publicly reachable.
- Avoid changing column headers unless you must.
- Do not remove required columns like name and type.
- Save the file again as CSV format after edits.
Step 3: Import Products Into Your New WooCommerce Store Using CSV
- Go to WordPress Dashboard on the new store.
- Click Products and then click All Products.
- Click the Import button on the top area.
- Upload the exported CSV file from your computer.
- Click Continue to open the field mapping screen.
- Match each CSV column with the correct WooCommerce field.
- Pay extra attention to SKU, price, stock, and type.
- If asked, choose to update existing products by SKU carefully.
- Click Run the Importer and wait for completion.
- Review the import summary for warnings and skipped items.
Step 4: Verify Imported Products and Fix Common Missing Details
- Open a few products and confirm title and descriptions.
- Check pricing, sale pricing, and scheduled sale dates.
- Check stock quantity and stock status for each sample.
- Open variable products and confirm all variations appear.
- Confirm product images and galleries load correctly.
- Confirm categories, tags, and attributes show properly.
- Test Add to Cart on at least three products.
- View the product page on frontend for layout issues.
Step 5: Fix Common CSV Transfer Problems After WooCommerce Product Migration
- If images are missing, confirm image URLs are accessible.
- If images are blocked, upload images to the new Media Library.
- If variations fail, recheck product type and parent mapping fields.
- If prices are missing, confirm price columns mapped correctly.
- If duplicates appear, confirm SKUs are unique and consistent.
- If categories are messy, clean names and reimport if needed.
- If imports time out, split CSV into smaller batches.
- If fields skip, confirm CSV format stayed in comma-separated form.
Post-Import Checks That Confirm a Clean WooCommerce Product Transfer
After import, you should do a final store level check. Count products on both stores and compare totals. Check your top categories and confirm product counts match. Search by SKU and confirm the right products are open. Check one variable product from each major category. Review stock changes and test checkout with one sample order. This helps you move WooCommerce products with confidence. It also ensures your WooCommerce export import products process succeeded.


Method 2: Using WP All Export and WP All Import for Large WooCommerce Product Migration
This method is best for large stores and complex catalogs. It works well when default CSV import feels limited. It also helps when you have many variable products. You get stronger control over mapping and field rules. Many store owners use it for clean WooCommerce product migration. It is also helpful for repeated WooCommerce product transfer runs. This method can transfer products from one WooCommerce to another with better accuracy. It also supports advanced WooCommerce export import products workflows.
Step 1: Install the Required Plugins on Both WooCommerce Stores
- Go to Plugins in the old store dashboard.
- Install and activate WP All Export plugin.
- If you have variations, add the WooCommerce add-on too.
- Go to Plugins in the new store dashboard.
- Install and activate WP All Import plugin.
- Add the WooCommerce import add-on for product support.
- Confirm both sites run the same WooCommerce version if possible.
- Keep other heavy plugins disabled during export and import runs.
Step 2: Create a Product Export File in the Old Store Using WP All Export
- Open WP All Export from the dashboard menu.
- Choose the export type as WooCommerce Products.
- Select All products or filter by category and status.
- Drag fields like title, description, price, and SKU.
- Include stock, product type, and shipping class fields too.
- Include categories, tags, and global attributes fields.
- Include image URL and gallery image URLs fields.
- If using custom fields, add the correct meta keys.
- Run the export and download the export file safely.
- Save the file with a clear name and date for tracking.
Step 3: Set Up the Import on the New Store Using WP All Import
- Open WP All Import from the new store dashboard.
- Click New Import and upload your export file.
- Choose WooCommerce Products as the import target type.
- Choose to create new products or update existing products.
- Use SKU as the main match key for safe updates.
- Go to the mapping screen and map core product fields.
- Map title, descriptions, price, sale price, and SKU fields.
- Map stock status, stock quantity, and backorder settings.
- Map product type and visibility settings correctly.
- Save settings and run the import process.
Step 4: Import Variable Products and Variations in the Correct Way
- Check if your export includes variation data properly.
- If variations are separate items, import parents first.
- Run the parent product import and confirm success.
- Start a second import for variations if required.
- Map variation SKU, variation price, and attributes carefully.
- Link each variation to the correct parent product field.
- Confirm attribute names match your new store attribute names.
- Run the variation import and review the final report.
Step 5: Transfer Images and Fix Image Issues During WooCommerce Product Migration
- Map the main product image field to featured image.
- Map gallery fields to product gallery images section.
- Ensure image URLs are public and not blocked.
- If URLs fail, upload images into the new Media Library.
- Use the plugin image download option if available.
- Run a small import test first to confirm image behavior.
- Regenerate thumbnails after import for clean frontend display.
Step 6: Handle Custom Fields and Extra Data Without Breaking Products
- Identify which plugin stores your custom product fields.
- Find the exact meta keys used for those fields.
- Add those meta keys in export and import mapping.
- Import in a staging site first if fields are complex.
- Confirm those fields show on product pages after import.
- If fields do not show, check the theme and plugin settings.
Step 7: Final Checks After You Move WooCommerce Products With Plugins
- Compare product counts on old and new stores.
- Open random products and verify key fields quickly.
- Check variable products for correct variation dropdowns.
- Confirm prices, stock, categories, and attributes display properly.
- Test Add to Cart for simple and variable products.
- Run a test checkout to confirm tax and shipping rules.
- Fix warnings based on the import log details.
This method offers better control over complex product data. It helps you map fields without losing important details. It also reduces broken variations in big catalogs. It is ideal when you need repeated imports in phases. It supports a cleaner WooCommerce product transfer overall. It helps you move WooCommerce products with fewer manual edits. It also improves success in advanced WooCommerce product migration work.
Method 3: Using WooCommerce REST API for Automated Product Transfer Between Two Stores
This method is best when you want automation and control. It is ideal when you manage multiple WooCommerce stores. It also helps when you need repeated syncing, not one-time. You can transfer products from one WooCommerce to another without manual CSV work. This is a developer-style WooCommerce product migration method. It supports custom rules for filtering and updating products. It can also reduce manual errors in large WooCommerce product transfer jobs. If you do not code, use the other two methods.
Step 1: Create API Keys in WooCommerce So Data Can Move Safely
- Open the source store WordPress dashboard.
- Go to WooCommerce and open Settings area.
- Open Advanced and then open REST API tab.
- Click Add key and set user with admin rights.
- Set permissions to Read for pulling products.
- Copy the Consumer Key and Consumer Secret safely.
- Repeat the same steps on the destination store.
- Set destination permissions to Write for pushing products.
- Store keys in a secure file, not in public notes.
Step 2: Test API Access Before You Move WooCommerce Products
- Use a REST client tool or simple test script.
- Send a request to fetch one product from source.
- Confirm you get product data without errors.
- Test creating one draft product on destination store.
- Confirm the product appears inside the Products list.
- If it fails, recheck permissions and SSL settings.
Step 3: Export Product Data Through REST API With Pagination Support
- Fetch products in small batches for stable results.
- Use page and per_page values to control the load.
- Pull product types, SKUs, prices, and stock details.
- Pull categories, tags, and attributes as well.
- Pull variation data for variable products carefully.
- Save data in JSON format for clean processing.
- Log failed product IDs for retry later.
Step 4: Convert Data So It Matches the New Store Structure
- Map category names instead of old category IDs.
- Create missing categories on the destination store first.
- Map attributes by name to avoid ID mismatch issues.
- Keep SKU as the main key for product matching.
- Decide create new products or update by SKU.
- Clean long descriptions if they include broken shortcodes.
- Remove old site URLs if they appear inside content.
Step 5: Import Products Into the New Store Using REST API Requests
- Create products first and store new product IDs.
- Push simple products with price, stock, and images.
- Push variable product parents before pushing variations.
- Create variations and link them to the parent product.
- Set variation prices, stock, and attribute options properly.
- Keep products as draft until you finish all checks.
- After checks, switch products to publish in bulk.
Step 6: Handle Product Images in a Simple and Reliable Way
- Use public image URLs if they are accessible.
- If URLs fail, upload images to the destination Media Library.
- Attach the uploaded image IDs to product image fields.
- Test a few products to confirm the image display is correct.
- Avoid hotlinking images from the old site long term.
Step 7: Know the Limits and Risks Before You Start This Method
- API calls can slow down on shared hosting servers.
- Large catalogs may hit timeout and memory limits.
- Variation linking needs careful parent product handling.
- Category and attribute IDs differ between both stores.
- Image upload can be the most time-heavy part.
- Logging is important for re-run and quick fixes.
Which Method Should You Choose for WooCommerce Product Transfer
Choose based on store size, time, and your skill level. If you want quick and free, use WooCommerce export import products. If you want better mapping, use WP All Export and Import. If you want automation, use the REST API method. For most store owners, CSV is the easiest start. For large stores, plugin-based WooCommerce product migration is safer. For dev teams, REST API helps move WooCommerce products repeatedly.
Conclusion
A clean WooCommerce product migration starts with the right method choice. If your store is small, the built-in WooCommerce export-import products CSV option works well. If your catalog is large or complex, a plugin-based WooCommerce product transfer gives better control. If you need automation, the REST API method helps you move WooCommerce products faster and repeatedly. Always back up both stores and test with a small batch first. This approach helps you transfer products from one WooCommerce to another without data loss. Final checks on images, variations, and stock keep your new store reliable.
Need expert help with transferring WooCommerce products or setting up a full store? Get fast, reliable support from the WooCommerce specialists at WooHelpDesk.