How to Setup Custom Order Status for WooCommerce to Simplify Order Management
Table of Contents
- Introduction + Why You Need Custom Order Statuses
- Why Default Statuses Don’t Work for Everyone
- How This Plugin Solves That Problem
- Plugin Features Breakdown
- Step-by-Step Setup and Configuration Process
- Real-World Use Cases
- Tips for Smarter Order Management
- Conclusion
Introduction + Why You Need Custom Order Statuses
Despite its strength, WooCommerce remains a limited eCommerce platform. One of the biggest gaps is in managing order statuses. By default, WooCommerce gives you only a few order statuses: pending, on-hold, processing, completed, cancelled, refunded, and failed.
For many store owners, these are not enough. Every business has its own order flow. If you sell custom products or handmade items or manage fulfillment in-house, you need more detailed statuses. That’s where the Custom Order Status for WooCommerce plugin comes in.
This plugin helps you create new order statuses that match your process. You can add as many as you need and even automate them. It gives you full control over how orders move through your store.
Why Default Statuses Don’t Work for Everyone
Let’s say you run a print shop. You may need these steps:
- Order received
- Design in progress
- Ready for customer approval
- In production
- Shipped
The default WooCommerce setup can’t handle that. You end up tracking orders manually. That leads to delays and confusion for your team and customers.
How This Plugin Solves That Problem
The custom order status plugin for WooCommerce allows you to:
- Add custom statuses for every step
- Use color coding to keep it clear
- Assign statuses manually or automatically
- Send emails when order status changes
- Track orders with more detail
This means your store runs smoother. Time is saved by your team. Your clients are kept up to date without having to request updates.
The plugin works for all kinds of stores:
- Food delivery businesses
- Custom clothing brands
- Manufacturing companies
- Service-based sites
If your business needs better order control, this plugin is for you.
Plugin Features Breakdown
There are several useful tools in the Custom Order Status for WooCommerce plugin. It lets you fully customize how orders are handled in your store. To use it, you do not need to know how to code or be tech savvy. Everything is built for store owners who want better control and automation.
Let’s examine this plugin’s main characteristics.
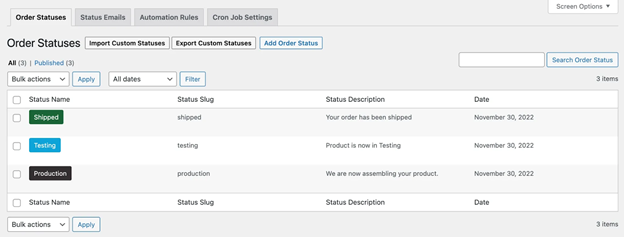
Create Multiple Custom Order Statuses
You can add as many custom statuses as you like using this plugin. These statuses can match your business steps, like “In Production” or “Waiting for Parts.”
Each status can be:
- Text-based or icon-based
- Customized with colors and labels
- Set as visible or hidden to customers
You can also:
- Set a payment status (paid, unpaid, or requires payment)
- Let users cancel orders at certain statuses
- Choose to exclude specific statuses from reports
- Add them to bulk actions on the orders page
This helps you organize your orders clearly. You’ll know exactly where each order stands.
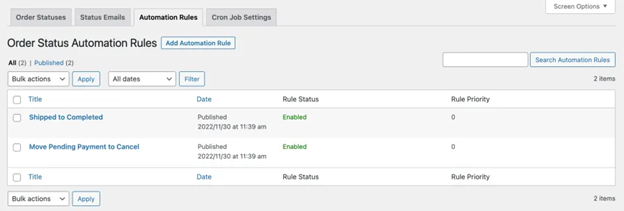
Assign Custom Statuses Automatically
You don’t need to manually update every order. The plugin allows you to set automation rules that change order statuses based on different conditions.
You can create rules that change order status when:
- A certain time has passed (like 24 hours after payment)
- Order value falls within a predetermined range.
- The order contains particular goods or categories.
- The customer’s billing or shipping country matches
- The customer belongs to a certain user role
- The order was placed between a certain number of dates.
These rules help automate your order workflow. No more delays or missed steps.
Email Notifications on Status Change
Additionally, this plugin has a robust email notification system. Alerts can be configured to notify you when an order changes status.
You can:
- Write custom email subjects and messages
- Choose whether to notify customers or admins
- Add rules only for key status changes
- Personalize email templates, just like you would with standard WooCommerce emails.
This facilitates the process of informing everyone. You avoid sending too many emails, while still giving updates when it matters.


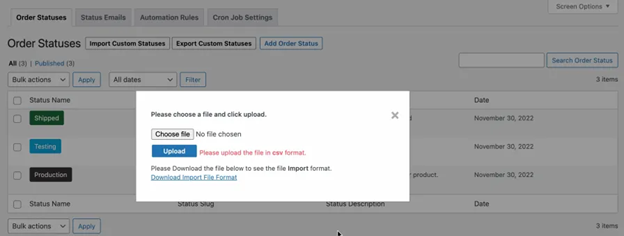
Import and Export Statuses
Custom statuses can be imported and exported using a CSV file to save time. This is useful if you run multiple stores or update statuses often.
You can:
- Import multiple statuses in one go
- Export current statuses for backup
- Quickly reapply saved settings in new stores
Note: You’ll still need to set automation rules manually after importing.
This feature saves time and keeps your store organized.
Step-by-Step Setup and Configuration Process
Setting up the Custom Order Status for WooCommerce plugin is simple. This section will guide you through every step. You don’t need to hire a developer. Just follow the instructions below, and you’ll be ready in no time.

Step 1: Install the Plugin
Installing the plugin on your WordPress website is the first step.


- Go to your WooCommerce account
- Download the plugin ZIP file
- In your WordPress dashboard, go to Plugins → Add New
- Click Upload Plugin and choose the ZIP file
- Click Install Now and then Activate
Once activated, you’ll see a new menu for Order Statuses in your WooCommerce settings.
Step 2: Create a Custom Order Status
Now it’s time to create your first custom status.
- Go to WooCommerce → Order Statuses
- Click Add New

You’ll now see a form with options to fill in.
- Status Title – This is the name shown in your order list
- Slug – A unique identifier used internally
- Description – For internal use (helps if you have many statuses)
- Choose Type – Pick between text-based or icon-based status
- Color and Icon – Customize the look for easy tracking
- Payment Status – Choose if the order is:
- Paid
- Requires payment
- Not linked to payment
- Visibility Options:
- Show or hide from customers
- Include or exclude in reports
- Enable for bulk actions
- Allow customer to cancel in this status
Click Save when done.

The order list dropdown will now display your customized status.
Step 3: Set Up Automation Rules
Order statuses can be automatically changed by creating rules.
- Go to WooCommerce → Order Statuses → Automation Rules
- Click Add Rule
Now configure the rule step by step.
- Select Current Status – This is the starting point
- Select New Status – This is the status to apply
- Set Conditions – You can add one or more:
- Time interval (after X minutes/hours/days)
- Order amount range
- Order quantity range
- Billing or shipping country
- Product or category in the order
- User role (like wholesaler or guest)
- Order date range
For the rule to be effective, all requirements must be met.
Click Save Rule. Your automation is now active.
Step 4: Configure Email Notifications
Let’s set up custom email alerts for status changes.
- Go to WooCommerce → Order Statuses → Status Emails
- Click Add Email Rule
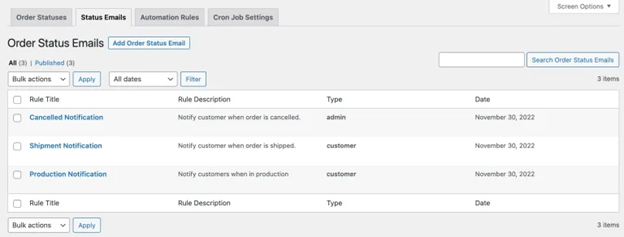
Now fill in the fields:
- Rule title and description (internal use)
- Choose to notify customer, admin, or both
- Add subject line, email heading, and message body
- Select which status change will trigger the email

You can use variables like:
- {order_id}
- {customer_name}
- {status}
Save your rule and test it by updating an order.
You can also edit the email design under WooCommerce → Settings → Emails.
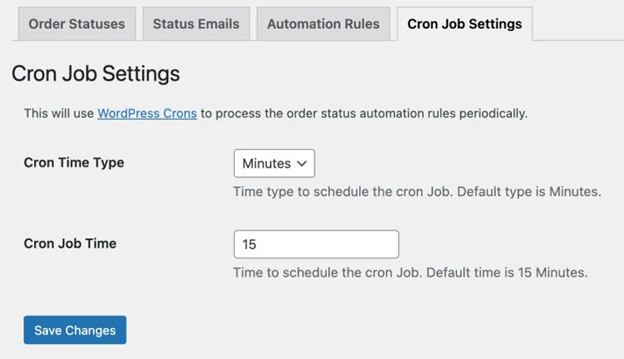
Step 5: Set Up Cron Job (Optional)
This is helpful for high-volume stores.
- Go to your hosting panel or use a cron manager plugin
- Set a schedule to run every 15–30 minutes
- This ensures automation rules and emails run on time
Once everything is set up, your order management becomes smarter. Orders move through your custom process automatically. Customers and staff stay informed without extra work.
Real-World Use Cases
The Custom Order Status for WooCommerce plugin is flexible. It is effective for a wide range of internet enterprises. Whether you sell products, offer services, or handle custom orders, this plugin can improve your workflow.
Here are some ways different businesses use custom order statuses:
- Print Shops
Use statuses like “Design Approved,” “In Print,” or “Shipped.” - Meal Delivery Services
Add steps like “Meal Being Prepared” or “Out for Delivery.” - Custom Clothing Stores
Create stages like “Fabric Selected,” “Tailoring in Progress,” and “Quality Check.” - Manufacturers
Add steps such as “Parts Ordered,” “Assembly Started,” or “Final Inspection.”
These detailed statuses help staff stay organized and customers feel informed.
Tips for Smarter Order Management
Using this plugin the right way can save time and effort.
- Keep statuses simple and clear
- Use color coding to spot updates quickly
- Only send emails for important status changes
- Test automation rules before using them live
- Group similar rules for better control
These tips will help your store run smoothly every day.
Conclusion
Managing orders is easier with the WooCommerce custom order status plugin. You can track progress, send alerts, and stay organized without extra tools.
If you need help with setup or customization, we’re here for you. WooHelpDesk offers expert support for WooCommerce and WordPress.
📞 Call us at +1 888 602 0119 (US & Canada) for fast, friendly support today.
Your store deserves better order control. Start improving your process now with Custom Order Status for WooCommerce.