How to Set Up Custom Fields in WooCommerce Using the “Custom Fields for WooCommerce” Plugin
Table of Contents
- Introduction
- What Are Custom Fields in WooCommerce?
- Why Choose “Custom Fields for WooCommerce” Plugin?
- Perfect for B2B and Advanced Stores
- Real Store Benefits
- Complete Feature Breakdown
- Step-by-Step Setup Process for Custom Fields for WooCommerce Plugin
- Why This Plugin Stands Out
- Conclusion
Introduction
Running a WooCommerce store means meeting many customer needs. Sometimes, the default product or checkout fields just aren’t enough. Whether you’re selling to individuals or businesses, collecting extra details becomes important.
That’s where the Custom Fields for WooCommerce plugin helps. It lets you add extra fields across your site — without writing code. You can place fields on the Checkout, Registration, or My Account pages. You have complete control over when and how those fields show up.
Let’s explore how this plugin works and why it’s a must-have.
What Are Custom Fields in WooCommerce?
Custom fields let you collect more than the default WooCommerce data. For instance, you may wish to request:
- Customer’s business name
- Upload files (like logo or ID)
- Choose delivery date or time
- Select product add-ons
- Enter VAT number
This is not possible with standard WooCommerce settings. That’s why a dedicated WooCommerce custom fields plugin is needed.
Why Choose “Custom Fields for WooCommerce” Plugin?
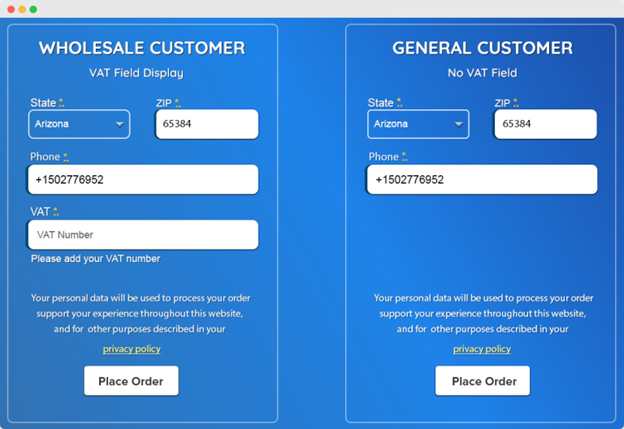
This plugin is created by Addify, a trusted developer in the WooCommerce space. It adds real flexibility to your store. You can create fields that show up only for certain products or user roles. It even supports conditional logic, so one field appears only if another is selected.
For example:
- Show VAT field only when “Company” is selected as account type
- Hide shipping fields for digital products
This makes your store smarter and cleaner. It also improves user experience and boosts trust.
Perfect for B2B and Advanced Stores
Not every store is the same. Many need more than basic fields. If you’re dealing with B2B clients, wholesale buyers, or need extra user data, this plugin works well.
It helps with:
- Adding a user role selector on registration
- Approving users manually based on role
- Showing different fields for wholesalers vs. general customers
You can also charge extra fees for specific field options. This is great for upsells or product customization.
Real Store Benefits
Using this plugin, you can:
- Collect better customer data
- Speed up order handling
- Personalize user experience
- Offer product customizations
- Reduce back-and-forth with customers
It’s all done through a simple interface inside your WordPress dashboard. You don’t need technical skills or extra coding.
This plugin turns WooCommerce into a flexible system for any type of online business. We’ll go into more depth about each feature in the following section.
Complete Feature Breakdown
There are a lot of strong features in the Custom Fields for WooCommerce plugin. These features help you collect more customer data and improve your store’s flow. A thorough explanation of the plugin’s features and how they operate can be found below.
Field Type Support (19 Different Types)
This plugin gives you a wide choice of field types. You can collect many kinds of data with these fields. No coding is required.
Here are the supported field types:
- Text
- Textarea
- Number
- Password
- Dropdown (single or multi-select)
- Radio buttons
- Checkboxes (single or multiple)
- Date picker
- Time picker
- File upload
- Color picker
- Google ReCAPTCHA
- VAT (with validation)
- Message display
- Heading
These fields let you collect both simple and complex information. You can build detailed forms using any combination.
Flexible Field Placement
You can choose where to display your fields. This includes:
- WooCommerce Registration page
- Checkout page
- My Account page
You can show the same field on multiple pages. For example, a “Phone Number” field can appear on registration and checkout. Data will stay synced between both pages.
Checkout Field Positioning
On the checkout page, custom fields can be found practically anywhere. The plugin offers 15 pre-defined positions such as:
- Before/after Billing Form
- Before/after Shipping Form
- Before/after Customer Details
- Before/after Order Review
- Before/after Order Notes
- Before/after Terms and Conditions
- Before/after Submit Button
This gives you control over your layout. You can place fields exactly where they make the most sense.
Conditional Fields and Logic
You don’t want every field visible all the time. This plugin supports conditional logic. That means a field appears only when it’s needed.
Examples:
- Show “VAT Number” only if “Company” is selected
- Display “Delivery Notes” only for physical products
You can set rules based on:
- Field selections
- User roles
- Cart contents (products, categories, or tags)
This makes your forms cleaner and more user-friendly.
Field Visibility by User Role
Different users see different things. That’s how it should be. Fields can be shown or hidden according to user roles with this plugin.
Example use cases:
- Show VAT field to B2B users only
- Hide phone number for guest users
You can also add a user role dropdown on the registration form. Let users choose roles like “Retail” or “Wholesale.” Then show specific fields based on that choice.
Field-Based Pricing Options
This plugin lets you add extra charges based on field input. You can:
- Add a fixed amount (e.g., $5 for gift wrap)
- Add a percentage (e.g., 10% for express service)
- Add different prices for each dropdown or checkbox option
This is perfect for paid add-ons or product upgrades.
Assign Fields to Specific Products or Categories
You don’t need to show every field all the time. Fields can only be made to appear when:
- A certain product is in the cart
- A product is added from a particular category.
- The product tag matches
Example:
- Show a “Customization Text” field only when a T-shirt product is selected
This helps keep your checkout page clean and relevant.
Manage Default WooCommerce Fields
WooCommerce comes with standard billing and shipping fields. This plugin allows you to:
- Show/hide default fields
- Rename field labels
- Make fields optional or required
- Control visibility by user roles
You can even show these default fields on the registration form, which WooCommerce doesn’t allow by default.
Field Data Handling
Where does the field data go? The plugin handles that too. Custom field data is displayed in:
- Admin Order Details page
- Order confirmation emails
- Customer’s My Account page
This ensures both store owners and customers see the right data in the right place.


Step-by-Step Setup Process for Custom Fields for WooCommerce Plugin
Setting up the Custom Fields for WooCommerce plugin is quick and easy. To begin, you don’t need to know how to code. Just follow the steps below to install and configure your custom fields.
Step 1: Install and Activate the Plugin
To begin, purchase and download the plugin from WooCommerce.com. Then follow these steps:
- Go to your WordPress Dashboard
- Navigate to Plugins → Add New
- Click Upload Plugin
- Upload the plugin ZIP file
- Click Install Now, then Activate
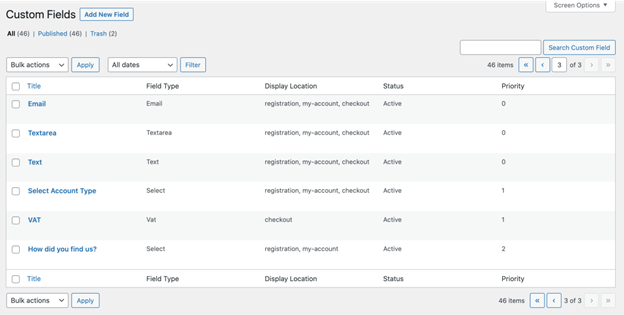
Once activated, a new menu called Custom Fields will appear in your dashboard.
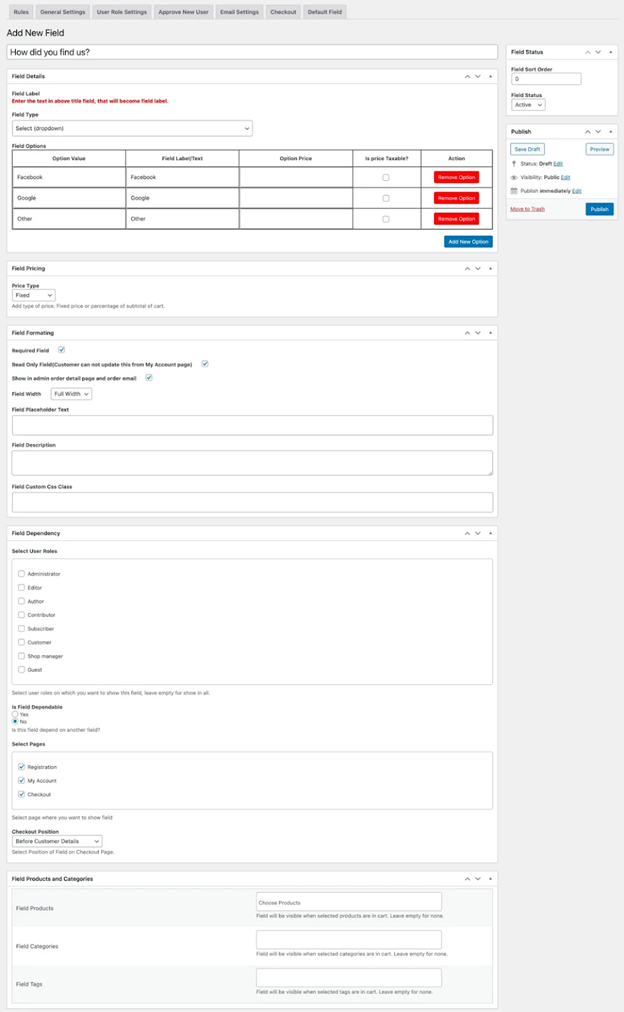
Step 2: Add a New Custom Field
Now it’s time to create your first field.
- Go to Custom Fields → All Fields
- Click on Add New Field
Fill in the following options:
- Field Title – This is what users will see
- Field Type – Choose from text, checkbox, dropdown, etc.
- Placeholder and Description – Add helpful hints for users
- Required – Decide if the field is mandatory
- Editable – You can allow or block edits from the My Account page
- Field Width – Choose full or half-width layout
Additionally, fields can be sorted according to the order you wish them to appear.

Step 3: Choose Where the Field Will Show
You can display each field in multiple locations:
- Registration page
- Checkout page
- My Account page
To specify where you want the field to appear, just check the boxes. For example, show a phone number field on both registration and checkout.
Step 4: Set Conditional Logic (Optional)
You can make a field appear only in certain cases. This is called conditional logic.
Use this to:
- Show extra fields based on a previous selection
- Display fields only for specific user roles
- Display fields when certain items are in the cart.
Example:
- Show “Company Name” only if “Account Type = Business”
These conditions are easy to set with dropdowns inside the field settings.
Step 5: Add Pricing to a Field (Optional)
You can charge users extra based on field input. This is great for upsells or custom requests.
Options include:
- Fixed fee (e.g., $10 gift wrap)
- Percentage fee (e.g., 5% service charge)
- Price per option in dropdown or checkbox fields
Enable this when creating the field under the pricing section.
Step 6: Assign Fields to Specific Products
Want to show a field only when there is a specific item in the cart.? You can do that too.
Inside field settings, select:
- Specific products
- Product categories
- Product tags
The field will only show at checkout if those products are present.
Step 7: Set Up the User Role Dropdown (For B2B)
If your store serves B2B users, enable the user role selection.
Steps:
- Go to Custom Fields → Settings → User Roles
- Enable the dropdown
- Select which roles customers can choose
You can also approve new users manually based on their selected role.
Step 8: Customize Default WooCommerce Fields
You can control default billing and shipping fields too. Go to:
- Custom Fields → Enable Default Fields
Here, you can:
- Rename fields
- Make them optional
- Show/hide fields based on user role
- Add them to the registration form
This helps you personalize the user experience even more.
Step 9: Preview and Test
After saving your field, test it on the front end. Make sure:
- The field appears in the right place
- It works with your rules and conditions
- Data shows in orders, emails, and My Account
Testing helps avoid user confusion or missing data later.
Why This Plugin Stands Out
The Custom Fields for WooCommerce plugin brings powerful flexibility to your store. Whether you run a simple shop or a complex B2B setup, this tool helps you gather the right data, at the right time.
It gives you control over what data is gathered, where it is shown, and who can view it. The plugin also improves customer experience by showing only relevant fields during checkout or registration. This keeps your forms clean, fast, and easy to complete.
Many plugins let you add basic fields. But this one goes beyond that. It combines ease of use with advanced features like conditional logic, pricing fields, and user role controls.
Here’s why it’s a smart investment:
- It works for both B2C and B2B stores
- You can control field visibility based on products or roles
- It adds dynamic pricing to checkout fields
- It improves the flow of customer data across your store
- Setup is easy, and no coding is needed
The plugin is also backed by great support and frequent updates. It works with the latest WooCommerce versions, making it a stable choice for serious store owners.
Conclusion
The Custom Fields for WooCommerce plugin is more than just a form builder. It is an adaptable tool that can help you expand your business. With better control over your fields, you can enhance both your checkout flow and your marketing power.
If you’re looking to simplify customer data collection, improve the shopping experience, or set up advanced B2B workflows — this plugin is the right fit.
Need help setting it up or customizing it further?
Contact WooHelpDesk at +1 888 602 0119 (US & Canada)— our team is ready to assist.
Or explore more helpful guides and WooCommerce solutions at woohelpdesk.com.
We’re here to make your store smarter, faster, and easier to manage.