How to Set Up Auctions for WooCommerce: Full Step-by-Step Guide
Table of Contents
- Introduction & Plugin Overview
- What Is Auctions for WooCommerce?
- Types of Auctions You Can Run
- Best Use Cases for This Plugin
- Why Store Owners Choose It
- Full Feature Breakdown
- Step-by-Step Setup & Configuration
- Advanced Use Cases & Customizations
- Conclusion
Introduction & Plugin Overview
Selling products with a sense of urgency is powerful. Auctions do that by design. With the Auctions for WooCommerce plugin, you can bring live bidding to your WooCommerce store. It’s a great way to add excitement, competition, and value to your products.
This plugin helps you turn any store into a full WooCommerce auction site. Whether you sell rare items, collectibles, or services, auctions create a competitive edge. The plugin works with physical and digital products. It gives store owners full control over how auctions run.
Let’s break down what this plugin offers and how it can help you grow.
What Is Auctions for WooCommerce?
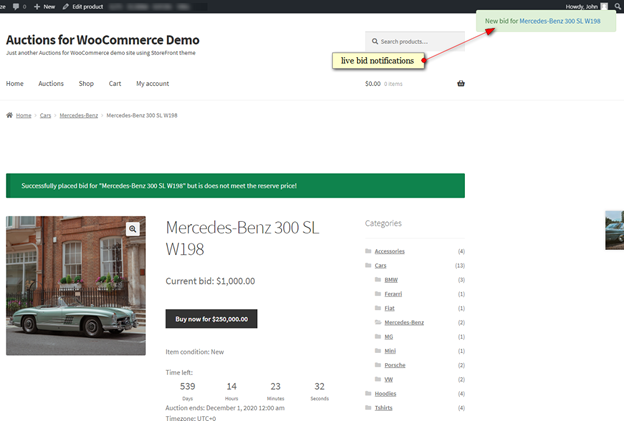
Auctions for WooCommerce is a premium extension that adds auction features to your site. Once installed, it lets you create a new product type called “Auction.” You can sell items using live bids instead of fixed prices. Customers can place bids, get notified if they’re outbid, and win the item.
It works just like eBay, but inside your WooCommerce store. You can run a simple one-time auction or set up a full WooCommerce auction marketplace with vendor plugins.
Types of Auctions You Can Run
This plugin supports multiple auction types. You can choose the one that fits your business best:
- Normal auction – Highest bid wins. Classic auction style.
- Proxy auction – Users set a max bid. The system auto-bids for them.
- Reverse auction – The lowest bid wins. Useful for service jobs.
- Silent auction – Bids are hidden. Users can’t see each other’s offers.
Each auction type has its use case. For example, reverse auctions are great for freelance tasks. Proxy bidding adds fairness and saves user time. You can even enable sealed bids for more privacy.
Best Use Cases for This Plugin
This plugin is perfect for:
- Selling rare or limited-edition products
- Running timed promotions or flash sales
- Hosting charity or fundraising auctions
- Offering custom services to the lowest bidder
- Creating vendor-based auction marketplaces
You can also combine it with plugins like Product Vendors to let others list their own auctions.
Why Store Owners Choose It
Many store owners pick this plugin because:
- It integrates fully with WooCommerce
- It supports all auction types
- It’s flexible and customizable
- It helps increase user engagement and conversions
Whether you want to auction one product or build a full bidding platform, this plugin has you covered.
Full Feature Breakdown
The Auctions for WooCommerce plugin offers powerful tools for store owners. It turns any WooCommerce product into a live auction item. You can control bidding rules, display settings, and notifications. This part explains all the features and how they work together.
Custom Product Type for Auctions
Once installed, the plugin adds a new product type called “Auction.” You can create auction listings just like regular products.
You can also define:
- Starting bid – The minimum amount to begin bidding.
- Bid increment – How much each new bid must increase by.
- Reserve price – The lowest amount you’re willing to accept.
- Buy it now price – A fixed price to skip the auction.
- Start and end time – Set your auction schedule.
- Item condition – Label items as new, used, or custom.
All these settings are easy to manage from the product editor.
Auction Types and Bid Styles
This plugin supports all major auction types. You can select the type that fits your goal.
- Normal Auction – Highest bidder wins when the auction ends.
- Proxy Auction – Users enter a max bid. The system bids for them.
- Reverse Auction – The lowest bidder wins the item.
- Silent Auction – Users submit hidden bids. No one sees current offers.
You can also set auctions to sealed mode, where the current bid is hidden from all users.
Advanced Bidding Features
The plugin adds smart features to improve the bidding experience.
- Anti-sniping – Extends the auction time if someone bids at the last second.
- Variable bid increments – Set fixed or percentage-based bid steps.
- Ajax live updates – Bids and auction history update without refreshing the page.
- Live browser notifications – Alerts when a bid is placed or auction closes.
These features help ensure fairness and increase competition.
Buyer Experience Tools
Buyers get a smooth and interactive experience. The plugin offers:
- Watchlist – Users can follow auctions they’re interested in.
- My Auctions page – A section showing active and past auctions.
- Email notifications – Alerts for outbid notices, wins, reminders, and more.
- Auction badges – Icons for winning bidders and active auctions.
All email templates can be edited to match your store’s branding.
Flexible Display Options
Store owners can choose how and where auctions appear.
You can:
- Show auctions alongside regular products.
- Use a dedicated auction-only page.
- Choose to display past, current, or upcoming auctions.
- Sort auctions by bid amount, date, or buy now price.
- Use a compact or extended countdown timer.
This gives you full control over how users browse and interact with auction items.
Built-in Widgets and Shortcodes
Widgets help you display auctions in sidebars or custom areas. Available widgets include:
- Ending soon auctions
- Recently added auctions
- Future auctions
- Featured auctions
- My watchlist
- My auctions
- Random auctions
- Recently viewed auctions
You can also use shortcodes to place auction content anywhere. For example:
- [ending_soon_auctions] – Shows auctions closing soon
- [featured_auctions] – Displays handpicked auctions
- [my_auctions_activity] – Shows user’s bidding activity
- [past_auctions] – Displays finished auctions
- [auctions_watchlist] – Lists watched auctions
Shortcodes can be used in page builders like Elementor.
Admin Dashboard Tools
Store admins get full control over auctions from the backend.
You can:
- Filter auctions by status (active, finished, failed)
- Delete bids manually
- Relist auctions automatically or on demand
- Create auctions from any product type (simple, virtual, downloadable)
- Track auction history and winning bids
- Use icons to identify auction status in product lists
These tools make auction management smooth and flexible.
Multilingual and Developer Friendly
The plugin supports WPML for multilingual sites. It includes many hooks and filters for developers to extend or customize behavior.
Template files can be overridden safely in your theme. This helps with custom design or layout changes.


Step-by-Step Setup & Configuration
Setting up the Auctions for WooCommerce plugin is simple if you follow the right steps. This part will guide you through everything—from installation to creating your first auction. You don’t need coding skills. Just follow this detailed guide to get started.
- Requirements Before Installation
Before installing the plugin, make sure your site meets the following:
- A working WordPress website
- WooCommerce plugin installed and active
- A theme that supports WooCommerce
- Inventory/stock management enabled in WooCommerce settings
Also, it’s good to back up your site before installing any new plugin.
To enable inventory:
- Go to WooCommerce > Settings > Products > Inventory
- Make sure “Manage stock” is checked
Without this, auctions won’t appear correctly.
- Install the Plugin
There are two ways to install the plugin.
Option 1: Via WordPress Dashboard
- Go to Plugins > Add New
- Click Upload Plugin
- Upload the ZIP file of Auctions for WooCommerce
- Click Install Now and then Activate
Option 2: Via FTP
- Unzip the plugin folder
- Upload it to /wp-content/plugins/
- Go to your WordPress dashboard
- Activate it from the Plugins page
Once activated, you’ll find auction options inside your product settings.


- Check System Status
After activation:
- Go to WooCommerce > Status
- Make sure there are no red warnings
- Pay special attention to memory limits and cron settings
This ensures smooth operation of the plugin and features like notifications.
- Creating Your First Auction Product
Creating an auction is just like adding a regular product.
Follow these steps:
- Go to Products > Add New
- Add product title, description, and images
- Select Auction from the Product Data dropdown
- A new Auction tab will appear
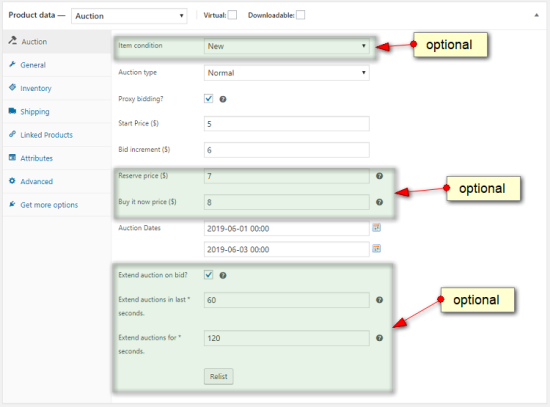

Inside the Auction tab, fill out these fields:
- Start Price – Minimum starting bid
- Bid Increment – Minimum difference between bids
- Reserve Price (optional) – Lowest price you will accept
- Buy Now Price (optional) – Fixed price to skip bidding
- Start Date and Time
- End Date and Time
- Item Condition – New, Used, etc.
- Choose auction type: Normal, Reverse, Proxy, or Silent
- You can also enable Sealed Bid or Auto Relist
Once everything is set, click Publish.
Your product is now live as an auction.
- Set Up Auction Settings
You can control how auctions work across your store.
Go to: WooCommerce > Settings > Auctions
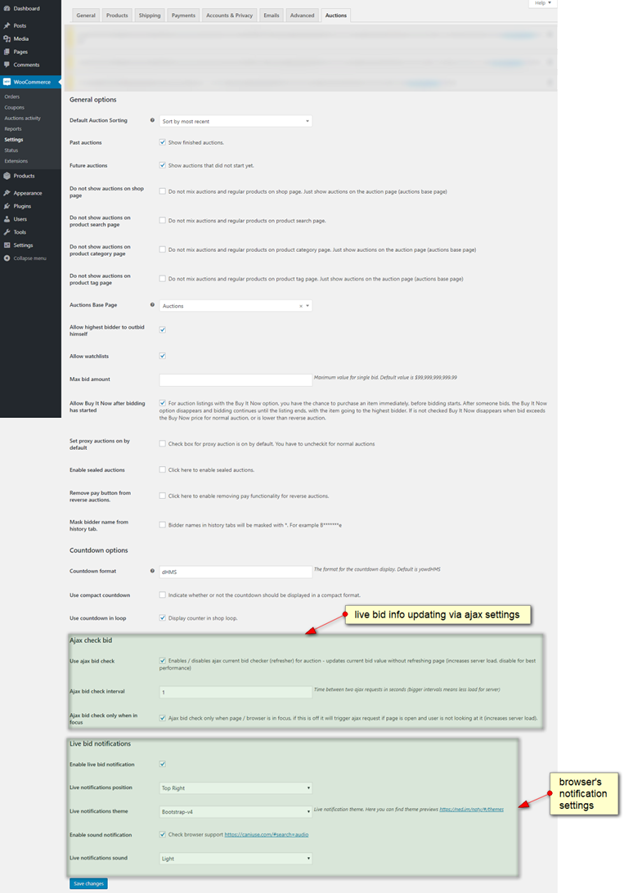
Key settings you can configure:
- Enable separate auction page
- Show/hide past and future auctions
- Enable countdown timer in product loop
- Choose default auction type (Normal, Proxy, etc.)
- Control bidding access (e.g., only users with saved cards)
- Limit auctions to logged-in users
- Enable self-outbidding for highest bidders
These settings give you control over auction visibility and behavior.
- Email Notification Settings
The plugin supports automatic emails for auction events.
Types of notifications include:
- Outbid alert
- Auction won
- Payment reminder
- Auction ending soon
- Auction failed or reserve not met
To manage templates:
- Go to WooCommerce > Settings > Emails
- Look for all auction-related notifications
- Click to customize each template or change recipients
Emails are sent based on cron jobs, which we’ll cover next.
- Setup Cron Jobs (Important)
The plugin uses cron jobs to keep auctions running on time. These scripts handle:
- Finishing auctions
- Sending email alerts
- Relisting unpaid auctions
- Ending soon reminders
You must set at least two cron jobs.
Minimum Required:
- Every minute:
/usr/local/bin/curl silent http://your-domain.com/?auction-cron=check - Once per day:
/usr/local/bin/curl silent http://your-domain.com/?auction-cron=mails
Optional but Recommended:
- Every 30 minutes (ending soon emails):
/usr/local/bin/curl silent http://your-domain.com/?auction-cron=closing-soon-emails - Every hour (auto relist):
/usr/local/bin/curl silent http://your-domain.com/?auction-cron=relist
You can set these using your hosting control panel or ask your host for help.
- Testing the Auction Process
Once setup is done:
- Create a test product with an auction
- Use two test accounts to place bids
- Confirm if emails and browser alerts work
- Try winning the auction and completing payment
Make sure the bidding, notifications, and payment flow are smooth.
Advanced Use Cases & Customizations
The Auctions for WooCommerce plugin is not only powerful—it’s flexible. You can customize it for different business needs, multi-vendor marketplaces, and advanced bidding rules. This part will show how you can take the plugin even further.
Create a Multi-Vendor Auction Marketplace
Want to build an eBay-style site? You can do that. Combine this plugin with a multi-vendor solution like Product Vendors.
With this setup:
- Vendors can create and manage their own auctions
- You can charge a listing fee or sales commission
- Auctions can be organized by vendor or category
This is great for art marketplaces, collectible items, and community selling platforms.
- Copy templates from the plugin folder
- Paste them into your theme’s /woocommerce/ folder
- Edit them without losing changes during updates
You can also create a custom auction archive page using archive-product-auctions.php.
Use Shortcodes in Builders
Shortcodes let you place auction content anywhere. Use them inside Elementor or any visual builder.
Some useful shortcodes:
- [ending_soon_auctions] – Display auctions closing soon
- [auctions_for_woocommerce_my_auctions] – Show user activity
- [past_auctions] – List completed auctions
This helps create custom layouts without coding.
Leverage Hooks and Filters
For developers, the plugin offers many action hooks and filters.
You can:
- Trigger custom code before or after bids
- Add custom messages or logic
- Modify bid behavior or notifications
This is perfect for stores needing unique workflows.
Enable Proxy and Sealed Bidding
You can enable proxy bidding by default. This allows auto-bidding up to a user’s limit.
Also, sealed auctions can be used for privacy. Bidders won’t see each other’s bids.
You can enable both options from the auction settings.
Translate and Localize
The plugin is WPML compatible. You can translate it using .po and .mo files. Place them in the correct folder to keep translations safe after updates.
With these advanced tools, you can build a fully customized, professional auction platform tailored to your market.
Conclusion
The Auctions for WooCommerce plugin offers everything you need to run auctions. It’s flexible, easy to set up, and packed with features. Whether you’re selling one item or building a full marketplace, this plugin is a solid choice.
Need help with your WooCommerce or WordPress website?
Reach out to WooHelpDesk today. Our experts are ready to assist you.
Call us now: 📞 +1 888 602 0119 (US & Canada)
Get fast, friendly, and reliable support when you need it most.
Let WooHelpDesk keep your auction site running smoothly.