How to Set Up and Configure Shipping Options in WooCommerce
Table of Contents
- Introduction
- Understand WooCommerce Shipping Basics Before You Start
- Pre-Setup Checklist to Avoid Shipping Mistakes in WooCommerce
- How to Set Up Shipping Options in WooCommerce With Simple Steps
- Add Shipping Classes in WooCommerce for Different Product Rates
- Quick Testing After Setup to Confirm Shipping Works
- How to Configure Shipping Options in WooCommerce for Better Control
- Configure Local Pickup for a Smooth Checkout Experience
- Configure Shipping Taxes in WooCommerce Without Errors
- Common WooCommerce Shipping Issues and Fixes That Work Fast
- Conclusion
Introduction
Shipping is the first cost customers check before paying online. If shipping looks confusing, many shoppers leave the checkout fast. A clean WooCommerce shipping setup builds trust and reduces cart drops. It also helps you deliver orders on time, every time. Many store owners add products first, then fix shipping later. That approach often creates errors, wrong totals, and angry customers. You should plan shipping early using clear rules and zones. This guide keeps the process simple and easy to follow.
This guide works for new stores and growing stores too. It also helps if you ship to many locations. You can use it for local delivery or national shipping rules. You can also use it for global shipping, if needed.
Understand WooCommerce Shipping Basics Before You Start
WooCommerce shipping works with a simple logic and clear rules. You define where you ship and what you charge there. Then WooCommerce shows the right rate at checkout automatically. When the basics are clear, setup becomes quick and smooth.
Shipping Zones Explained Clearly for Better Checkout Results
WooCommerce shipping zones are areas where you offer specific shipping rules. A zone can be a country, a state, or a city. It can also be a set of pin codes or zip codes. WooCommerce checks the customer address and matches a zone. Zones work like a priority list from top to bottom.
WooCommerce tries the first zone and looks for a match. If it fails, WooCommerce checks the next zone below. This is why zone order matters a lot for accuracy. A simple zone structure makes your shipping easier to manage daily. Most stores use three common zones for clean control. You can follow this basic structure for strong results:
- Local Zone: Your city or nearby service area only.
- Domestic Zone: Your full country with standard shipping rules.
- International Zone: Other countries you choose to support.
If zones are missing or ordered wrong, shipping may not appear. Many stores then see the “no shipping available” message. That issue often comes from a zone mismatch problem. So keep zones clear and ordered with care.
When your zones are correct, your checkout becomes stable. Customers see correct WooCommerce shipping rates without confusion. That also reduces support tickets and refund requests later.
Pre-Setup Checklist to Avoid Shipping Mistakes in WooCommerce
A smooth checkout starts with clean planning and storing data. This checklist prevents missing methods and wrong WooCommerce shipping rates later. Complete these items before changing your WooCommerce shipping settings.
- Confirm your store address is correct in WooCommerce.
- Confirm your shipping origin matches your real dispatch location.
- Decide your shipping coverage for countries, states, and cities.
- Decide if you need zip or pin code based rules.
- Add product weight and dimensions for every shippable product.
- Decide your shipping strategy for speed and simple pricing.
- Choose flat, free, pickup, or carrier based WooCommerce shipping options.
- Decide if rates apply per order or per item.
- Decide if you will charge a handling fee.
- Decide if shipping should be taxable for your store.
- Make two test addresses for every shipping area.
- Disable aggressive cache while testing checkout shipping updates.
This checklist makes your WooCommerce shipping setup easier and safer. It also reduces checkout errors after you go live.
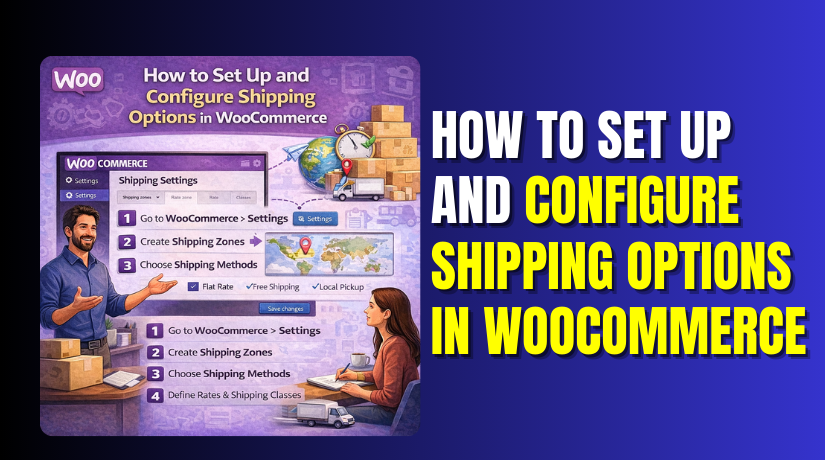
How to Set Up Shipping Options in WooCommerce With Simple Steps
Follow these steps in the same order for a clean WooCommerce shipping setup. Each step helps you avoid missing WooCommerce shipping options at checkout.
Step 1: Open WooCommerce Shipping Settings
- Go to your WordPress dashboard and open WooCommerce menu.
- Click Settings and then open the Shipping tab. If Shipping is missing, enable it from WooCommerce settings first.
Step 2: Set Your Shipping Locations in General Settings
- Go to WooCommerce, Settings, then open the General tab.
- Find “Shipping location(s)” and select where you will ship.
- Choose specific countries for fewer errors and better checkout results. Save changes before moving to the next step.
Step 3: Review Shipping Destination and Calculator Settings
- Now open WooCommerce, Settings, then Shipping, then Shipping options.
- Set “Shipping destination” to customer shipping address for clarity.
- Enable the cart shipping calculator if your store needs it.
- Save changes again for safe WooCommerce shipping settings.
Step 4: Open Shipping Zones and Create Your First Zone
- Go to WooCommerce, Settings, then Shipping, then Shipping zones.
- Click “Add shipping zone” to create your first zone. Name it clearly, like “Local Shipping Zone” for quick management.
Step 5: Add Zone Regions for Accurate Address Matching
- In the zone, choose the region you will ship to.
- Select country, state, or city based on your service area.
- Add postcodes if you need pin or zip based shipping rules. This builds correct WooCommerce shipping zones matching logic.
Step 6: Add Another Zone for Domestic Shipping Coverage
- Click “Add shipping zone” again to create the next zone.
- Name it “Domestic Shipping” for full country coverage.
- Select your entire country or selected states you support. Save the zone to lock the region settings.
Step 7: Add International Zone Only If You Ship Globally
- Create a third zone only if you support international orders.
- Name it “International Shipping” for easy control later.
- Select the countries you ship to and save the zone. Skip this step if you do not ship abroad.
Step 8: Arrange Zones in the Correct Order for Priority
- Go back to the Shipping zones list screen again.
- Drag zones to reorder them from most specific to broad.
- Keep local zones on top and country zones below. This prevents wrong WooCommerce shipping rates at checkout.
Step 9: Confirm Every Zone Has a Shipping Method Added
- Click each zone and check the shipping methods section.
- If no method exists, add at least one option quickly.
- This prevents “no shipping options available” errors later.
Step 10: Run a Quick Test Using Real Addresses
- Add a product to cart and go to the checkout page.
- Test one address for each shipping zone you created.
- Confirm the correct zone and shipping method shows properly. If it fails, recheck zone regions and zone order.
Add Shipping Classes in WooCommerce for Different Product Rates
Shipping classes help you charge different shipping for different products. Use them when heavy or oversized items cost more. This improves profit and keeps WooCommerce shipping rates fair.
Step 1: Create Shipping Classes in WooCommerce
- Go to WooCommerce, Settings, then Shipping, then open Shipping classes.
- Click Add shipping class and enter a class name.
- Use simple names like Heavy, Oversized, or Fragile for easy use. Save each class after adding it.
Step 2: Assign Shipping Classes to Products
- Open Products in your dashboard and edit a product.
- Go to the Shipping section inside product data settings.
- Choose a shipping class from the dropdown and update the product.
- For variable products, open each variation and set shipping class. This ensures mixed carts calculate rates more accurately.
- This step is important for a clean configure WooCommerce shipping workflow.
Step 3: Add Class Costs Inside Flat Rate Shipping
- Go back to WooCommerce shipping zones and open a zone.
- Click Edit on your Flat rate method inside that zone. You will see class cost fields if classes exist.
- Add extra cost for each class based on shipping effort. For example, set Heavy class higher than the Light class.
- Save changes and test with products from different classes. This gives better control over WooCommerce shipping settings.
Quick Testing After Setup to Confirm Shipping Works
Testing confirms your zones and methods work as expected. It also helps you catch mistakes before real customers do. Follow these quick checks without skipping any step.
- Test two addresses for each shipping zone you created.
- Test cart with one item and check shipping shows correctly.
- Test cart with mixed shipping classes for correct rates.
- Test free shipping rule using the required minimum amount.
- Test local pickup selection and confirm it does not disappear.
- Check cart page and checkout page for matching shipping totals.
- If anything looks wrong, check zone order and zone regions first. Then check if methods are added properly inside each zone.
How to Configure Shipping Options in WooCommerce for Better Control
Your zones and methods now work for most checkout cases. This part helps you fine-tune WooCommerce shipping settings for better results. You will improve free shipping rules, pickup flow, and tax handling. You will also learn optional live rates and labels setup basics.
Configure Free Shipping Rules in WooCommerce Like a Pro
Free shipping can boost sales when rules are clear and tested. It should never confuse customers during checkout steps. Use these steps to configure WooCommerce shipping free shipping correctly.
Step 1: Confirm Free Shipping Method Exists in the Right Zone
- Go to WooCommerce, Settings, then Shipping, then Shipping zones.
- Open the zone where you want free shipping available.
- Check the Shipping methods list for Free shipping option. If it is missing, click Add shipping method and add it.
Step 2: Set a Clear Free Shipping Requirement
- Click Edit under the Free shipping method in that zone.
- Choose a requirement that matches your sales goal.
- Use “Minimum order amount” for easy customer understanding. Use “A valid free shipping coupon” for controlled promotions.
Step 3: Set the Minimum Amount and Save Changes


- If you choose minimum amount, enter a clean target number.
- Pick a number that supports your average shipping costs.
- Save changes and test at checkout with real cart totals.
Step 4: Keep Flat Rate as a Backup Method
- Always keep a backup method like Flat rate below free shipping.
- This helps when the free shipping rule is not met.
- Customers still see valid WooCommerce shipping options at checkout.
Step 5: Use Clean Names to Reduce Checkout Confusion
- Rename methods using simple titles customers understand quickly.
- Use “Standard Shipping” for flat rate and “Free Shipping” clearly.
- Clear naming improves trust and reduces support questions.
Best Practice When Free Shipping and Flat Rate Both Appear
If both show, customers may pick the wrong option sometimes. Keep free shipping listed above flat rate for visibility. Keep the flat rate cost reasonable to avoid angry reactions later. Always test the zone using two different cart totals.
Configure Local Pickup for a Smooth Checkout Experience
Local pickup is great for local orders and quick fulfillment. It should show only where pickup makes real sense. Follow these steps for a clean WooCommerce shipping setup pickup flow.
Step 1: Add Local Pickup to the Correct Shipping Zone
- Go to your Shipping zones list and open the local zone.
- Click Add shipping method and choose Local pickup option. Save the method and click Edit for pickup settings.
Step 2: Set Pickup Cost and Tax Status Carefully
- Keep pickup free if you want faster customer decisions.
- Add a pickup fee only when it covers real handling costs.
- Choose taxable status based on your local tax requirements. Save changes after updating these fields.
Step 3: Rename Pickup Title for Clear Customer Action
- Change the title to “Pickup From Store” or “Local Pickup”.
- Avoid unclear names like “Method 1” or “Pickup Option”. Clear titles reduce checkout mistakes and order notes confusion.
Step 4: Control Where Pickup Appears Using Zones
- Do not add pickup inside your nationwide shipping zone.
- Keep it only inside the local zone for correct targeting. This keeps WooCommerce shipping methods clean and more reliable.
Step 5: Add Clear Pickup Instructions on the Checkout Page
- Add pickup instructions using your checkout notes or order emails.
- Mention pickup address, pickup hours, and contact details.
- Customers should know the next step after placing orders.
Configure Shipping Taxes in WooCommerce Without Errors
Shipping tax rules vary based on your country and tax laws. WooCommerce can handle shipping taxes when settings are correct. Follow these steps to keep totals accurate and stable.
Step 1: Confirm Taxes Are Enabled in WooCommerce
- Go to WooCommerce, Settings, then General, and enable taxes.
- Save changes and open the Tax tab if it appears. If you do not need tax, keep this disabled.
Step 2: Decide Whether Shipping Should Be Taxable
- Many stores apply tax to shipping in some locations.
- Some stores do not tax shipping at all. Check your business rules before enabling shipping tax.
Step 3: Set Shipping Tax Class Inside Shipping Methods
- Open each shipping method and check its tax status.
- Flat rate often has a taxable toggle and tax class option. Choose the correct tax class used for your store.
Step 4: Test Tax and Shipping Together on Checkout
- Add a test product to cart and open the checkout page.
- Use a test address where tax should apply correctly.
- Confirm shipping totals and tax totals look correct. Repeat test for a non-tax location if needed.
Common WooCommerce Shipping Issues and Fixes That Work Fast
Shipping issues often come from zone mismatch or missing method setup. Fixing them becomes easy with a simple checklist approach. Use these fixes when WooCommerce shipping options behave oddly.
Issue 1: “No Shipping Options Were Found” at Checkout
This error usually means the customer address matched no zone. It can also mean a zone has no method added.
- Check the customer country, state, and postcode values first.
- Confirm a matching zone exists for that address range.
- Confirm at least one method exists inside that matched zone.
- Move the most specific zone above the broader zones list.
- Save changes and test again using the same address.
Issue 2: Shipping Cost Looks Wrong or Too Expensive
Wrong totals often happen due to per item costs stacking. Class costs can also stack when mixed carts exist.
- Open Flat rate settings and confirm pricing type logic.
- Check if your flat rate is charging per item unintentionally.
- Review shipping class costs and remove unneeded extra costs.
- Confirm product weights and classes are assigned correctly.
- Test a single item cart and then a mixed cart again.
Issue 3: Free Shipping Not Showing When It Should
Free shipping fails when the rule is not met properly. It can also fail due to wrong zone selection.
- Confirm cart total meets the minimum amount requirement.
- Confirm the coupon rule is correct if using the coupon requirement.
- Confirm the Free shipping method exists inside that matched zone.
- Confirm tax settings are not changing totals unexpectedly.
- Clear cache and retest checkout totals after changes.
Issue 4: Local Pickup Missing on Checkout Page
Pickup usually disappears due to wrong zone placement. Theme or checkout tools can also hide methods.
- Confirm Local pickup is added inside the local shipping zone.
- Confirm the customer address matches that local zone region.
- Disable checkout custom plugins and test shipping again.
- Switch to a default theme for quick conflict testing.
- Re-enable plugins one by one to find the conflict.
Issue 5: Shipping Not Updating When Address Changes
This often happens due to caching or script conflicts. It can also happen due to blocked checkout refresh requests.
- Disable cache plugins and minify tools during testing.
- Exclude cart and checkout pages from caching permanently.
- Confirm your theme supports WooCommerce checkout correctly.
- Update WooCommerce and your theme to stable versions.
- Test again using incognito browser for clean results.
Issue 6: ZIP or Postcode Errors During Checkout
Postcode problems happen due to strict formats or wrong rules. Some zones also use postcode lists that block valid users.
- Check customer postcode format matches selected country format.
- Remove overly strict postcode rules from shipping zone settings.
- Confirm the customer country and state match the zone region.
- Test using a known valid postcode for that area.
- Save changes and retest checkout from a clean browser.
Conclusion
A clean WooCommerce shipping setup keeps your checkout smooth and reliable. Start by creating clear WooCommerce shipping zones for each service area. Add the right WooCommerce shipping methods inside every zone. Set simple WooCommerce shipping rates customers can understand fast. Use shipping classes only when products need different pricing.
Always test shipping with real addresses before going live. Recheck your WooCommerce shipping settings after any plugin or theme update. If you want a stress-free way to configure WooCommerce shipping, WooHelpDesk can handle it for you.