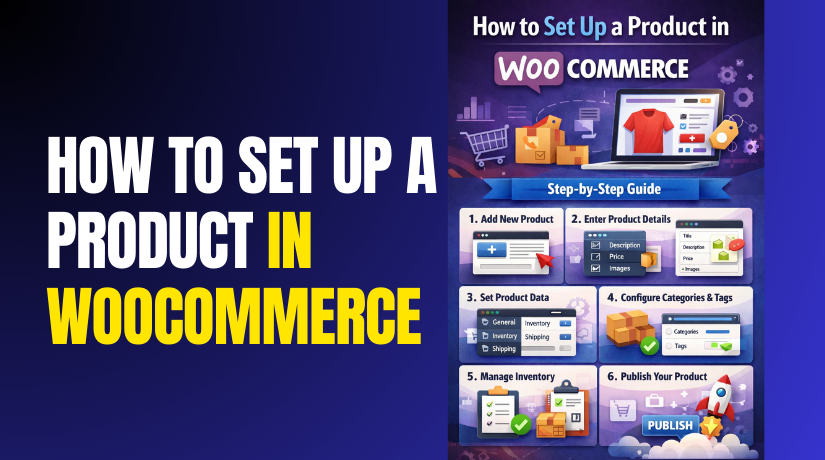
How to Set Up a Product in WooCommerce Step by Step?
Table of Contents
- Introduction
- What Are the Types of Products in WooCommerce?
- What Information is Needed to Include when Adding a Product in WooCommerce?
- SEO Fields and URL Slug Optimization
- What Are Common Mistakes to Avoid During WooCommerce Product Setup?
- How to Set Up Different Types of Product in WooCommerce Step by Step?
- Final Verdict
Introduction
Setting up products correctly is essential for every WooCommerce online store. Products control pricing, inventory, checkout behavior, and overall customer experience. Many beginners struggle while trying to add products in WooCommerce properly. Incorrect setup often causes pricing errors and checkout confusion issues. A clear WooCommerce product setup guide prevents common store mistakes early. This guide explains how to set up products in WooCommerce step by step. It focuses on accuracy, structure, and long term store growth. Learning the basics first helps create WooCommerce products correctly.
WooCommerce is flexible but requires proper understanding before product creation. Each product type behaves differently during checkout and inventory handling. Choosing the wrong product type affects pricing and customer expectations. Many stores face issues due to rushed product configuration decisions. A structured WooCommerce product tutorial helps avoid these problems. Understanding product fundamentals improves store performance and customer trust.
This guide is written for beginners and growing WooCommerce store owners. It explains product types, required information, and setup logic clearly. Each section builds knowledge before advanced configuration steps. This method supports scalable and professional WooCommerce store development.
What Are the Types of Products in WooCommerce?
WooCommerce offers multiple product types for different selling needs. Each product type controls pricing, inventory, and checkout behavior. Choosing the correct type is essential for proper store functionality. Using the wrong type often causes customer confusion and order issues. Understanding product types is the foundation of any WooCommerce product setup guide.
WooCommerce product types are designed for flexibility and scalability. They support physical goods, digital items, and service based offerings. Store owners can mix different product types in one store. This flexibility makes WooCommerce suitable for many business models. Knowing when to use each type improves store performance.
1. Simple Product in WooCommerce
A simple product is the most commonly used WooCommerce product type. It represents a single product with no variations. Pricing and inventory are managed from one place. This product type works best for straightforward items.
Simple products are ideal for physical goods with fixed pricing. They are also suitable for digital products without variations. Beginners often start with simple products during store setup. This makes it easier to add products in WooCommerce confidently. Simple products support stock management, shipping, and tax settings easily.
2. Variable Product in WooCommerce
A variable product allows multiple variations under one product listing. Each variation can have its own price and stock. Common variations include size, color, or material options. This product type improves catalog organization and user experience.
Variable products are useful for products with multiple options. Customers can choose variations before adding items to cart. Each variation behaves like a separate product internally. Proper setup prevents pricing and stock errors. This makes variable products important in a WooCommerce product tutorial.
3. Grouped Product in WooCommerce
A grouped product combines multiple simple products together. It does not have its own price or stock. Instead, it displays related products on one page. Customers can buy items individually from the group.
Grouped products are useful for product bundles without forced purchase. They work well for collections or related items. This product type helps increase cross selling opportunities. It also improves product discovery within your store. Grouped products support better catalog navigation.
4. External or Affiliate Product in WooCommerce
An external product links to another website for purchase. It does not use WooCommerce checkout or cart system. Clicking the button redirects customers to an external URL. This product type is useful for affiliate marketing.
External products are commonly used for affiliate stores. They allow promotion of third party products easily. Pricing and inventory are managed outside WooCommerce. This keeps the store lightweight and focused on referrals. External products help monetize content driven websites.
5. Downloadable Product in WooCommerce
A downloadable product delivers digital files after purchase. It does not require shipping or physical handling. Customers receive access to files after payment completion. This product type is often combined with simple products.
Downloadable products work well for ebooks, software, and media files. WooCommerce manages file access and download limits. This protects digital content from unauthorized sharing. It is an essential option when you create WooCommerce products for digital sales. Proper setup ensures secure delivery.
6. Virtual Product in WooCommerce
A virtual product does not require shipping. It is commonly used for services or memberships. Shipping options are automatically disabled for these products. This simplifies checkout for customers.
Virtual products are ideal for consulting, subscriptions, and appointments. They reduce checkout friction by removing shipping fields. This improves conversion rates significantly. Virtual products are often used alongside downloadable products. This makes them useful for service based stores.
What Information is Needed to Include when Adding a Product in WooCommerce?
To set up a product in WooCommerce correctly, you need complete product details. Missing information often causes customer confusion and lower conversion rates. A strong WooCommerce product setup guide always starts with clear product data. Each field supports pricing accuracy, SEO visibility, and smooth checkout behavior. Use this WooCommerce product tutorial checklist before you publish any product.
- Product Name and Product Title
- The product name is the first thing customers notice in your store.
- It should be clear, specific, and easy to understand quickly.
- Include important attributes like size, color, or model when needed.
- Avoid keyword stuffing because it looks unnatural and spammy.
- A strong title helps customers and improves search visibility.
- A good title supports the WooCommerce product tutorial structure properly.
- It also helps when users search for your product online.
- Keep product titles consistent across categories and similar products.
- This improves store navigation and product comparison.
- Product Description and Short Description
- The main description explains features, usage, and benefits in detail.
- The short description gives a quick summary near the buy button.
- Both sections help customers decide faster and with confidence.
- Use simple language and focus on real buyer questions.
- A complete description improves trust and reduces return requests.
- Descriptions also help SEO performance for your product pages.
- Use keywords naturally like create WooCommerce products and add products in WooCommerce.
- Include specifications, compatibility notes, and care instructions when relevant.
- This makes the page informative and easy to scan
- Product Images and Product Gallery
- Images are essential for product trust and purchase decisions.
- Add a clear featured image with good lighting and sharp focus.
- Use a gallery for multiple angles, close ups, and usage shots.
- Avoid large image sizes that slow down page loading.
- Optimized images improve performance and shopping experience.
- Use consistent image dimensions for a professional catalog appearance.
- Add alt text to images for accessibility and SEO improvement.
- Good images reduce pre-sale questions and increase conversions.
- This is a critical step in any WooCommerce product setup guide.
- Product Price and Sale Price
- Pricing must be accurate and easy to understand instantly.
- Enter the regular price and add sale price only when needed.
- Ensure discounts look realistic and match your marketing strategy.
- Incorrect pricing causes checkout disputes and customer dissatisfaction.
- Always double check currency and decimal settings.
- Use scheduled sales for limited time promotions when suitable.
- Show savings clearly without confusing customers during checkout.
- Pricing accuracy improves trust and reduces refund requests.
- This is essential when you set up a product in WooCommerce correctly.
- Inventory and Stock Management
- Inventory settings control whether products appear in stock or not.
- Enable stock management if you track quantities and backorders.
- Set stock quantity, stock status, and low stock notifications carefully.
- This prevents overselling and reduces canceled orders.
- Inventory settings improve operational control and customer trust.
- Use SKU values to organize products for tracking and fulfillment.
- SKUs help identify products quickly during order processing.
- Consistent SKUs are important for large catalogs and reporting.
- This is a key part of a WooCommerce product tutorial.
- Shipping Details for Physical Products
- Shipping details apply to non virtual physical products.
- Add weight and dimensions if your shipping rates depend on size.
- Set a shipping class if you use special shipping rules.
- Correct shipping settings prevent wrong shipping charges at checkout.
- They also support accurate delivery estimates for customers.
- Use clear shipping policies and expected delivery timelines.
- Incorrect shipping setup causes cart abandonment and support requests.
- Always test checkout with real shipping addresses.
- This ensures your WooCommerce product setup guide steps work properly.
- Product Categories and Product Tags
- Categories help organize your store and improve browsing experience.
- Choose one main category and add subcategories when needed.
- Tags help users filter products and improve internal search accuracy.
- Use categories and tags consistently across your entire catalog.
- Good structure helps SEO and navigation.
- Categories also affect breadcrumbs and internal linking across pages.
- Better internal linking supports ranking and user experience.
- Avoid adding too many tags without clear purpose.
- Keep tags relevant and useful for filtering.
- Product Attributes and Variations Data
- Attributes define features like size, color, and material options.
- They are used for filtering and variable product creation.
- Add attributes carefully because they affect variation setup later.
- Good attribute planning saves time and avoids rework.
- This step is essential for a WooCommerce product setup guide.
- Use global attributes for consistent filtering across products.
- Use custom attributes for product specific details when needed.
- Clean attributes improve product filters and search results.
- They also support better customer decision making.
- Product Type Selection and Visibility Settings
- Selecting the correct product type is essential before publishing.
- Choose simple, variable, grouped, or external based on your needs.
- Set catalog visibility to control where products appear.
- Enable featured product options for promoted listings and campaigns.
- Proper visibility settings improve store layout and conversion performance.
- Also review product status before publishing live.
- Use draft status while building your product details.
- Preview product pages before making them public.
- This reduces mistakes when you add products in WooCommerce.
SEO Fields and URL Slug Optimization
- SEO fields help product pages rank better in search engines.
- Use a clean URL slug that matches product intent.
- Add meta titles and descriptions using short clear wording.
- Use keywords naturally like WooCommerce product tutorial and create WooCommerce products.
- Good SEO setup improves product visibility and organic traffic.
- Add schema and structured data through SEO plugins when needed.
- Ensure product pages have unique content to avoid duplicates.
- Use internal links to related products and categories.
- SEO improvements help long term growth and sales.
What Are Common Mistakes to Avoid During WooCommerce Product Setup?
- Rushing product configuration without proper review
Many errors occur due to rushed product configuration. Skipping checks causes pricing and display issues. Always review all product fields carefully. - Publishing products without testing checkout behavior
Avoid publishing products without testing checkout behavior. Untested products may fail during purchase. Testing ensures smooth order completion. - Not previewing product pages before going live
Always preview product pages before making them live. Previewing helps catch layout and content errors. This prevents poor customer experience. - Mixing incorrect product types
Do not mix product types incorrectly during setup. Wrong product types cause checkout and inventory issues. Always match product type with selling intent. - Incorrect pricing and stock configuration
Ensure pricing and stock settings match product intent. Incorrect values cause customer confusion and refund requests. Double check prices and quantities. - Skipping testing after setup completion
Testing prevents customer complaints and refund issues. Always test cart, checkout, and order confirmation. Proper testing improves store reliability.
How to Set Up Different Types of Product in WooCommerce Step by Step?
WooCommerce allows setting up different product types using structured steps. Each product type has unique configuration requirements. Following correct steps prevents pricing and checkout related issues. This WooCommerce product setup guide explains each type clearly. Use these steps to create WooCommerce products accurately.
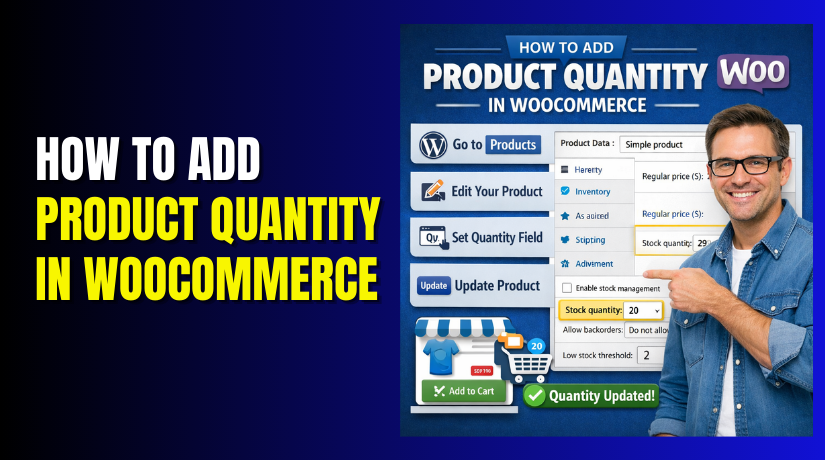
1. How to Set Up a Simple Product in WooCommerce?
A simple product is used for single items without variations. It is the easiest product type to configure. Use these steps to add products in WooCommerce correctly. This WooCommerce product tutorial follows a clean setup workflow.
Step 1: Open the Add Product Screen
- Dashboard → Products → Add New
- This is where you start the WooCommerce product setup guide process.
- You will create WooCommerce product data from this editor screen.
Step 2: Add Product Name and Descriptions
- Add New Product → Product Name Field → Enter Title
- Write a clear product name that matches the item being sold.
- Use specific words so customers understand the product quickly.
- Add New Product → Product Description → Enter Details
- Add the full description with features, usage, and key benefits.
- This helps customers decide faster and reduces support questions.
- Add New Product → Product Short Description → Add Summary
- Write a short summary near the add to cart button area.
- This improves clarity and helps increase conversion rates.
Step 3: Select Simple Product Type
- Product Data → Dropdown → Select “Simple Product”
- This selection tells WooCommerce you need one product without variations.
- It keeps setup simple and prevents variation settings from appearing.
Step 4: Set Pricing for the Product
- Product Data → General → Regular Price
- Enter the normal selling price carefully and check currency format.
- This price will display as the main product price.
- Product Data → General → Sale Price
- Add sale price only when you are running discounts.
- Use sale pricing to improve sales without confusing customers.
Step 5: Configure Inventory and Stock Settings
- Product Data → Inventory → SKU
- Add SKU to help identify products during order handling.
- SKU improves catalog management for growing WooCommerce stores.
- Product Data → Inventory → Manage Stock
- Enable stock management if you track quantities for this product.
- This prevents overselling and avoids customer order issues.
- Product Data → Inventory → Stock Quantity
- Add stock quantity based on actual available items.
- Low stock alerts help you restock before selling out.
Step 6: Add Product Images and Gallery
- Product Image → Set Product Image → Upload Image
- Upload a clear featured image with good lighting and sharp focus.
- This image appears in product lists and search results.
- Product Gallery → Add Product Gallery Images → Upload
- Add multiple angles to help customers understand the product better.
- Gallery images reduce returns and improve customer trust.
Step 7: Add Categories and Tags
- Product Categories → Select Category → Add New Category
- Choose the correct category to keep store navigation organized.
- Categories help customers browse products faster.
- Product Tags → Add Tags → Save Tags
- Add relevant tags for filtering and internal store search.
- Avoid too many tags because it reduces tag usefulness.
Step 8: Review and Publish the Product
- Preview → Check Product Page Layout
- Review how price, images, and description appear on the frontend.
- Fix layout issues before publishing the product publicly.
- Publish → Click Publish Button
- Publishing makes the product live and available for purchase.
- This completes the process to set up product WooCommerce correctly.
2. How to Set Up a Downloadable Product in WooCommerce?
Downloadable products deliver digital files after successful payment. Shipping is not required for these products. Follow the steps below to create WooCommerce products for downloads correctly.
Step 1: Open the Add Product Page
- Dashboard → Products → Add New
- This page is used to add products in WooCommerce.
- All downloadable product details are entered here.
Step 2: Add Product Name and Descriptions
- Add New Product → Product Name Field → Enter Title
- Enter a clear name that explains the digital product.
- This helps customers understand what they will receive.
- Add New Product → Product Description → Enter Details
- Explain file content, format, and usage instructions clearly.
- This reduces confusion after purchase.
- Add New Product → Product Short Description → Add Summary
- Add a short summary near the add to cart button.
- This improves buyer confidence and conversion rates.
Step 3: Select Simple and Downloadable Product Type
- Product Data → Product Type Dropdown → Select Simple Product
- A simple product is required for downloadable items.
- Product Data → Checkboxes → Enable Downloadable
- Enabling downloadable removes shipping options automatically.
- This tells WooCommerce the product delivers files digitally.
Step 4: Upload the Downloadable File
- Product Data → Downloadable Files → Add File
- Upload the digital file securely from your computer.
- You can upload PDFs, ZIP files, or software packages.
- Downloadable Files → File Name → Enter Label
- Add a clear file name customers can recognize easily.
- This improves download clarity after purchase.
Step 5: Configure Download Limits and Expiry
- Product Data → Download Limit → Set Number
- Limit how many times customers can download the file.
- This protects your digital content from misuse.
- Product Data → Download Expiry → Set Days
- Set expiry if you want limited time access.
- Leave blank if downloads should never expire.
Step 6: Set Pricing for the Downloadable Product
- Product Data → General → Regular Price
- Enter the selling price for your digital product.
- Ensure pricing matches perceived value of the content.
- Product Data → General → Sale Price
- Add sale price only if offering discounts.
- Scheduled sales can boost limited time promotions.
Step 7: Add Product Image and Categories
- Product Image → Set Product Image → Upload
- Upload a cover image representing the digital product.
- Good visuals increase trust for downloadable items.
- Product Categories → Select Category
- Assign the product to a digital or downloads category.
- Categories improve store organization and browsing.
Step 8: Review and Publish the Downloadable Product
- Preview → Check Download Settings
- Verify file access, pricing, and descriptions carefully.
- Test checkout to confirm downloads unlock after payment.
- Publish → Click Publish Button
- Publishing makes the downloadable product live.
- Customers can now purchase and download files.
3. How to Set Up a Virtual Product in WooCommerce?
Virtual products are services without physical delivery. Shipping fields are removed automatically. Follow these steps to add products in WooCommerce as a virtual service correctly.


Step 1: Open the Add Product Screen
- Dashboard → Products → Add New
- This screen is used to create WooCommerce product entries.
- All virtual product details are added from this page.
Step 2: Add Product Name and Descriptions
- Add New Product → Product Name → Enter Title
- Write a clear service name describing what customers will receive.
- Clear naming helps customers understand the service quickly.
- Add New Product → Product Description → Enter Details
- Explain the service scope, duration, and delivery method clearly.
- This reduces confusion and support questions after purchase.
- Add New Product → Short Description → Add Summary
- Add a short summary near the buy button.
- This helps customers make faster purchase decisions.
Step 3: Select Simple and Virtual Product Type
- Product Data → Product Type Dropdown → Select Simple Product
- Simple products are required for most virtual services.
- Product Data → Checkboxes → Enable Virtual
- Enabling virtual removes shipping options automatically.
- This tells WooCommerce no physical delivery is required.
Step 4: Set Pricing for the Virtual Product
- Product Data → General → Regular Price
- Enter the service price carefully.
- Ensure pricing matches service value and duration.
- Product Data → General → Sale Price
- Add sale price only if running promotions.
- Optional discounts can increase conversions.
Step 5: Configure Inventory Settings if Needed
- Product Data → Inventory → Manage Stock
- Disable stock management if service availability is unlimited.
- This avoids unnecessary out of stock issues.
- Product Data → Inventory → Stock Status
- Set status to In Stock for active services.
- This keeps the service purchasable at all times.
Step 6: Add Categories and Tags
- Product Categories → Select Category
- Choose a service related category for better navigation.
- Categories help customers find services easily.
- Product Tags → Add Relevant Tags
- Add tags related to service type or audience.
- Tags improve filtering and internal search results.
Step 7: Review Checkout Behavior and Publish
- Preview → Check Checkout Fields
- Confirm shipping fields are removed during checkout.
- Ensure service description and pricing display correctly.
- Publish → Click Publish Button
- Publishing makes the virtual product live.
- Customers can now purchase the service.
4. How to Set Up a Variable Product in WooCommerce
Variable products support multiple options like size or color. Each variation has its own price and stock. Follow these steps carefully to create WooCommerce product variations correctly.
Step 1: Open the Add Product Screen
- Dashboard → Products → Add New
- This screen is used to add products in WooCommerce.
- Variable product setup always starts from this page.
Step 2: Add Product Name and Descriptions
- Add New Product → Product Name → Enter Title
- Enter a clear product name covering all variations.
- Example names include size or color ranges.
- Add New Product → Product Description → Enter Details
- Explain product features common to all variations.
- Avoid variation specific pricing in the main description.
- Add New Product → Short Description → Add Summary
- Add a short overview near the add to cart button.
- This helps customers understand available options quickly.
Step 3: Select Variable Product Type
- Product Data → Product Type Dropdown → Select Variable Product
- This selection enables Attributes and Variations tabs.
- WooCommerce now treats this as a variable product.
Step 4: Add Attributes for Variations
- Product Data → Attributes → Add New Attribute
- Add attributes like Size, Color, or Material.
- Enter values separated by vertical bars.
- Attributes → Enable “Used for Variations” → Save Attributes
- This step allows attributes to create variations.
- Saving attributes is required before moving forward.
Step 5: Create Product Variations
- Product Data → Variations → Create Variations
- Choose “Create variations from all attributes.”
- WooCommerce generates all possible variation combinations.
- Variations → Expand Each Variation
- Each variation behaves like a separate product.
- Configure each variation individually.
Step 6: Set Price, Stock, and Image for Variations
- Variations → Regular Price → Enter Price
- Add pricing for each variation separately.
- Prices can differ based on the option selected.
- Variations → Inventory → Manage Stock
- Set stock quantity for each variation if needed.
- This prevents overselling specific options.
- Variations → Image → Upload Variation Image
- Add images matching each variation option.
- This improves visual clarity for customers.
Step 7: Review Variation Selection and Publish
- Preview → Select Variations → Test Add to Cart
- Confirm variation dropdowns work correctly.
- Check pricing and stock updates properly.
- Publish → Click Publish Button
- Publishing makes the variable product live.
- Customers can now choose options before purchase.
5. How to Set Up a Grouped Product in WooCommerce?
Grouped products display multiple related products together. Each item is purchased separately. Follow these steps to add products in WooCommerce as a grouped product correctly.
Step 1: Open the Add Product Screen
- Dashboard → Products → Add New
- This screen is used to create WooCommerce product entries.
- Grouped product setup always starts from this page.
Step 2: Add Product Name and Short Description
- Add New Product → Product Name → Enter Title
- Enter a name that represents the group clearly.
- Use words that explain the relationship between products.
- Add New Product → Short Description → Add Summary
- Explain why these products are grouped together.
- This helps customers understand the grouped product purpose.
Step 3: Select Grouped Product Type
- Product Data → Product Type Dropdown → Select Grouped Product
- Selecting grouped products disables pricing and stock fields.
- WooCommerce treats this product as a container only.
Step 4: Leave Price and Inventory Fields Empty
- Product Data → General → Skip Price Fields
- Grouped products do not have their own price.
- Each linked product controls its own pricing.
- Product Data → Inventory → Skip Stock Settings
- Inventory is managed individually for each linked product.
- This prevents stock conflicts during checkout.
Step 5: Link Existing Simple Products
- Product Data → Linked Products → Grouped Products
- Search and select existing simple products to include.
- Only simple products can be added to a grouped product.
- Linked Products → Add Multiple Products
- Add all related items that belong in the group.
- The order selected controls the frontend display order.
Step 6: Add Product Image and Categories
- Product Image → Set Product Image → Upload
- Upload an image representing the full product group.
- This improves visual appeal on category pages.
- Product Categories → Select Category
- Assign category based on product group type.
- Categories help customers find grouped products easily.
Step 7: Review Layout and Publish the Product
- Preview → Check Grouped Product Layout
- Confirm linked products display correctly on frontend.
- Ensure add to cart buttons appear for each item.
- Publish → Click Publish Button
- Publishing makes the grouped product live.
- Customers can now purchase items individually.
6. How to Set Up an External or Affiliate Product in WooCommerce
External products redirect customers to another website for purchase. WooCommerce checkout is not used. Follow these steps to add a product in WooCommerce as an affiliate product correctly.
Step 1: Open the Add Product Screen
- Dashboard → Products → Add New
- This screen is used to create WooCommerce product listings.
- External product setup always starts from this page.
Step 2: Add Product Name and Descriptions
- Add New Product → Product Name → Enter Title
- Enter a clear product name matching the external product.
- Use simple wording so customers understand what is offered.
- Add New Product → Product Description → Enter Details
- Describe product features, benefits, and use cases clearly.
- Mention that purchase happens on an external website.
- Add New Product → Short Description → Add Summary
- Add a short summary near the action button.
- This helps customers decide before clicking external links.
Step 3: Select External Product Type
- Product Data → Product Type Dropdown → Select External Product
- This option disables WooCommerce cart and checkout.
- WooCommerce treats this product as a redirect link.
Step 4: Add External Product URL
- Product Data → External Product URL → Enter Link
- Paste the affiliate or external product purchase URL.
- Ensure the link opens correctly in a new browser tab.
- Product Data → Button Text → Enter Label
- Use button text like Buy Now or View Product.
- Clear button text improves click through rates.
Step 5: Set Display Price for Reference
- Product Data → General → Price Field
- Enter price only for display reference.
- Actual payment happens on the external website.
- Product Data → Sale Price → Optional
- Add sale price only if you want to show discounts.
- Pricing here does not affect checkout processing.
Step 6: Add Product Image and Categories
- Product Image → Set Product Image → Upload
- Upload a high quality image representing the product.
- Images improve trust and click engagement.
- Product Categories → Select Category
- Assign product to appropriate affiliate category.
- Categories help organize content driven stores.
Step 7: Test Redirection and Publish
- Preview → Click External Button
- Test redirection to confirm correct destination page.
- Ensure the button opens the external website properly.
- Publish → Click Publish Button
- Publishing makes the affiliate product live.
- Customers can now visit external product pages.
Final Verdict
Setting up products correctly is essential for a successful WooCommerce store. Proper configuration improves pricing accuracy, checkout flow, and customer trust. Many issues arise when store owners skip structured setup steps. This WooCommerce product setup guide helps avoid those common mistakes. Following correct steps makes store management easier long term.
WooCommerce supports multiple product types for different business needs. Simple products work best for fixed price physical or digital items. Downloadable and virtual products remove shipping steps and speed checkout. Variable products improve customer choice with multiple options. Grouped and external products support cross selling and affiliate strategies. Choosing the correct type is critical for store performance.
Using a step by step WooCommerce product tutorial saves time. It reduces errors related to pricing, stock, and checkout behavior. Clear product information improves SEO and user experience together. Always test products before publishing them live. A structured approach helps you create WooCommerce products confidently. This method supports growth, scalability, and long term store success.
Have questions before starting with WooCommerce & WordPress? Get support here at WooHelpDesk.