How to Manually Install WooCommerce Extensions (Step-by-Step Guide)
Table of Contents
- Introduction
- What Are WooCommerce Extensions?
- Role of WooCommerce Extensions and Why Many Stores Need Them
- Install WooCommerce Extensions Manually: Step-by-Step Beginner Guide
- Important Things to Keep in Mind Before and After Manual Installation
- Conclusion
Introduction
WooCommerce stores often need extra features for smooth selling. These extra features come through extensions and add-ons. Sometimes, you cannot install them with one click. In those cases, you must Manually Install WooCommerce Extensions. This guide explains the basics in simple steps. You will also learn why manual installs help many store owners.
By the end, you will understand the right approach. You will also feel confident to install WooCommerce extensions manually. This is a beginner-friendly guide with clear, easy language. It also supports safe WooCommerce extension manual installation practices.
What Are WooCommerce Extensions?
WooCommerce extensions are add-ons that expand store features quickly. They work like plugins and integrate into WooCommerce settings. Many people call them WooCommerce plugins or WooCommerce add-ons. They help you add payments, shipping, and marketing features.
Some extensions add invoices, subscriptions, or booking options too. These tools reduce manual work and save your time. They also help you build a better customer experience. Many store owners prefer them over custom coding. Extensions can be free or paid, based on the provider. Some come from WooCommerce.com and some from third parties.
Role of WooCommerce Extensions and Why Many Stores Need Them
WooCommerce is powerful, but every store has unique needs. Extensions help you add those missing features easily. They help you improve both store work and customer flow. They also help you reduce time spent on manual tasks. This is why store owners keep adding new extensions over time. When you use the right ones, your store runs smoothly.
Add New Store Features Without Writing Custom Code
Many store owners do not want complex development work. Extensions can add features without code changes or risk. You can add checkout fields, product options, and order rules. You can also add filters, dashboards, and stock tools. This reduces errors and saves many working hours.
Improve Checkout, Payment, and Shipping Experience for Buyers
Checkout is where most store problems start and end. Extensions help make checkout faster and more reliable. Payment extensions add secure payment methods for customers. Shipping extensions show rates and estimated delivery time. These features build trust and reduce cart drop-offs.
Add Marketing, Reports, and Automation for Better Daily Work
Marketing extensions help you reach and keep more buyers. You can send emails, offer deals, and recover carts. Reporting extensions help you understand sales and customer behavior. Automation tools reduce repetitive store tasks each day. This makes your store easier to manage and grow.
Scale Your Store When Orders and Customers Start Growing
A small store has simple needs at the start. A growing store needs better control and smarter tools. Extensions help you handle more orders without stress. They also help improve speed, stability, and workflow. When you grow, you may need manual install methods. That is where WooCommerce extension manual installation becomes useful.
Many users also search and install WooCommerce extensions manually for this reason. In the next part, you will learn the manual methods. You will also learn when each method works best.
Install WooCommerce Extensions Manually: Step-by-Step Beginner Guide
Manual installation means you add the extension file yourself. You do not rely on auto installs or store connections. This approach is helpful when uploads fail or links break. It is also useful when your host blocks large ZIP files.
Many beginners search how to install WooCommerce plugins manually for this reason. The good news is the process is simple and safe. You just need the right file and a clean method. This guide covers Manually Install WooCommerce Extensions using three beginner-friendly methods.
- Method 1 uses your WordPress dashboard and a ZIP file.
- Method 2 uses FTP or your hosting file manager.
- Method 3 is for WooCommerce.com extensions with licensing needs.
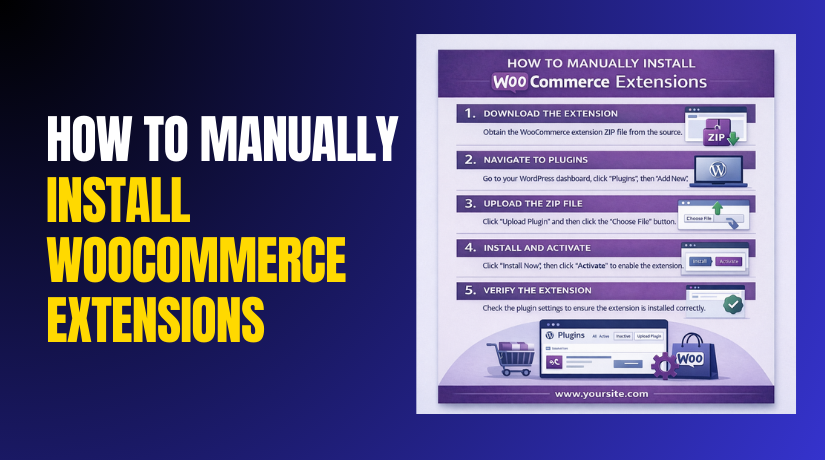
Method 1: Install Using WordPress Dashboard With a ZIP Upload
This method installs your extension from the WordPress admin panel. You upload the plugin ZIP file and activate it. It works great for most small and medium extensions. It also keeps things simple for beginners. This is the most common WooCommerce extension manual installation method. It is also called manual WooCommerce plugin installation by many users.
Step 1: Download the Correct Extension ZIP File
- Download the ZIP from WooCommerce.com or the vendor account.
- Keep it as a ZIP file and do not unzip.
Step 2: Go to the Plugin Upload Screen in WordPress
- Login to WordPress admin.
- Go to Plugins → Add New → Upload Plugin.
Step 3: Upload the ZIP File and Start Installation
- Click Choose File, select the ZIP, then click Install Now.
Step 4: Activate the WooCommerce Extension After Install
- When installation finishes, click Activate Plugin immediately.
Step 5: Confirm the Extension Is Active in Plugins List
- Go to Plugins → Installed Plugins and check it shows Active.
Step 6: Find the Extension Settings in WooCommerce
- Open WooCommerce → Settings and look for a new tab.
- Payment and shipping options appear in their sections.
Step 7: Test the Site Feature to Ensure It Works
- Open your site and test the related feature.
- Try cart, checkout, or shipping rates as needed.
Method 2: Install Using FTP or Hosting File Manager
Method 2 is useful when your WordPress upload does not work. It also helps when your hosting has low upload limits. Many store owners use this for large extension files. This method is still safe and beginner-friendly. It is a common way to Manually Install WooCommerce Extensions without dashboard limits.
It also matches manual WooCommerce plugin installation methods used by developers. You will upload the plugin folder directly to your server. Then you will activate it from the WordPress dashboard. This is a trusted WooCommerce extension manual installation method.
Step 1: Download the Extension ZIP File From a Trusted Source
- Download the extension ZIP from WooCommerce.com or vendor account.
- Avoid cracked files from unknown websites.
- Keep the ZIP saved on your computer for extraction. You should also confirm the file name and plugin version.
- This reduces errors during install WooCommerce extensions manually.
Step 2: Extract the ZIP File on Your Computer
- Right-click the ZIP file and extract it to a folder. You should see one main plugin folder after extraction.
- Open that folder and check if plugin files exist inside.
- You should see files like PHP, assets, or readme. If you see another folder inside, check structure carefully.
- Wrong structure causes install failure in many cases.
- Clean structure improves WooCommerce extension manual installation success.
Step 3: Upload the Plugin Folder to wp-content/plugins Location
- Now open FTP or your hosting file manager in control panel.
- Go to your WordPress site root folder on the server.
- Open this path: wp-content/plugins/ on your server.
- Upload the extracted plugin folder into the plugins folder. Wait for all files to upload completely before moving on.
- Missing files can cause activation errors and crashes. This step is the core of manual WooCommerce plugin installation.
Step 4: Activate the Extension From WordPress Dashboard
- After upload, go back to your WordPress admin dashboard.
- Open Plugins and then Installed Plugins page.
- Find the plugin name in the list and click Activate.
- If it activates smoothly, the install is done.
- This confirms your Manually Install WooCommerce Extensions process worked.
Step 5: Confirm Settings and Run a Quick Store Test


- Open WooCommerce settings and find the extension options.
- Shipping and payments appear inside their related sections.
- If it is a checkout tool, check checkout fields and flow.
- Open cart and checkout pages and do a test order.
- This helps confirm stable WooCommerce extension manual installation.
Method 3: Install WooCommerce.com Extensions Manually and Connect License Properly
Method 3 is used for WooCommerce.com paid extensions often. You can install them like normal plugins using ZIP. But updates may require a connected subscription or license.
Manual install works, but updates may not show automatically. This method helps when WooCommerce.com connection has issues. It also helps when auto install fails on some hosting. Many users call this WooCommerce extension manual installation for WooCommerce.com files. The key part is installing first and licensing after.
Step 1: Download the Extension ZIP From Your WooCommerce.com Account
- Login to your WooCommerce.com account where you bought the extension.
- Go to your downloads or purchases section and download the ZIP.
- Save it on your computer and keep it in ZIP format.
- This is the file you will use to Manually Install WooCommerce Extensions.
Step 2: Install the ZIP Using Method 1 or Upload Using Method 2
- You can now install the ZIP using WordPress dashboard upload method.
- If upload fails, use FTP and upload extracted folder.
- Both ways are valid and safe for WooCommerce.com extensions.
- This step completes the base manual WooCommerce plugin installation.
Step 3: Activate the Extension and Check It Appears in Plugins List
- After installation, activate the extension from the Plugins page.
- Confirm it shows as Active and remains enabled.
- Then open WooCommerce settings and locate the extension features.
- This confirms your install WooCommerce extensions manually steps are correct.
Step 4: Connect Your WooCommerce.com Subscription for Updates
- Now connect your WooCommerce.com account for license updates.
- Go to WooCommerce and open the Extensions or Connect page.
- Follow the on-screen steps to connect your store to WooCommerce.com.
- Once connected, updates appear in the WordPress updates screen.
- If subscription is expired, updates may not work. This is the most important part of Method 3.
- It ensures long-term success after WooCommerce extension manual installation.
Step 5: Confirm Updates and Test the Extension Feature
- Go to Dashboard and open Updates to see available updates.
- You can also check Plugins page for update notices. Then test the extension feature on your store again.
- For payment extensions, run sandbox or test mode. For shipping tools, check rates and labels flow.
- This final test ensures clean Manually Install WooCommerce Extensions results.
Important Things to Keep in Mind Before and After Manual Installation
Manual installs are safe when you follow basic rules. Small mistakes can still break your store quickly. These tips help you Manually Install WooCommerce Extensions without risk. They also make WooCommerce extension manual installation smoother and cleaner. Keep this checklist handy for every new extension install.
Always Take a Full Backup Before You Install Anything
A backup helps you restore your site if anything breaks. It protects your database, plugins, and theme files. Take a backup before you install WooCommerce extensions manually. If your host offers backups, use that option first. You can also use a trusted backup plugin if needed. This one step can save many hours later.
Check Compatibility With WooCommerce, WordPress, and PHP Versions
Extensions may fail when versions do not match your site. Always check the extension requirements before installing. Confirm it supports your WooCommerce and WordPress versions. Also confirm your PHP version meets the extension needs. Many errors happen due to low PHP versions on hosting. This check improves your manual WooCommerce plugin installation success.
Use a Staging Site When Your Store Is Live and Busy
Staging is a test copy of your real website. You can install and test extensions without harming customers. If you run a busy store, staging is very important. Test the extension on staging first, then move changes live. This reduces risk during WooCommerce extension manual installation. It also prevents broken checkout during peak hours.
Install One Extension at a Time and Test After Each Install
Installing many plugins together makes troubleshooting very hard. Install one extension, activate it, and test the site. Then move to the next extension after successful testing. This helps you find the exact cause of any issue. It is a best practice for how to install WooCommerce plugins manually. It also keeps your store stable during changes.
Avoid Nulled or Cracked Extensions to Protect Your Website
Nulled plugins are modified paid extensions shared illegally. These files often contain hidden malware and backdoors. They can steal customer data and damage your site reputation. Always download extensions from official and trusted sources. This protects your store during install WooCommerce extensions manually steps. It also keeps your business safe and compliant.
Watch for Plugin Conflicts With Themes and Other Extensions
Some extensions conflict with other plugins and themes. Conflicts can break checkout, cart, and payment pages fast. If you notice issues after activation, deactivate the extension. Then check if the site returns to normal quickly. You can also switch to a default theme for testing. This conflict check is part of safe WooCommerce extension manual installation.
Keep Extensions Updated for Security and Store Stability
Updates fix bugs, add features, and patch security problems. If you install WooCommerce.com extensions, connect your subscription. That ensures you receive updates in your dashboard. For third-party extensions, follow vendor update instructions. Regular updates reduce errors after WooCommerce core updates. This helps every manual WooCommerce plugin installation stay stable long term.
Know How to Disable a Plugin Fast if the Site Breaks
Sometimes a plugin can cause a white screen or 500 error. If you cannot access WordPress admin, use FTP quickly. Go to wp-content/plugins/ and find the plugin folder. Rename the folder to disable the plugin immediately. Then refresh your site and login again. This safety trick helps during Manually Install WooCommerce Extensions work. It also reduces downtime when problems appear.
Conclusion
Manual installation gives you more control over your WooCommerce store. It also helps when normal installs do not work. You can Manually Install WooCommerce Extensions even with hosting limits. You just need the right file and the right method. Method 1 is best for quick ZIP uploads in WordPress. Method 2 is perfect when the upload size is blocked. Method 3 is useful for WooCommerce.com extensions and updates.
Each method supports safe WooCommerce extension manual installation. Always download from trusted sources to avoid security risks. Always take a backup before you change anything important. Install one extension, then test cart and checkout properly.
This habit prevents surprise issues during live sales hours. If something breaks, disable the plugin using FTP quickly. Also keep extensions updated for better security and smooth performance.
If you want expert help, WooHelpDesk is ready to assist. We can install WooCommerce extensions manually, fix conflicts, and resolve errors fast. We can also guide you on the safest setup for your store.