How to Create a WooCommerce Website Using WordPress (Step-by-Step Guide)
Table of Contents
- Introduction
- Why You Need a WooCommerce Website Using WordPress for Business Growth
- Benefits of a WooCommerce Website Using WordPress
- Planning Before You Create a WooCommerce Website
- How to Create a WooCommerce Website in WordPress for Beginners
- Common Issues After You Create a WooCommerce Website
- Conclusion
Introduction
If you want to sell online, you need a solid plan. Many people try to rush the setup. They install plugins fast and hope things work. That approach often creates issues later. A better method starts with clear goals and a clean base. This guide is written as a WooCommerce tutorial for beginners. It also works well for growing businesses. You will learn how to create WooCommerce website steps correctly. You will understand what to set up first. You will also learn what to avoid early.
A WooCommerce website using WordPress gives you strong control. You own your store, your design, and your data. You can change prices, pages, and layouts anytime. You can add products without limits. You can also add new features when you need them. This is why many brands choose a WooCommerce WordPress website. It works for small shops and large stores. It supports physical items, digital files, and services. It can also support bookings and subscriptions with addons.
By the end of this guide, you will know what to prepare. You will have a simple plan to follow. You will also know what decisions matter the most. This helps you build WooCommerce stores in a smooth way. It also helps your store look professional from day one.
Why You Need a WooCommerce Website Using WordPress for Business Growth
Businesses want a platform they can trust long term. They want control over design and checkout. They want to add features without big limits. They also want better control over SEO. A WordPress eCommerce website with WooCommerce meets those needs. It gives you a store and a content site together. You can publish blogs and sell products in one place. That mix helps you grow traffic and sales.
Many platforms lock you into fixed layouts and rules. Some platforms charge higher fees as you scale. Others limit product types or checkout changes. WooCommerce works differently. It is flexible and open. You can shape your store the way you want. You can start simple and expand later. This helps you create WooCommerce website that fits your business.
Here are the main reasons businesses pick WooCommerce and WordPress.
- Full control over your store and customer data. You can control your pages, products, and user flow. You can also control customer accounts and emails. You keep your store data under your own hosting. This matters for long term business safety.
- Easy start with a clean WordPress WooCommerce setup. You can launch a store with basic steps. You can add products and accept payments quickly. You can also improve the store over time. This is great for small teams and founders.
- Works for many product and service types. You can sell physical products, digital downloads, or services. You can also sell memberships using add-ons. You can even sell bookings with the right tools. This makes WooCommerce a strong all-around choice.
- A large plugin and theme ecosystem. WooCommerce supports thousands of extensions and themes. That means you can add features when needed. You can add reviews, wishlists, and custom checkout fields. You can also add advanced shipping rules and invoices.
- Strong content and SEO support through WordPress. WordPress is built for content and publishing. That helps your store rank better over time. You can write guides and product content easily. You can also build internal links across your site.
When you combine these strengths, you get a powerful base. You can build WooCommerce store that grows with you. You can also keep your costs more stable. Your store becomes an asset you own.
When a WooCommerce WordPress Website Is the Best Option
WooCommerce is not only for big brands. It works well for many business sizes. Still, it fits best in some clear situations. If these points match you, WooCommerce is a strong choice.
- You want full ownership and long term freedom. If you want full control, WooCommerce helps you. You can move hosts when you want. You can change themes and layouts easily. You do not depend on one closed platform.
- You need custom checkout, pricing, or shipping rules. Many stores need special checkout fields. Some need delivery rules by location. Others need price rules by user role. WooCommerce can handle these needs with tools. This is where WooCommerce store setup shines.
- You want better SEO control for Google traffic. Google traffic can reduce your ad costs. It can also bring steady buyers daily. WooCommerce with WordPress helps SEO strongly. You can control titles, URLs, and content structure. You can also create blogs that support product pages.
- You want to sell more than just simple products. Some businesses sell services and downloads together. Some sell bundles or subscriptions later. Some offer appointments or rentals. WooCommerce can grow into these models. That makes it a good long term platform.
- You want to avoid marketplace rules and limits. Marketplaces can change policies anytime. They can also hold your payments at times. They can restrict branding and customer access. With WooCommerce, you control your own store rules. You control your customer experience fully.
If these needs match your goals, proceed with confidence. You can create WooCommerce website using a clear plan. You can also avoid common early mistakes.
Benefits of a WooCommerce Website Using WordPress
Full Control to Create a WooCommerce Website Your Way Without Limits
When you own your store, you control your growth. WooCommerce gives you that ownership. You choose your hosting and your theme. You choose how your store looks and feels. You can also change it later without rebuilding everything. This is a key reason to create WooCommerce website using WordPress.
You control your product layout and product pages. You control your cart and checkout experience. You can decide what fields show at checkout. You can add trust badges or delivery notes. You can also change your emails and order messages. This level of control is hard on closed platforms.
Easy WordPress WooCommerce Setup for Any Store Type and Selling Model
A big benefit is how flexible WooCommerce is. It supports many store types from day one. You can start with a simple product store. You can also sell digital products with downloads. You can sell services like consultations or repairs. You can even combine these models together.
This makes WooCommerce useful for many industries. A local shop can sell products online. A coach can sell digital guides and sessions. A creator can sell prints and merch. A company can sell spare parts and service plans. That flexibility matters when your business changes.
SEO Advantages for a WooCommerce WordPress Website That Brings Free Traffic
SEO matters for long term sales. Paid ads can be costly. Social traffic can be unstable. Search traffic can stay steady for years. WooCommerce with WordPress supports SEO well. That is a strong reason to use a WordPress eCommerce website.
WordPress lets you create strong content easily. You can write product guides and comparisons. You can write how-to blogs that attract search users. You can link those blogs to product pages. This helps buyers move from content to checkout. It also builds trust with visitors.
Flexible Payments in WooCommerce Website Using WordPress for Smooth Checkout
Payments can make or break an online store. Buyers want easy payment options. They also want a safe checkout experience. WooCommerce supports many payment gateways. You can choose local and global options. You can offer cards, wallets, and bank payments. You can also enable cash on delivery if needed.
A flexible payment setup helps reduce cart drop. Some users prefer cards. Some prefer UPI or wallet options. Some prefer pay later or COD. When you offer options, you reduce friction. That helps you build WooCommerce store with better sales results.
Shipping Control in WordPress WooCommerce Setup for Better Delivery Rules
Shipping is a common pain point for new stores. Many beginners fear shipping settings. WooCommerce makes shipping easier when you plan first. You can set shipping zones by country or region. You can set different rates for different zones. You can also offer local pickup for nearby customers.
Shipping control helps you manage costs. You can add flat rates for simple pricing. You can offer free shipping above a certain amount. You can add shipping classes for heavy products. You can also set rules for fragile items. That keeps your pricing fair and clear.
Extend Features Using Plugins on a WooCommerce WordPress Website Anytime
Every store needs different features. Some stores need wishlist and compare tools. Some need advanced coupons and bundles. Some need invoices and packing slips. Some need role-based pricing for wholesalers. WooCommerce supports these needs with extensions.
This is powerful because you are not stuck. You can start with the basics. Then you add features after you learn. You can add features based on your sales needs. That keeps your store lighter and faster. It also keeps your setup simpler in the beginning.
Scale Your WooCommerce WordPress Website as You Grow Without Rebuilding
Many people start small, then grow fast. Your store should support that growth. WooCommerce can scale with the right approach. You can upgrade hosting when traffic increases. You can add caching and speed tools when needed. You can use a faster theme if required. You can also improve images and scripts over time.
Scaling is easier when your base is clean. If you plan your store structure early, scaling becomes smooth. Clear categories help large catalogs later. Clean product data helps inventory control later. Clean shipping rules help order volume later. A solid base reduces future fixes and costs.
Planning Before You Create a WooCommerce Website With Less Confusion Later
Planning makes your store setup easy and stress free. It also saves time later. Many people start building without a clear plan. Then they get stuck with pages, shipping, or pricing. A simple plan fixes these problems early. Use this checklist before your WordPress WooCommerce setup starts. It will help you create WooCommerce website in the right order.
Choose what you will sell and how it will work
Decide what you want to sell in your store. It can be physical products, digital files, or services. Decide if you need size or color options. Decide if you need simple products only at start. Keep your first launch small and clean. This helps you build WooCommerce store without confusion.
Prepare your store content in advance
Get your logo ready in good quality format. Collect product images with clear and bright views. Write product names and short descriptions in simple words. Note down prices, SKUs, and stock numbers if needed. This makes WooCommerce store setup faster and smoother.
List the pages your WooCommerce WordPress website needs
Every store needs a few important pages. Plan these pages before you design anything. You should have Home, Shop, Cart, and Checkout pages. You should also have Contact and My Account pages. Add policy pages like Shipping, Returns, Privacy, and Terms. These pages build trust in your WordPress eCommerce website.
Decide your shipping plan in simple terms
Think about where you will deliver your products. Decide if you deliver locally or across the country. Decide if you want flat rate shipping or free shipping. Decide if you want local pickup for nearby customers. These choices make WordPress WooCommerce setup easier later.
Decide how you will handle taxes and billing
Taxes depend on your business location and rules. Decide if prices include tax or add tax later. Decide if you need invoices for every order. If you are unsure, keep it simple first. You can update tax rules later when needed.
Keep a simple category plan for products
Make a short list of your main product categories. Keep category names clear and easy to read. Avoid too many categories in the beginning. Add more categories only when you have more products. This makes your WooCommerce WordPress website easier to browse.
Set a small launch goal and a simple next step
Decide how many products you want at launch. Decide what payment methods you will offer first. Decide what shipping option you will show first. Then plan your first month improvements slowly. This helps you learn and improve step by step.
Quick planning checklist you can follow today
- Decide product type and basic product options.
- Prepare logo, images, prices, and descriptions.
- List key pages and policy pages for trust.
- Choose shipping areas and simple shipping methods.
- Keep taxes simple and update later if needed.
- Create a small category plan for easy browsing.
- Set a small launch goal and improve after launch.
This simple plan keeps everything clear from the start. Now you are ready for the next move that will cover domain, hosting, and WordPress basics. Then your WooCommerce website using WordPress will be ready for setup.
How to Create a WooCommerce Website in WordPress for Beginners
Creating a WooCommerce website in WordPress is one of the easiest ways to start selling online. You do not need advanced coding skills to begin. You only need a WordPress website and the right setup plan. WooCommerce works like an online store system inside WordPress. It lets you add products, collect payments, and manage orders easily. You can sell physical products, digital downloads, or even services. You can also control shipping, taxes, and discount settings from one place. This makes WooCommerce a great choice for beginners. But if you start without a clear process, things can get confusing fast. That is why it helps to follow a simple step-by-step setup. In the next section, you will see the exact steps to create your WooCommerce website from scratch. Each step is beginner-friendly and easy to follow. You can complete the setup by moving through one step at a time.
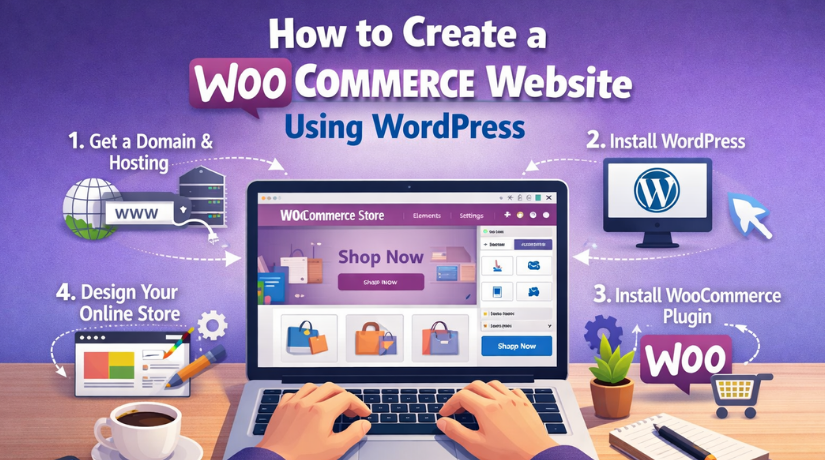
Domain & Hosting for WooCommerce Website Using WordPress Setup Without Confusion
Before you install anything, you need two things ready. You need a domain name and a hosting plan. Your domain is your website name on the internet. Your hosting is where your site files will live. A strong base makes your WordPress WooCommerce setup smooth. It also reduces speed and security issues later. Follow the steps below in the same order. This is the safest way to create WooCommerce website for long term use.
Step 1: Buy a Domain Name for Your WooCommerce WordPress Website With a Clear Brand Name
Your domain should be easy to remember and easy to type. It should also match your brand and products. A good domain helps people trust your store faster. It also helps marketing and sharing.
- Pick a short and clear name. Avoid long names and extra words.
- Use a common extension when possible. Most stores prefer .com.
- Avoid numbers and hyphens. They confuse users during typing.
- Check spelling and pronunciation. Say it loud before buying.
- Buy related domains if needed. This protects your brand identity.
- Turn on domain privacy if offered. This hides your public details.
- Keep auto renewal active. This prevents domain expiry problems.
This is the first step to build WooCommerce store properly. Once the domain is ready, move to hosting. This will help your WooCommerce website using WordPress stay stable.
Step 2: Choose Hosting for WordPress WooCommerce Setup That Is Fast and Reliable
Hosting matters a lot for online stores. A slow store loses visitors quickly. A weak server can break checkout during traffic. Choose hosting that supports eCommerce needs. Even a small store needs stable performance.
What type of hosting should you choose
- Shared hosting: Best for small stores and low traffic start.
- Managed WordPress hosting: Best for speed, support, and peace.
- VPS hosting: Best for high traffic and larger product catalogs.
Hosting features you must have
- Free SSL certificate support. HTTPS is required for checkout trust.
- Daily backups or easy backup tool. This helps restore fast.
- Good storage and bandwidth. Images and products need space.
- Latest PHP and MySQL support. WooCommerce needs modern versions.
- Fast support chat or tickets. Store issues need quick help.
- Good uptime record. Your store should stay online always.
Recommended setup for beginners
- Start with managed WordPress hosting if budget allows.
- Start with shared hosting only if the store is small.
- Upgrade later when your traffic and orders increase.
This step is important for WooCommerce store setup success. Good hosting helps your WordPress eCommerce website load fast. It also keeps checkout stable for buyers.
Step 3: Connect Domain to Hosting With Simple DNS Settings
After domain and hosting are ready, connect them. This step points your domain to your server. It tells the internet where your site lives. Many beginners feel confused here. Keep it simple and follow the bullets.
- Open your hosting account and find nameservers. Copy them safely.
- Open your domain registrar account. Go to DNS or nameserver area.
- Replace old nameservers with hosting nameservers. Save changes.
- Wait for DNS to update. It can take a few hours.
- Check if the domain opens your hosting page. That confirms success.
Once DNS is connected, your WooCommerce WordPress website is ready for WordPress. This step is a key part of how to create WooCommerce website correctly.
WordPress Setup for WooCommerce Website Creation With Clean Settings
Step 4: Install WordPress for Your WooCommerce Website Using WordPress
WordPress is the base system for your store. WooCommerce runs on top of WordPress. Most hosting companies offer one click installs. Use that option if available. It is faster and safer for beginners.
- Login to your hosting control panel. Find WordPress installer.
- Choose your domain name from the list. Confirm it is correct.
- Set an admin username that is not “admin.” Use a unique name.
- Set a strong password. Use letters, numbers, and symbols.
- Add your admin email address. Use an email you check often.
- Click install and wait for completion. Then login to WordPress.
Now your WordPress eCommerce website base is ready. Next, you will adjust important settings. This makes your WordPress WooCommerce setup cleaner.
Step 5: Configure WordPress Settings for a WooCommerce WordPress Website That Ranks Better
Before installing WooCommerce, fix basic WordPress settings. These settings help SEO, links, and site trust. They also help you avoid URL issues later.
- Set site title and tagline. Keep it clear and brand focused.
- Set timezone and date format. Match your business location.
- Set permalinks to Post name. This helps clean SEO URLs.
- Delete sample post and sample page. Keep your site clean.
- Remove unused plugins and themes. Keep only what you need.
- Enable basic spam control for comments. This keeps your site clean.
This makes your WooCommerce website using WordPress easier to manage. It also helps you build WooCommerce store with better SEO structure.
Step 6: Enable SSL HTTPS for WooCommerce Website Using WordPress Checkout Safety
SSL is required for online stores. It turns your site into HTTPS. It protects login and checkout details. It also builds trust with buyers. Google also prefers secure websites.
- Open your hosting panel and find SSL settings. Enable free SSL.
- Wait for SSL to activate. It may take a few minutes.
- Open WordPress settings and update URLs to HTTPS. Save changes.
- Force HTTPS in hosting settings if available. This avoids redirects.
- Check your site in browser. You should see the lock icon.
Fix common SSL issues quickly
- If images show as not secure, update old HTTP links.
- If the site loops, clear cache and check redirects.
Now your WordPress WooCommerce setup foundation is complete. In Part 3, you will install WooCommerce and start store settings. That is where you will finally create WooCommerce website store features. You will also start the real WooCommerce store setup in a clean way.
WooCommerce WordPress Setup for a Store That Works Smoothly From Day One
Now your domain, hosting, and WordPress base are ready. In this part, you will start the real store build. You will install WooCommerce and set core store settings. You will also set accounts and privacy for customers. This is where your WooCommerce website using WordPress becomes a real store. Follow each step in order for fewer issues later. This section is a clean WooCommerce tutorial for beginners.
Step 7: Install WooCommerce Plugin in WordPress for a Clean Store Start
WooCommerce is the main plugin that adds store features. It creates key pages like Cart and Checkout. It also adds product and order management tools. A clean install is important for stable store setup.
- Go to WordPress Dashboard → Plugins → Add New.
- Search for “WooCommerce” and choose the official plugin.
- Click Install and then click Activate.
- Start the WooCommerce setup wizard when it appears.
- Allow WooCommerce to create required pages automatically.
What you should check after activation
- You can see WooCommerce menu in the dashboard.
- Shop, Cart, Checkout, and My Account pages are created.
- No errors show on the admin screen after activation.
This step is the start of how to create WooCommerce website properly. Now you are ready to configure store settings and build WooCommerce store foundation.
Step 8: Configure Store Details in WordPress WooCommerce Setup With Correct Basics
Store settings control how your store works. These settings affect prices, shipping, and checkout. If you set them correctly now, you avoid issues later. Keep settings simple in the beginning. You can fine tune them as your store grows.
- Set your store address and country. It helps taxes and shipping.
- Set your currency and currency position. Keep it clear for buyers.
- Choose selling locations. Select where you want to sell products.
- Choose shipping locations. Match them with selling locations.
- Set measurement units. Choose weight and size units correctly.
Inventory settings to keep store stable
- Enable stock management only if you track inventory.
- Set low stock alert email. This helps avoid overselling.
- Choose whether to allow backorders. Keep it off for beginners.
- Set hold stock time for unpaid orders. This reduces fake orders.
Product settings that improve store experience
- Enable reviews if you want social proof.
- Choose default product sorting. Popular or latest works well.
- Keep product page layout clean and simple.
This step makes your WordPress eCommerce website ready for real selling. It also makes your WooCommerce WordPress website easier to manage.
Step 9: Set Up Accounts and Privacy for WooCommerce Website Using WordPress Trust
Customers want safe shopping and simple login options. You need clear account settings and privacy pages. This builds trust and improves checkout flow. It also helps your store follow basic policy needs.
- Allow guest checkout if you want fewer checkout steps.
- Allow account creation during checkout for easy signup.
- Allow account creation on My Account page too.
- Require strong passwords for better security.
Privacy and policy setup you should add
- Create a Privacy Policy page in WordPress.
- Create Terms and Conditions page for store rules.
- Create Returns and Refund Policy page for clarity.
- Create a Shipping Policy page for delivery details.
- Link these pages in WooCommerce settings where available.
With these settings done, your WooCommerce store setup becomes more trusted. Now you can move to design and essential pages.


Design and Pages for a WooCommerce WordPress Website That Looks Professional
Step 10: Choose a Theme for WooCommerce WordPress Website Design That Loads Fast
Your theme controls how your website looks and feels. A good theme must support WooCommerce layouts properly. It should also be mobile friendly and fast. A slow theme can hurt sales and SEO.
- WooCommerce compatibility is clearly mentioned.
- Mobile responsive design works on all screen sizes.
- Fast loading pages with clean design.
- Easy header, footer, and layout options.
- Good support and regular updates.
Simple steps to install a theme
- Go to WordPress Dashboard → Appearance → Themes.
- Click Add New and search the theme you want.
- Click Install and then click Activate.
- Import demo content only if you really need it.
- Remove extra demo pages you will not use.
This step supports your goal to create WooCommerce website that looks clean. It also helps you build WooCommerce store with better user trust.
Step 11: Create Essential Pages for WooCommerce Website Using WordPress That Users Expect
Pages give structure to your store. Without proper pages, users feel lost. WooCommerce creates core pages automatically. You still need to create a few important pages manually. These pages help trust, support, and navigation.
Core pages WooCommerce usually creates
- Shop page for product listing.
- Cart page for order review.
- Checkout page for payment and address.
- My Account page for login and order history.
Pages you should create for a professional store
- Home page with clear sections and a clean layout.
- Contact page with email, phone, and support details.
- About page to explain your brand and purpose.
- Shipping Policy page with delivery zones and timelines.
- Returns and Refund Policy page with rules and steps.
- Privacy Policy and Terms pages for legal clarity.
This is a major step in how to create WooCommerce website using WordPress. It builds trust and reduces customer confusion.
Step 12: Customize Menus, Header, and Footer for Easy Navigation on a WooCommerce WordPress Website
Navigation helps users find products quickly. Your header menu should be short and clear. Your footer should include trust links and support links. Clean navigation improves sales and reduces exits.
Header menu items you should add
- Home link for quick return.
- Shop link for browsing products.
- Categories link if you have many categories.
- Contact link for support access.
- My Account link for login and orders.
- Cart icon for quick checkout access.
Footer links you should add
- Privacy Policy and Terms links for trust.
- Shipping and Returns policy links for clarity.
- Contact link and business email for support.
- Social links only if you use them actively.
Simple steps to create menus
- Go to Appearance → Menus and create a new menu.
- Add key pages and categories to the menu list.
- Set the menu location as the Primary menu.
- Create a footer menu if your theme supports it.
Now your WooCommerce WordPress website looks organized and user friendly. Next, you will build the product catalog and start selling.
Products and Catalog Setup in WooCommerce WordPress Website for Easy Shopping
Step 13: Add Your First Product in WooCommerce Website Using WordPress With Complete Details
Products are the heart of your store. A clear product setup improves sales. It also reduces returns and support questions. Start with one product and set it up properly. Then repeat the same format for other products.
- Go to Products → Add New in the dashboard.
- Add a clear product name and simple short description.
- Write a main description with benefits and use cases.
- Upload a clear main image and a few gallery images.
- Set regular price and sale price if needed.
- Add SKU for inventory control if you use stock.
- Set stock status and stock quantity if required.
- Set weight and dimensions if you ship physical items.
- Choose the correct product category and tags.
- Click Publish and view the product page.
Product page quality checks
- Images are clear and match the product well.
- Price is visible and easy to understand.
- Add to cart button works properly.
- Product description is short, clear, and helpful.
This step helps you build WooCommerce store in the right way. It is also a key part of WordPress WooCommerce setup for beginners.
Step 14: Create Product Categories and Tags for a WooCommerce WordPress Website That Browses Better
Categories help users find products fast. Tags help users discover similar items. A clean category structure also helps SEO. Keep it simple in the beginning. Too many categories confuse users.
- Go to Products → Categories.
- Add main categories first and keep names simple.
- Add category description if you want better SEO.
- Upload category image if your theme shows it.
- Create subcategories only when needed.
How to use tags correctly
- Use tags for small product labels and features.
- Examples are “gift”, “summer”, “lightweight”, “premium”.
- Do not create too many tags for one product.
This improves navigation and helps users shop faster. It also supports SEO for your WordPress eCommerce website.
Step 15: Add Variable Products in WordPress WooCommerce Setup for Size and Color Options
Variable products are used when one product has options. These options can be size, color, or other choices. WooCommerce uses attributes and variations to manage these options. It looks professional and improves user choice.
- Open the product and set Product type to Variable product.
- Go to Attributes and add attributes like Size or Color.
- Enable “Used for variations” for each attribute.
- Go to Variations and create variations from attributes.
- Set price for each variation if prices differ.
- Set stock for each variation if you track inventory.
- Add variation image if needed for better visuals.
- Save changes and test option selection on the product page.
Quality checks for variable products
- Variation dropdown works without errors.
- Price updates correctly when option changes.
- Stock status shows correctly for each variation.
- Add to cart works for all variations.
Now your WooCommerce store setup supports real catalog needs. Your WooCommerce website using WordPress is ready for payments and shipping. In Part 4, you will configure payment gateways and shipping zones. You will also learn SEO basics and launch testing. This completes the full how to create WooCommerce website process.
Payment Setup for WooCommerce Website Using WordPress That Helps Buyers Pay Easily
Payment setup is one of the most important store steps. If payments fail, sales stop immediately. If checkout looks unsafe, users leave quickly. A clean payment flow builds trust and improves conversions. Follow the steps below to complete your WordPress WooCommerce setup. This also helps you build WooCommerce store that works smoothly.
Step 16: Choose Payment Methods for Your WooCommerce WordPress Website Based on Customer Needs
Different customers prefer different payment options. Some prefer cards and net banking. Some prefer UPI and wallet payments. Some prefer cash on delivery for trust. Choose payment methods based on your target buyers.
Simple payment method options you can offer
- Credit and debit cards for fast checkout.
- UPI and wallets for mobile friendly payments.
- Net banking for bank based payments.
- Cash on delivery for local or trusted deliveries.
- Bank transfer for manual show orders or B2B sales.
How to pick the right methods quickly
- Check what payment types buyers use in your region.
- Start with one or two methods at first.
- Add more options after your store starts getting orders.
- Avoid too many methods on day one. It can confuse users.
This is a key part of how to create a WooCommerce website that sells. Good payment options improve trust and reduce checkout drop.
Step 17: Configure Payment Gateway in WordPress WooCommerce Setup With Testing First
After choosing methods, you must configure the gateway settings. Gateway setup links your checkout to the payment provider. This step needs careful attention. A small mistake can block payments. Always test before using live mode.
- Go to WooCommerce → Settings → Payments.
- Enable the payment method you want to use.
- Install the gateway plugin if it is required.
- Open the gateway settings and add required details.
- Add API keys or account credentials securely.
- Enable test mode first for safe testing.
- Save changes and run a test checkout.
Important checks before going live
- Payment completes and order status updates correctly.
- Order confirmation page shows without errors.
- Customer receives order email after successful payment.
- Admin also receives new order email notifications.
- Refund option is visible in the payment provider panel.
This step completes a major part of WooCommerce store setup. It also builds trust for your WooCommerce website using WordPress.
Shipping and Tax Setup for WordPress eCommerce Website That Charges Correctly
Step 18: Set Up Shipping Zones in WordPress WooCommerce Setup With Simple Rules
Shipping should be clear and predictable for buyers. If shipping costs look confusing, users leave. WooCommerce uses shipping zones for better control. Zones help you set rates based on location.
- Go to WooCommerce → Settings → Shipping.
- Click Add shipping zone and name it clearly.
- Select zone regions like country, state, or postcode.
- Add a shipping method for that zone.
- Repeat for each region you deliver to
- Save changes and test shipping in the cart.
Common shipping methods for beginners
- Flat rate for simple fixed delivery cost.
- Free shipping for orders above a minimum amount.
- Local pickup for nearby customers and store pickup.
When to use shipping classes
- Use classes for heavy or large products.
- Use classes for fragile items needing extra packing.
- Use classes for bulky items needing special delivery.
This step helps you create WooCommerce website that delivers smoothly. It also improves customer trust during checkout.
Step 19: Configure Taxes for WooCommerce Website Using WordPress With Clear Pricing
Taxes can feel confusing for beginners. Still, basic tax setup is important. It helps you charge correctly and avoid billing confusion. Keep tax settings simple at the start.
- Go to WooCommerce → Settings → General.
- Enable taxes and save changes.
- Go to Tax settings and choose basic options.
- Decide if product prices include tax or not.
- Add tax rates based on your local rules.
Helpful tax setup choices for beginners
- Use one main tax rate if your rules are simple.
- Keep tax labels clear like “Tax” or “GST.”
- Show tax totals on checkout for transparency.
- Test tax calculation using a sample address.
This helps your WordPress eCommerce website stay professional. It also reduces customer questions and disputes later.
Optional Store Features to Improve WooCommerce WordPress Website Sales
Step 20: Create Coupons and Discounts in WooCommerce Store Setup With Simple Rules
Discounts can increase orders when used wisely. Coupons also help promotions and email campaigns. Keep your coupon rules simple at the start.
- Go to Marketing → Coupons in WooCommerce.
- Click Add coupon and create a coupon code.
- Choose discount type like percentage or fixed amount.
- Set coupon usage limits to avoid misuse shown.
- Set minimum spend if needed for profit safety.
- Save the coupon and test it in cart.
Coupon types that work well
- 10% off for first order coupon.
- Flat amount off for high value carts.
- Free shipping coupon for selected zones.
This helps you build WooCommerce store marketing basics easily. It also supports a better checkout experience for customers.
Step 21: Improve Search and Filters on a WooCommerce WordPress Website for Faster Shopping
Users want to find products quickly. If browsing feels hard, users leave. Simple filters and sorting improve shopping experience. They also help users reach checkout faster.
- Use clear categories and subcategories.
- Add product attributes like size and color.
- Enable sorting by popularity and latest products.
- Use a search bar in header for quick search.
- Add filter widgets if your theme supports them.
This step makes your WooCommerce WordPress website user friendly. It also improves conversions and reduces bounce.
Step 22: Add Trust Builders to Your WordPress WooCommerce Setup for Better Conversions
Trust builders reduce fear during checkout. Buyers want proof your store is real. They also want clear support and return rules. Add trust builders early for better results.
- Enable product reviews for social proof.
- Show clear shipping and return policy links.
- Add contact details on the Contact page.
- Add business email and phone if available.
- Add secure checkout message in checkout area.
- Add order tracking info if you can provide it.
This is an important part of how to create WooCommerce website that converts. Trust builders help reduce cart drop and support tickets.
SEO, Speed, and Security for WooCommerce Website Using WordPress That Stays Fast
Step 23: Speed Basics for WooCommerce WordPress Website With Clean Performance
Speed affects sales and SEO. Slow sites lose buyers quickly. Focus on simple speed wins first. Do not add many tools at once.
- Resize and compress product images before uploading.
- Use a caching plugin with safe default settings.
- Exclude Cart and Checkout from caching always.
- Remove unused plugins and heavy features.
- Use a lightweight theme to avoid slow loading.
This helps your WordPress eCommerce website rank better. It also improves user experience and checkout speed.
Step 24: SEO Setup for WooCommerce Website Using WordPress With Clean Structure
SEO helps you get free traffic from Google. WooCommerce plus WordPress makes SEO easier. You need clean pages and good product content. Keep SEO simple and consistent.
- Use clean permalinks for products and pages.
- Write clear product titles using natural keywords.
- Write short product descriptions with key benefits.
- Use category pages with short and clear descriptions.
- Add image alt text for product images.
- Create blog posts to support product searches.
- Link blog content to product and category pages.
This supports your goal to create WooCommerce website that ranks. It also improves long term sales without high ad spend.
Step 25: Security and Backup Setup for WooCommerce WordPress Website Safety
Security matters because stores handle customer data. Backups matter because mistakes can happen anytime. A safe store reduces stress and losses. Keep security steps simple and strong.
- Use strong admin passwords and limit admin users.
- Enable a security plugin with basic protection.
- Limit login attempts to stop brute force attacks.
- Keep WordPress, themes, and plugins updated regularly.
- Remove unused plugins and themes from your site.
- Use regular backups and keep backup copies safe.
This keeps your WooCommerce website using WordPress safe long term. It also protects orders, customers, and store work.
Testing and Launch Your WooCommerce WordPress Website With Confidence
Step 26: Test Your WordPress WooCommerce Setup End-to-End Before Launch
Testing helps you find problems before customers do. It also helps you confirm checkout works perfectly. Test like a real customer from start to finish.
- Add product to cart and check cart totals.
- Apply coupon and confirm discount works correctly.
- Check shipping cost shows based on address.
- Confirm tax adds correctly in checkout totals.
- Run payment test in test mode first.
- Check order email received by customer and admin.
- Confirm order appears in WooCommerce orders list.
- Test checkout on mobile screen for easy usability.
This is a core part of WooCommerce store setup success. It helps you launch with fewer refunds and support problems.
Step 27: Launch Checklist for WooCommerce Website Using WordPress Without Missing Anything
Launch is not just clicking publish. You must ensure everything is ready. A clean launch improves trust and reduces mistakes.
- Switch payment gateway from test to live mode.
- Remove test products, test pages, and dummy content.
- Confirm shipping zones and rates are correct.
- Confirm policy pages are published and linked in footer.
- Check site logo, menus, and footer links work properly.
- Check SSL lock icon shows on all key pages.
- Run final mobile speed check and homepage check.
Now your how to create WooCommerce website process is complete. Your WooCommerce WordPress website can accept real orders.
Post-Launch Maintenance for WooCommerce WordPress Website Growth
Step 28: Maintenance Routine After WordPress WooCommerce Setup With Weekly Habits
Maintenance keeps your store stable and fast. It also prevents security issues and plugin conflicts. Weekly habits keep problems small and easy.
- Check updates for WordPress, themes, and plugins.
- Take a backup before doing updates always.
- Review failed orders and payment errors quickly.
- Check shipping settings if delivery issues appear.
- Remove unused plugins and keep site lightweight.
- Check website speed and fix slow pages early.
This helps you build WooCommerce store that performs well. It also reduces downtime and support requests.
Step 29: Grow Your WooCommerce WordPress Website With Simple Improvements
Growth does not need big changes every time. Small improvements can increase sales steadily. Start with simple steps and track results.
- Add upsells and cross-sells on product pages.
- Collect customer emails with a simple signup offer.
- Send order follow-up emails for reviews and repeat buys.
- Improve product photos and descriptions for clarity.
- Create helpful blog posts for SEO traffic growth.
- Test small changes on checkout to reduce drop.
This completes your WooCommerce tutorial for beginners journey. You now know how to create WooCommerce website and run it.
Common Issues After You Create a WooCommerce Website and Simple Fix Ideas
Even with clean setup, small issues may happen. These issues are common and fixable. You can solve most issues with basic checks first.
Common issues you may face
- Cart or Checkout page not loading properly.
- Payment fails or order stays pending.
- Shipping options not showing for some addresses.
- Order emails not sending to customers.
- Store pages loading slow on mobile devices.
Simple first checks that often fix issues
- Clear cache and test again in a private browser.
- Disable one plugin at a time to find conflicts.
- Check SSL and mixed content warnings in browser.
- Confirm shipping zones match customer address correctly.
- Check email settings and hosting email limits.
These checks keep your WooCommerce store setup stable. They also help your WooCommerce website using WordPress run smoothly.
Conclusion
You have now completed the full setup path. You started with planning and a clean base. You configured your WordPress WooCommerce setup properly. You built pages, added products, and enabled payments. You set shipping, tax, and trust builders for checkout. You also improved SEO, speed, and security basics.
Now take the next action step. Add more products and polish product pages. Test orders weekly and fix issues quickly. Publish helpful blogs for SEO growth over time. Keep updates and backups consistent every week. This is the best way to build WooCommerce store that grows steadily. Your WooCommerce WordPress website is now ready to accept customers and orders.