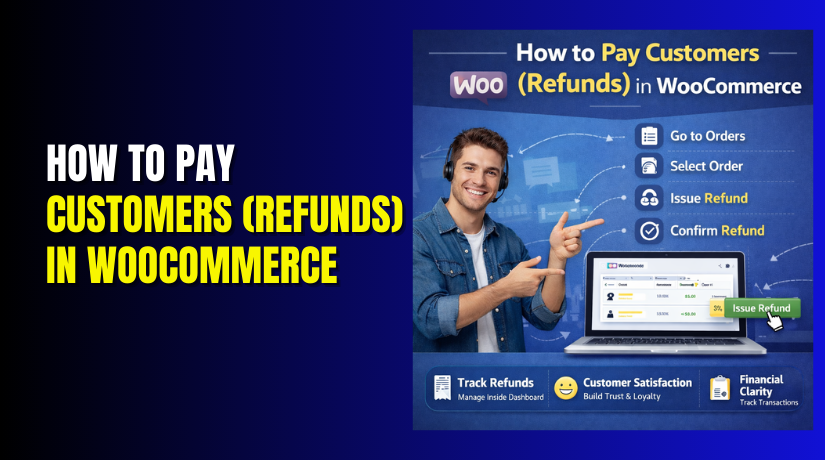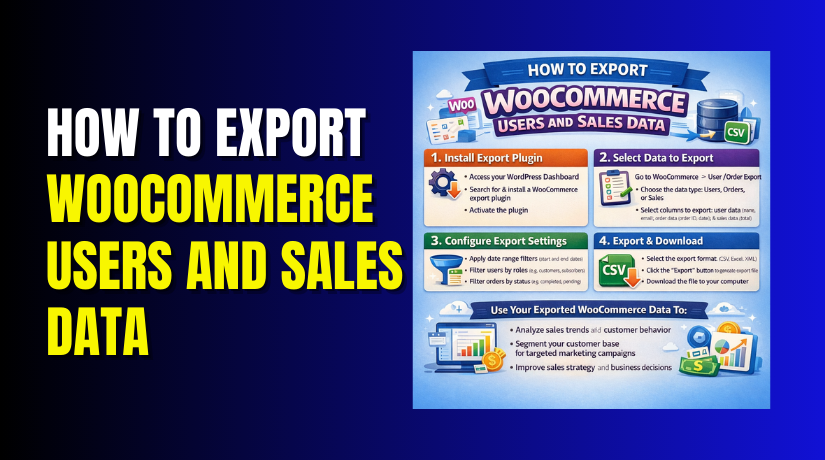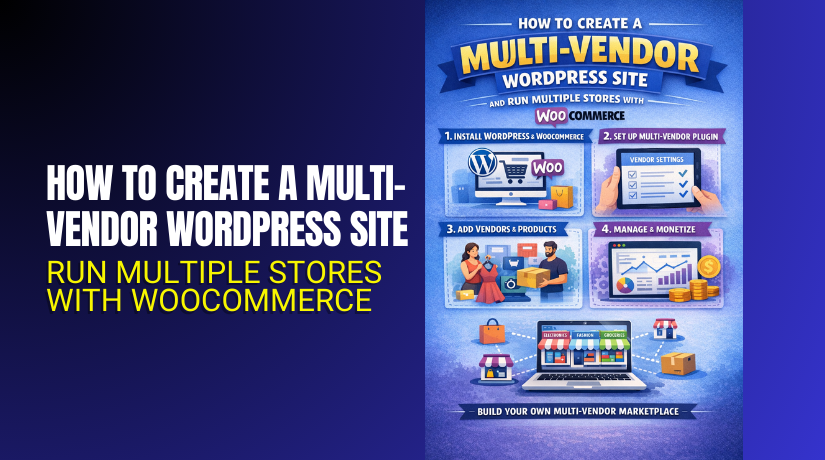
How to Create a Multi-Vendor WordPress Site and Run Multiple Stores with WooCommerce?
Table of Contents
- Introduction
- What Is a WordPress Multivendor Marketplace Website?
- How a Multi-vendor WordPress marketplace works
- Key roles in a multi-vendor marketplace
- What are Marketplace Website Types?
- What are the Key Features of a Multi-Vendor Marketplace?
- What Are the Multivendor Marketplace Benefits?
- Is WooCommerce a suitable system to create marketplaces?
- How to Create a Multi-Vendor WordPress Site?
- How to Run Multiple Stores with WooCommerce?
- What’s the best top 3 multi-vendor plugin for WooCommerce?
- Final Verdict
Introduction
A Multi-vendor WordPress marketplace lets many sellers sell together online. You run one platform, while vendors manage their own stores. This model grows faster than a single store selling alone. You earn commissions while vendors handle products and daily operations.
A Multi-vendor WooCommerce site uses WooCommerce for checkout and orders. WooCommerce multiple stores becomes possible using a marketplace plugin system. This guide explains how to create a multi-vendor marketplace in WordPress properly. You will learn types, features, and planning steps before setup. Later parts cover setup steps, vendor rules, and top plugins.
What Is a WordPress Multivendor Marketplace Website?
A WordPress multivendor marketplace website hosts many sellers on one site. Each seller gets a dashboard to manage products and orders. Customers buy from many vendors using one shared checkout process. The marketplace owner controls policies, approvals, and commission settings. A WordPress marketplace plugin adds vendor tools on top. A Multi-vendor WooCommerce site uses WooCommerce for catalog and checkout. The plugin adds vendor stores, payouts, and seller management features.
How a Multi-vendor WordPress marketplace works
- Vendors register and submit details for approval by the admin.
- Vendors create store profiles and list products on the marketplace.
- Customers add products from multiple vendors into one cart.
- Customers pay once through a shared WooCommerce checkout system.
- Vendors receive payouts after commissions and platform fees are deducted.
Key roles in a multi-vendor marketplace
- The owner manages branding, policies, commissions, and platform operations.
- The vendor manages products, pricing, inventory, and order fulfillment tasks.
- The customer browses products, places orders, and leaves reviews later.
- The support team resolves disputes and helps users with urgent issues.
What are Marketplace Website Types?
Marketplace websites follow different models based on what they sell. Your marketplace type controls features, costs, and daily operations. Pick one clear model first to reduce management complexity. You can expand into a hybrid model after stable growth.
- Product marketplace
A product marketplace sells physical or digital products from many vendors. It needs shipping rules, taxes, and structured product listing controls. It also needs order splitting and vendor fulfillment workflows.
Best use cases for product marketplaces
- Handmade goods marketplaces with multiple artisans selling unique products.
- Multi-brand niche stores selling fashion, gadgets, or home accessories.
- Digital marketplaces selling files, templates, themes, and design assets.
- Local marketplaces selling products from shops in one city.
- Service marketplace
A service marketplace connects customers with service providers and experts. It needs provider profiles, booking flow, and service request handling. WooCommerce can take payments, but booking needs extra tools.
Best use cases for service marketplaces
- Tutors offer paid sessions and lessons through provider listings.
- Repair providers taking service requests and booking time slots.
- Consultants selling packages and paid calls through vendor profiles.
- Beauty professionals offering appointments across many local providers.
- Rental marketplace
A rental marketplace lists items customers rent for specific time periods. It needs booking dates, deposits, and availability rules for rentals. It also needs damage policies and clear rental terms for trust.
Best use cases for rental marketplaces
- Camera rentals from multiple shops with date based availability.
- Party rentals from suppliers with deposits and return rules.
- Tool rentals with pickup scheduling and late fee policies.
- Vehicle rentals with verification steps and return timelines.
- Affiliate marketplace
An affiliate marketplace lists products but sends buyers to other stores. It earns commission using affiliate links and tracking systems. It does not process checkout or payments on your website.
Best use cases for affiliate marketplaces
- Comparison sites for niche tools and popular online services.
- Local deal directories where partners handle payment and delivery.
- Curated directories for premium brands and recommended products.
- Review sites earning revenue through trusted affiliate programs.
- Hybrid marketplace
A hybrid marketplace combines products, services, and rentals in one site. It offers flexibility but increases complexity and vendor management overhead. Start simple first, then expand when operations are stable.
What are the Key Features of a Multi-Vendor Marketplace?
A Multi-vendor WordPress marketplace needs features for owners and vendors. These features improve trust, protect buyers, and support long term growth. They also help your marketplace run smoothly at a higher scale.
Vendor registration and onboarding
- Vendors need a simple signup flow with clear store requirements.
- Admin approval helps block spam sellers and low quality stores.
- Onboarding should guide vendors through store setup steps clearly.
- Vendor guidelines keep listings consistent and professional across sellers.
- Document checks help reduce fraud and identity related marketplace risk.
Vendor dashboard and store management
- Vendors need a dashboard to manage products and orders easily.
- Vendors must edit pricing, stock, and images without coding.
- Vendors need shipping, return, and store policy settings access.
- Vendors should see alerts for new orders and customer messages.
- Dashboards reduce admin workload and improve vendor response speed.
Vendor store pages and branding
- Each vendor needs a store page with profile and listings.
- Store pages should show ratings, reviews, and store information.
- Store branding helps buyers trust sellers before placing orders.
- Store SEO URLs help vendors rank for branded store searches.
- Clear store layouts improve browsing and increase buyer confidence.
Product listing controls and moderation
- Admin should control categories, product types, and listing standards.
- Product approval workflows protect marketplace quality and customer trust.
- Attribute rules keep product data searchable and filter friendly.
- Image rules keep the catalog consistent across all vendors.
- Moderation reduces disputes and helps prevent misleading product listings.
Commission rules and earnings tracking
- You need commission rules to earn revenue from each order.
- You may set category commissions for different product types.
- Vendors must see earnings, fees, and deductions clearly always.
- Transparent earnings reduce vendor disputes and support requests.
- Reports help vendors plan inventory and promotions with confidence.
Order management and fulfillment rules
- Orders can be split by vendor when customers buy mixed carts.
- Vendors must see customer shipping details for their order items.
- Vendors must update status and add tracking when required.
- Admin must monitor delays and intervene for problem sellers.
- Clear rules reduce refunds and improve delivery satisfaction.
Vendor payouts and payment automation
- Vendors need payouts based on a clear payout schedule.
- Payouts can be manual, weekly, or monthly by policy.
- Payout methods can include bank transfers, PayPal, or Stripe.
- Payout history builds vendor trust and reduces payout confusion.
- Automated payouts reduce admin effort and human payout mistakes.
Reviews, ratings, and trust signals
- Reviews help buyers choose confidently and reduce purchase hesitation.
- Vendor ratings improve accountability and long term service quality.
- Admin moderation prevents fake reviews and unfair rating attacks.
- Trust signals increase conversions and repeat customers over time.
- Reviews also support SEO freshness for product and vendor pages.
Search, filters, and category navigation
- Strong search is essential as your catalog grows larger.
- Filters help buyers narrow results by price and rating quickly.
- Category pages improve SEO and product discovery for buyers.
- Attribute filters improve mobile browsing and reduce bounce rates.
- Better navigation increases session time and conversion quality.
Policies, disputes, and support workflows
- Refund policies must be clear for customers and vendors.
- Vendor policies must define shipping delays and cancellation rules.
- Dispute steps must cover damage, wrong items, and late delivery.
- Support channels must help sellers and customers separately.
- Policies protect your platform and reduce legal and refund risk.
What Are the Multivendor Marketplace Benefits?
A Multi-vendor WordPress marketplace benefits owners and sellers together.
Owners scale faster because vendors bring products and catalog variety.
Sellers grow faster because the platform brings buyers and trust.
This model supports WooCommerce multiple stores without separate websites.
A WordPress marketplace plugin makes this model manageable and structured.
1. Benefits for Marketplace Owners
Faster catalog growth with less inventory risk
- Vendors add products, so you do not stock everything.
- You save money because inventory investment stays very low.
- You also avoid dead stock and warehouse storage problems.
- This helps you launch categories quickly and test demand safely.
Multiple revenue streams beyond product sales
- You earn commissions from every vendor sale on your platform.
- You can also charge vendor membership fees for premium store features.
- You can sell featured listings to vendors needing more visibility.
- You can charge for ads, banners, and homepage product placement.
Better SEO growth from more pages and listings
- More products create more pages for long tail search traffic.
- Vendor store pages also rank for brand and niche keywords.
- Category pages grow as vendors list more items consistently.
- This helps your Multi-vendor WordPress site gain organic growth faster.
Stronger customer retention through marketplace choice
- Buyers return when they find many options in one place.
- More choice increases average order value and repeat purchases.
- Customers also trust one checkout across many vendors.
- This makes the marketplace feel easier than separate small websites.
Vendor network effect creates long term growth
- More sellers attract more buyers through better selection.
- More buyers attract better sellers who want higher demand.
- This loop strengthens your marketplace against new competitors.
- It is one reason marketplaces scale better than single stores.
Central control over quality and brand reputation
- You can approve vendors and listings before they go live.
- You can enforce image rules and product data formatting standards.
- You can control banned products and restricted categories easily.
- This protects customer trust and reduces refunds and disputes.
Lower operational load using vendor dashboards
- Vendors manage products, stock, and basic customer questions.
- You focus on platform improvements and marketing strategy.
- A WordPress marketplace plugin reduces manual admin tasks significantly.
- Automation keeps the marketplace stable as vendor count grows.
Better analytics for category and vendor performance
- You can track best categories, best sellers, and buyer behavior.
- Data helps you improve commissions and promotions with clear decisions.
- You can remove poor sellers using performance signals and reviews.
- This improves marketplace quality and improves conversions over time.
2. Benefits for Sellers
Faster start without building a full website
- Sellers can start selling without expensive website development work.
- They use your vendor dashboard to list products quickly.
- They avoid hosting, theme, and maintenance tasks entirely.
- This helps small sellers enter online selling with lower effort.
More trust through marketplace brand and reviews
- Buyers trust known marketplaces more than unknown new sellers.
- Marketplace reviews help sellers gain trust faster than solo sites.
- Secure checkout improves confidence and reduces buyer hesitation.
- This increases conversions even for new sellers with small brands.
Access to built in traffic and marketing support
- Your platform marketing benefits all sellers on the marketplace.
- Sellers gain exposure through category pages and search results.
- Featured sections can highlight sellers during seasonal promotions.
- This reduces the seller burden for paid ads and SEO work.
Easier payments and order handling systems
- Sellers get payment support through platform gateway integrations.
- They do not manage WordPress payment gateway setup alone.
- They receive order details and shipping requirements in one dashboard.
- This reduces operational errors and improves delivery performance.
Better support tools for inventory and listing updates
- Vendors can edit prices, stock, and images anytime easily.
- They can add product variations and attributes for better filtering.
- They can create coupons if your marketplace allows promotions.
- These tools help sellers compete better and improve storefront quality.
Fair earning model with transparent commission rules
- Sellers see earnings, fees, and payout details clearly.
- Transparent rules reduce disputes and build long term vendor trust.
- Vendors can plan margins better when fees stay predictable.
- This makes sellers stay longer and grow their product range.
Growth opportunity without platform switching later
- Sellers can scale product count without building new systems.
- They can hire staff while keeping the same store dashboard.
- They can improve service quality and gain better reviews over time.
- This supports long term business growth inside your marketplace.
Is WooCommerce a suitable system to create marketplaces?
Why WooCommerce works well for multivendor marketplaces?
WooCommerce is stable, widely supported, and flexible for store needs. It supports products, carts, checkout, taxes, and order management. It also supports many payment gateways for buyer convenience.
- WooCommerce provides strong checkout and payment support
- Checkout is reliable and supports many payment gateway options.
- It supports Stripe, PayPal, and regional gateways with extensions.
- It supports taxes, coupons, and shipping rules for many countries.
- This is a strong base for WooCommerce multiple stores workflows.
- WooCommerce provides solid product and order management
- Vendors can list products using familiar WooCommerce product structures.
- Orders can be tracked, updated, and fulfilled with standard order tools.
- Admins can review orders and refunds with clear order status logs.
- This reduces training time for vendors already using WooCommerce.
- WooCommerce offers large plugin and theme compatibility
- Many themes and plugins are built for WooCommerce compatibility.
- This helps you customize design, performance, and conversions easily.
- You can add SEO tools, caching tools, and security tools as needed.
- This flexibility supports long term marketplace scaling and growth.
- WooCommerce supports scalable catalog and category structures
- You can build categories, tags, and attributes for better filtering.
- This improves marketplace browsing and helps SEO category pages rank.
- Product data remains structured for large catalogs and long tail searches.
- A Multi-vendor WordPress catalog needs this structure for performance.
How to Create a Multi-Vendor WordPress Site?
A Multi-vendor WordPress marketplace needs a clean setup plan first. You will use WooCommerce for checkout and orders. You will add a WordPress marketplace plugin for vendor tools. Follow the steps below for a stable Multi-vendor WooCommerce site setup.
Step 1: Choose a marketplace niche and clear store rules
Planning Document → Niche → Categories → Vendor Rules
Pick one niche so buyers understand your marketplace purpose quickly. Choose categories with steady demand and real vendor supply. Decide what vendors can sell and what is not allowed. Write rules for titles, images, pricing, and fake discounts. Choose digital, physical, or both product types for your platform.
Marketplace planning checklist
- Niche and target audience must be finalized before setup begins.
- Vendor approval rules must be ready before vendor registration starts.
- The commission model must be set before vendors start selling.
- Payout schedule must be defined before the first order happens.
- Support and dispute rules must be ready before public launch.
Step 2: Get the right hosting for marketplace performance
Hosting Provider → Plan Compare → Buy Plan → Connect Domain
A marketplace needs stronger hosting than a simple blog site. Choose good CPU, RAM, and SSD storage for faster load. Choose daily backups and security tools for safer operations. Use a server location close to your main customers. Use a plan that can scale when vendors and products increase.
Hosting requirements that matter most
- PHP and MySQL must match WooCommerce and plugin requirements.
- Caching support must be available for faster store pages.
- SSL support must be included because checkout needs HTTPS.
- Staging support helps test updates without breaking checkout.
- Support response time must be fast for payment and order issues.
Step 3: Set up domain, SSL, and basic WordPress settings
Domain Provider → DNS → Hosting → SSL → WordPress Settings
Buy a domain that matches your marketplace identity and niche. Install SSL and force HTTPS for checkout safety and trust. Set Site Title, Tagline, and Timezone for accurate order logs. Set Permalinks to Post name for clean SEO friendly URLs. Remove unused default plugins to keep your site lightweight.
Step 4: Install WooCommerce and finish the store wizard
Dashboard → Plugins → Add New → WooCommerce → Setup Wizard
Install and activate WooCommerce from the WordPress plugins screen. Run the setup wizard and set currency and store location. Enable your payment method options for customer checkout. Set basic shipping even if vendors manage shipping later. This creates core pages neededfor a Multi-vendor WooCommerce site.
WooCommerce pages you must verify
- Pages → Cart must exist and open correctly.
- Pages → Checkout must exist and open correctly.
- Pages → My Account must exist and work properly.
- WooCommerce → Settings → Advanced must map pages correctly.
- Checkout test must be done before multi-vendor plugin setup.
Step 5: Choose a compatible theme for marketplace layouts
Appearance → Themes → Add New → Install → Customize
Choose a theme that supports WooCommerce and works on mobile. Avoid heavy themes with too many scripts and slow features. Check product pages, cart, and checkout layout on mobile screens. Use a child theme if you plan deeper design changes later. A fast theme improves SEO and conversions for marketplaces.
Theme checks you must do before launch
- The product page must show price, stock, and vendor info clearly.
- Cart and checkout must be readable and smooth on mobile.
- Category pages must have clean navigation and filters.
- The header menu must support categories and vendor links easily.
- Trust elements like reviews must fit the theme layout well.
Step 6: Install a WordPress marketplace plugin for vendors
Dashboard → Plugins → Add New → Install Plugin → Activate
WooCommerce alone cannot run WooCommerce multiple stores by default. Install one WordPress marketplace plugin to add vendor dashboards. This enables vendor registration, stores, commissions, and payouts. Use one main multi-vendor plugin to avoid conflicts and overlap. Choose the plugin based on your workflow and budget.
Compatibility checklist before you install the plugin
- Plugin must support your WooCommerce and WordPress versions.
- Plugin must support your gateway and payout method choice.
- Plugin must support split orders and vendor order access.
- Plugin must support your product types and variation needs.
- Plugin must have active updates and reliable support.
Step 7: Configure vendor registration and approval settings
Marketplace Plugin → Settings → Vendor → Registration Rules
Enable vendor registration only after your rules are ready. Use manual approval first to stop spam vendors early. Restrict vendor permissions to avoid risky admin access. Enable vendor store pages and set store URL structure. Add required vendor fields for better verification and trust.
Vendor onboarding settings you should configure
- Vendor business names should be required for better store identity.
- Vendor phone number helps payouts and dispute verification.
- Vendor address helps for shipping and return responsibility.
- Vendor tax fields help when legal compliance is required.
- Vendor agreement checkbox confirms rules acceptance clearly.
Step 8: Create essential marketplace pages and policy pages
Pages → Add New → Policies → Publish → Add Menu Links
Create Vendor Terms, Refund Policy, Shipping Policy, and Privacy Policy. Create a Contact page with clear support response timing. These pages reduce disputes and improve checkout trust. Add these pages in header or footer for easy access.
Recommended SEO pages for better marketplace rankings
- Category landing pages for top product categories.
- Sell on Our Marketplace page for vendor recruitment.
- How It Works page for buyer and vendor clarity.
- Vendor FAQs page for payouts and registration questions.
- Buyer FAQs page for shipping and returns questions.
Step 9: Set commission rules and vendor earning structure
Marketplace Plugin → Settings → Commission → Save Rules
Set a simple commission model at the start for clarity. Add category or vendor tier commissions after tracking performance. Show commission rules clearly inside vendor dashboards. Transparency reduces payout complaints and builds vendor trust.
Common commission models used by marketplaces
- Flat commission uses one rate for every product sold.
- Category commission uses different rates for different categories.
- Vendor tier commission rewards top vendors with better rates.
- Subscription plus commission uses monthly fee plus lower fees.
Step 10: Configure payouts and vendor payment schedules
Marketplace Plugin → Settings → Payouts → Schedule → Save
Choose a payout method that your plugin supports reliably. Choose weekly, biweekly, or monthly payouts for clear expectations. Keep payouts manual at first for better control during launch. Move to automation only after your refund process is stable. Show payout dates and payout history clearly to vendors.
Payout settings you must decide clearly
- Minimum payout threshold prevents tiny payouts and extra fees.
- Payout hold period protects refunds and chargeback risks.
- Payout day must be shared during vendor onboarding.
- Fee handling must be clear so vendors know net earnings.
- Missing bank details must block payouts until updated.
Step 11: Configure taxes and invoices for marketplace orders
WooCommerce → Settings → Tax → Rules → Save
Decide who handles tax based on your marketplace model. Enable taxes in WooCommerce and set region rules correctly. Enable order emails and invoices for buyers and vendors. Test totals using different buyer addresses for accuracy. Tax clarity protects your marketplace from future issues.
Basic tax setup navigation
- WooCommerce → Settings → General → Enable taxes.
- WooCommerce → Settings → Tax → Add rates if needed.
- WooCommerce → Settings → Tax → Set calculation rules.
- Test checkout totals using different customer locations.
- Confirm vendor earnings match tax and fee rules.
Step 12: Configure shipping rules for multi-vendor orders
WooCommerce → Settings → Shipping → Zones → Methods
Decide vendor shipping or marketplace shipping before configuration. Decide if shipping is per vendor or combined per order. Create shipping zones and add shipping methods per region. Define handling time rules for clear delivery expectations. Document rules inside your Shipping Policy page.
Shipping strategy options you can choose
- Vendor shipping gives control but needs strict standards.
- Marketplace shipping gives control but needs strong admin operations.
- Flat shipping is simple but may fail for heavy items.
- Table rate shipping supports weight and distance pricing better.
Step 13: Set product approval and quality moderation workflow
Marketplace Plugin → Settings → Products → Approval → Enable
Enable product approval for new vendors during early growth. Review images, pricing, description, and category before approving. Restrict banned products for payment gateway safety. Enforce stock accuracy and variation accuracy for fewer refunds. This protects your marketplace reputation and SEO.
Moderation rules that reduce future support issues
- Return policy text must be present on vendor store pages.
- Stock levels must be accurate to prevent cancellations.
- Shipping timelines must be honest to avoid disputes.
- Correct categories must be used for navigation and SEO.
- Correct variations prevent wrong orders and refunds.
Step 14: Add payment gateways and test full checkout flow
WooCommerce → Settings → Payments → Enable → Test Mode
Enable payment gateways and test before accepting real payments. Place a test order from one vendor and multiple vendors. Confirm order split and vendor dashboards show correct order data. Confirm commission calculation matches your commission rules. Confirm vendor earnings reflect the final order values.
Checkout testing checklist for marketplaces
- Test guest checkout and account checkout.
- Test coupons and confirm commission stays correct.
- Test refunds and confirm payout holds work properly.
- Test emails for admin, vendor, and buyer delivery.
- Test mobile checkout for real buyer experience.
How to Run Multiple Stores with WooCommerce?
WooCommerce multiple stores works using a multi-vendor plugin layer. Each vendor store runs inside one marketplace website. You manage rules, while vendors manage their own stores. A Multi-vendor WordPress system needs daily operations discipline. Use the steps below for stable Multi-vendor WooCommerce site growth.
Step 1: Set vendor roles and permissions correctly
Go to WordPress Dashboard → Users → All Users → Select Vendor user.
- Change Role to Vendor based role provided by your marketplace plugin.
- Block access to plugins, themes, and WooCommerce core settings.
- Allow access to products, orders, and vendor store settings only. This keeps Multi-vendor WordPress secure and manageable.
Step 2: Create vendor store guidelines and enforce quality
WordPress Dashboard → Pages → Add New → Vendor Guidelines
- Create one Vendor Guidelines page and link it everywhere.
- Explain product title rules and banned keyword stuffing rules.
- Explain product image rules and minimum quality requirements.
- Explain shipping timelines and return responsibility rules clearly.
- Explain penalties for delays, fake products, or policy violations. This improves trust for your Multi-vendor WooCommerce site.
Step 3: Standardize vendor store pages for better trust
Marketplace Plugin Menu → Vendors → Edit Vendor → Store Settings
- Each vendor needs a store page that looks professional.
- Add required fields like logo, banner, and store description.
- Add contact options and store policy links on the store page.
- Add ratings and reviews to improve buyer confidence quickly. Standard store pages help Multi-vendor WordPress conversions improve.
Step 4: Control product categories and attributes centrally
Products → Categories → Add Category, then Products → Attributes → Add New
- Categories and attributes keep marketplaces searchable and clean.
- Go to Products → Categories → Create main category structure.
- Go to Products → Attributes → Create global attributes for filters.
- Restrict vendors to approved categories and approved attributes. This improves filters and SEO pages for organic traffic.
Step 5: Configure vendor product approvals for safer launches
Marketplace Plugin Menu → Settings → Products → Enable Product Approval


- Product approval protects your brand while vendors are new.
- Enable product approval for new vendors at the beginning.
- Disable approvals later for trusted vendors with good performance.
- Use approvals for restricted categories and high value products. This prevents low quality listings from hurting marketplace trust.
Step 6: Manage orders with split rules and vendor fulfillment
WooCommerce → Orders → Open Order, then Vendor Dashboard → Orders → Update
- Multi-vendor WooCommerce site orders are often split by vendor.
- One customer checkout can create several vendor sub orders.
- Vendors should fulfill their items and update tracking properly.
- Admin should monitor delays and intervene when needed. This keeps WooCommerce multiple stores operations stable.
Step 7: Decide shipping responsibility and keep it consistent
WooCommerce → Settings → Shipping → Shipping Zones → Add Method
- Shipping can be vendor controlled or marketplace controlled.
- Vendor shipping gives flexibility but needs strict standards always.
- Marketplace shipping gives control but adds admin workload daily.
- Choose one approach and document it in your policies. Consistency keeps buyers from getting confused at checkout.
Step 8: Create payout schedules and reduce payout disputes
Marketplace Plugin Menu → Settings → Payments → Payouts
- Payout clarity keeps vendors happy and loyal long term.
- Set a payout schedule like weekly or monthly payouts.
- Add a payout hold period to protect refunds and chargebacks.
- Set minimum payout thresholds to reduce transaction fees.
- Share payout rules during onboarding and inside vendor dashboards.
Step 9: Handle refunds and returns with clear responsibility
WooCommerce → Settings → Advanced → Refunds, plus Pages → Refund Policy
- Refunds can create conflict without clear responsibility rules.
- Decide if the vendor handles refunds or the marketplace handles refunds.
- Decide if refunds come from escrow or from vendor balance.
- Decide to return shipping responsibility for damaged or wrong items.
- Publish rules in Refund Policy and Vendor Terms pages.
Step 10: Build a dispute and support workflow for marketplace scale
Pages → Add New → Support Policy, then Contact Form → Support Ticket Form
- Disputes increase when orders and vendors increase over time.
- Create a support ticket flow with categories for faster resolution.
- Create a vendor escalation rule when response times are missed.
- Create evidence requirements for disputes and chargeback prevention. A clean workflow protects Multi-vendor WooCommerce site reputation.
Step 11: Control vendor communication and prevent policy violations
Marketplace Plugin Menu → Settings → Messages, plus Vendor Terms page
- Vendor messages must stay professional and policy compliant.
- Block vendors from sharing external payment links in messages.
- Block vendors from redirecting buyers to private channels.
- Keep communication inside marketplace tools whenever possible. This prevents fraud and protects your platform from disputes.
Step 12: Track vendor performance and remove bad sellers early
Marketplace Plugin Menu → Reports → Vendors → Performance
- Vendor performance tracking protects buyer trust and conversions.
- Track late shipments, cancellations, and refund rate by vendor.
- Track low ratings and dispute frequency by vendor as well.
- Reward good vendors with better visibility and lower commission tiers.
- Remove sellers who repeatedly harm the marketplace experience.
What’s the best top 3 multi-vendor plugin for WooCommerce?
A WordPress marketplace plugin adds vendors, stores, and commission controls. WooCommerce multiple stores need one stable plugin for vendor workflows. These three plugins are widely used for Multi-vendor WordPress marketplaces.
1. Dokan Multivendor
Plugin overview
Dokan is a popular Multi-vendor WordPress solution for WooCommerce marketplaces. It adds vendor stores, dashboards, and commission based earning systems. It fits many marketplace models and supports scalable store operations.
Key Features
1) Vendor dashboard for products, orders, and earnings
- Vendors get a dashboard to manage products from one place.
- Vendors can view orders, update statuses, and add tracking details.
- Vendors can check earnings reports and payout history easily.
- This reduces admin workload and improves vendor self management.
2) Flexible commission rules by vendor, category, or product
- You can set different commission rates for different vendor levels.
- You can set category commissions for different profit margin categories.
- You can set product based commissions for special high value items.
- This supports marketplace pricing control and long term profitability.
3) Automatic payment splitting with supported gateway systems
- Dokan can split payments between vendors and the marketplace automatically.
- This reduces manual payouts and reduces payout calculation mistakes.
- Vendors trust faster payouts when records stay clear and consistent.
- This improves WooCommerce multiple stores payout operations stability.
4) Vendor store pages with branding and public storefront layout
- Vendors get store pages with banners, logos, and store descriptions.
- Buyers can browse vendor products and learn about the vendor profile.
- Store pages improve trust and improve conversions for new vendors.
- This creates a professional Multi-vendor WordPress marketplace look.
5) Admin reports for revenue, vendors, and order trend tracking
- Admin reports help you track revenue and commission performance easily.
- You can identify top vendors and categories that bring most sales.
- You can track order trends to plan promotions and seasonal campaigns.
- Better reporting supports smarter marketplace growth decisions.
Pros
1) Clean vendor dashboards reduce vendor confusion
- The dashboard layout feels simple for new vendors and beginners.
- Vendors find orders, products, and earnings without extra training.
- This improves vendor onboarding speed and reduces support requests.
2) Strong commission controls support many marketplace strategies
- Commission settings help you run flexible marketplace fee models.
- You can adjust commissions without changing your WooCommerce checkout.
- This helps keep both owners and sellers satisfied long term.
3) Payment disbursement reduces payout workload for admins
- Payment splitting reduces manual payout work and payout disputes.
- Vendors receive clearer earning records and fewer missing payment issues.
- This improves trust and vendor retention for growing marketplaces.
4) Store pages improve buyer trust before purchase
- Buyers can review vendor details before placing an order.
- Store pages make the marketplace feel more professional and reliable.
- Better trust improves conversions and reduces refund requests later.
5) Works without custom coding for marketplace setup
- Dokan helps you run WooCommerce multiple stores without development work.
- You can create vendor stores using settings and dashboards only.
- This saves setup time and reduces cost for marketplace owners.
Cons
1) Advanced marketplace features may require paid upgrades
- Some features are available only in higher plan versions.
- Growing marketplaces may need upgrades for full automation needs.
- This can increase cost as your marketplace expands.
2) Complex settings need careful testing before launch
- Commission rules and payouts need testing with real scenarios.
- Order splitting must be checked for multi vendor cart situations.
- Poor testing can create disputes and checkout confusion quickly.
3) Heavy add-ons can reduce performance on weak hosting
- Too many modules can slow dashboards and store pages.
- Shared hosting may struggle with large catalogs and many vendors.
- You may need better hosting for stable multi vendor performance.
4) Custom styling may need extra theme adjustments
- Store pages may need styling to match your brand perfectly.
- Some layouts require theme tweaks for better design consistency.
- This may require small development help for polished results.
Download Link: Dokan: AI Powered WooCommerce Multivendor Marketplace Solution
2. WCFM Marketplace
Plugin overview
WCFM Marketplace is a WooCommerce multi-vendor plugin with strong free tools. It focuses on frontend vendor management and flexible marketplace workflows. It suits owners who want many controls without heavy upfront costs.
Key Features
1) Frontend vendor management for products, orders, and coupons
- Vendors manage products from the frontend dashboard without admin access.
- Vendors can handle orders, update statuses, and add tracking details.
- Vendors can create coupons for sales and category based promotions.
- This keeps vendor work simple and reduces admin support requests.
2) Flexible commission modes like percent, fixed, and mixed
- You can set a percentage commission for standard marketplace operations.
- You can set a fixed commission for stable fee control per sale.
- You can mix percent and fixed fees for balanced marketplace earnings.
- This helps manage profit margins across different product categories.
3) Withdrawal based payouts with admin approval controls
- Vendors request withdrawals based on their available wallet balance.
- Admin can approve payouts after checking refunds and disputes status.
- This reduces payout mistakes and protects marketplace cashflow better.
- This system suits marketplaces that want more payout control.
4) Vendor shipping features and marketplace shipping configurations
- Vendors can manage shipping rules based on marketplace permissions.
- The marketplace can control shipping zones and shipping cost structure.
- This improves delivery accuracy and reduces checkout confusion for buyers.
- It supports WooCommerce multiple stores shipping operations better.
5) Vendor dashboards that reduce admin workload significantly
- Vendor dashboards centralize products, orders, and earnings reporting.
- Vendors become more independent and need less admin intervention.
- Admin handles fewer edits and fewer daily vendor support tasks.
- This helps Multi-vendor WooCommerce site scaling over time.
Pros
1) Strong free features help launch a marketplace faster
- The free version includes many tools needed for early marketplace setup.
- Owners can test marketplace workflows before paying for upgrades.
- This reduces upfront cost and helps validate the marketplace model.
2) Detailed commission options support complex fee models
- Commission flexibility helps you run category and vendor based strategies.
- You can refine fees as marketplace categories and margins change.
- This supports better earnings planning for owners and for vendors.
3) Frontend tools reduce vendor reliance on WordPress admin screens
- Vendors do not need wp-admin access for daily tasks.
- This improves security and prevents accidental backend changes.
- It also improves vendor confidence and speeds up daily operations.
4) Withdrawal payouts protect owners during refunds and disputes
- Admin can delay payouts until return windows are completed.
- This reduces loss during chargebacks and customer disputes.
- It helps keep marketplace cashflow stable and predictable.
5) Works well for marketplaces needing deep vendor management tools
- It suits marketplaces with many vendors and many product categories.
- It supports structured operations with dashboards and reporting tools.
- It helps WooCommerce multiple stores stay organized and controlled.
Cons
1) Setup can feel complex for first time marketplace owners
- Many settings require planning for commissions, shipping, and payouts.
- Owners must test order flows carefully before going live.
- Wrong settings can confuse vendors and create buyer checkout issues.
2) Many options can confuse vendors without strong onboarding
- Vendors may struggle if dashboards have too many visible modules.
- You must create vendor guides and training pages for smoother onboarding.
- Clear rules reduce support requests and improve vendor performance.
3) Some advanced features require paid add-ons for full control
- You may need paid modules for deeper shipping, analytics, or automation.
- Costs can rise when your marketplace grows and needs more features.
- Planning upgrade needs early helps avoid surprise expenses later.
4) Too many modules can slow dashboards on shared hosting
- Heavy modules can increase load time for vendor dashboards and reports.
- Shared hosting can struggle with large catalogs and many vendors.
- Better hosting and careful module selection improves performance.
Download Link: WCFM Marketplace – Multivendor Marketplace for WooCommerce
3. WC Vendors
Plugin overview
WC Vendors is a long-standing WordPress marketplace plugin for WooCommerce. It focuses on reliable vendor management, commissions, and payout workflows. It fits owners who want stable operations and clean processes.
Key Features
1) Vendor management tools for marketplace operations
- It lets you create and manage vendors with clear role control.
- It helps you approve vendors and manage vendor store access rules.
- It keeps vendor actions limited to their store responsibilities only.
- This improves Multi-vendor WooCommerce site security and stability.
2) Flexible commissions and payout management workflows
- It supports commission setup for vendor earnings and platform fees.
- It helps track vendor earnings and payout records in one system.
- It supports payout workflows that reduce mistakes and confusion.
- This makes WooCommerce multiple store income management easier.
3) Vendor dashboards for listings and order updates
- Vendors can manage product listings and updates from their dashboard.
- Vendors can view orders and update order status during fulfillment.
- Vendors can add tracking details based on your marketplace workflow.
- This reduces admin workload and speeds up vendor daily operations.
4) Supports scalable marketplace models for WooCommerce multiple stores
- It supports many marketplace models with flexible store structures.
- It works for small marketplaces and can scale with more vendors.
- It supports stable workflows when catalogs and orders grow larger.
- This supports long term Multi-vendor WordPress marketplace growth.
5) Quick installation from WordPress plugins screen
- It installs easily using the WordPress plugins installation process.
- It works with WooCommerce setup and standard marketplace pages quickly.
- It reduces setup friction for owners building their first marketplace.
- This helps to create a multi-vendor marketplace in WordPress faster.
Pros
1) Stable workflows for long-term marketplace operations
- It is designed for predictable vendor and order operations.
- It helps reduce random issues during vendor growth and scaling.
- It supports marketplace owners who want fewer daily surprises.
2) Guided setup feels less messy for marketplace owners
- Setup steps feel structured and easier for many store owners.
- It reduces confusion during commission and vendor configuration.
- This helps owners launch a Multi-vendor WooCommerce site safely.
3) Commission and payout tools fit common marketplace needs
- It supports most marketplaces using simple commission models.
- It supports payout tracking and vendor earnings reporting clearly.
- It helps owners manage marketplace income and vendor payments better.
4) Supports many marketplace models and vendor business types
- It fits physical product sellers and service based vendor listings.
- It fits niche marketplaces and broad category marketplaces as well.
- This makes it flexible for different Multi-vendor WordPress goals.
5) Vendor tools reduce admin handling for daily tasks
- Vendors can manage listings and orders without admin interference.
- Admin can focus on approvals, disputes, and marketplace growth tasks.
- This improves WooCommerce multiple stores operations efficiency.
Cons
1) Some premium features require upgrades for full capabilities
- Some advanced tools may be locked behind paid plans.
- Growing marketplaces may need upgrades for automation and controls.
- This can increase cost as the marketplace expands over time.
2) Styling can need theme work for perfect branding
- Store pages may need design adjustments for a consistent look.
- Some layouts may need theme settings or small CSS changes.
- This matters when your marketplace brand needs a polished finish.
3) Complex marketplaces may need add-ons for advanced workflows
- Advanced shipping, analytics, or automation may need extra modules.
- Large marketplaces often need extra tools for better control.
- Planning add-ons early prevents workflow gaps later.
4) Refund and payout planning is required to avoid disputes
- Owners must set payout holds to handle refunds and chargebacks.
- Clear policies prevent vendor frustration and buyer disputes.
- Poor planning can create cashflow issues and support problems.
Download Link: WC Vendors – WooCommerce Multivendor, WooCommerce Marketplace, Product Vendors
Final Verdict
A Multi-vendor WordPress marketplace works best with clear rules and clean setup. WooCommerce gives you checkout, orders, and payment control. A WordPress marketplace plugin adds vendors, stores, commissions, and payouts. Your success depends on niche focus, vendor quality, and strong policies. Good hosting, clean theme, and tested checkout protect buyer trust.
For WooCommerce multiple stores, keep operations simple at launch. Start with manual approvals and manual payouts for better control. Use clear commission rules and enforce product quality standards. Scale slowly using automation after workflows feel stable. Dokan, WCFM Marketplace, and WC Vendors are strong plugin options. Choose the one matching your budget and daily workflow needs.
Have questions before starting with WooCommerce & WordPress? Get support here at WooHelpDesk.