How to Change the Product or Cart Layout in WooCommerce?
Table of Contents
- Introduction
- Why Change the Product or Cart Layout in WooCommerce?
- How to Change the Product or Cart Layout in WooCommerce?
- Final Verdict
Introduction
WooCommerce offers a robust and user-friendly platform for setting up your online store. However, many store owners want more control over the look and feel of their product and cart pages. The WooCommerce product layout and cart page layout customization are two essential areas for improving the overall shopping experience for your customers. A well-designed product page can increase conversions, while a streamlined cart page can reduce abandonment rates.
Changing the default product or cart layout in WooCommerce can greatly improve your store’s appearance, functionality, and usability. Whether you’re looking to customize WooCommerce cart layout for a cleaner checkout process or change WooCommerce product layout to highlight key product details, these changes can help you tailor your store to meet your business goals.
In this guide, you will learn how to modify the layout of your product and cart pages in WooCommerce. We’ll cover various methods, from simple WooCommerce layout changes without coding to advanced customization techniques using hooks and templates. By the end of this series, you’ll be equipped with the knowledge to create a personalized, user-friendly WooCommerce store layout that enhances the shopping experience and drives sales.
Why Change the Product or Cart Layout in WooCommerce?
Changing the layout of your WooCommerce product or cart pages isn’t just about aesthetics. It has a direct impact on how your customers interact with your site, which in turn affects conversions and customer satisfaction. Below, we’ll explore the key reasons why you might want to change the WooCommerce product page layout and cart layout customization.
1. Improve User Engagement and Shopping Experience
A well-designed product page is essential for creating a seamless shopping experience. The default WooCommerce layout might not effectively showcase your products or encourage customers to make a purchase. By changing the product layout, you can:
- Display product information more clearly: Organize product features, specifications, and prices in a visually appealing way.
- Highlight key selling points: Add sections like customer reviews, related products, or special offers to make your page more engaging.
- Improve mobile responsiveness: Many customers shop on their mobile devices. A mobile-friendly product page layout ensures that your customers have a smooth experience, regardless of their device.
2. Reduce Cart Abandonment
Cart abandonment is a common challenge for eCommerce stores. The WooCommerce cart page is a critical part of the checkout process, and a poorly designed cart can discourage customers from completing their purchase. By customizing the cart layout, you can:
- Simplify the checkout process: Reduce the number of steps and fields required to complete a purchase.
- Improve visual appeal: A clean, organized cart layout encourages customers to continue their purchase journey.
- Add upsell and cross-sell options: Display related products or promotions in the cart to increase the average order value.
3. Highlight Key Products and Offers
In WooCommerce, you might have specific products or promotions you want to emphasize. By customizing the product page layout, you can:
- Feature specific products or collections: Showcase bestsellers, seasonal items, or limited-time offers prominently.
- Improve product organization: Group similar products together to make browsing easier for customers.
- Offer personalized recommendations: Use cross-selling and upselling techniques to suggest relevant products based on customer behavior.
4. Enhance Brand Identity
Your WooCommerce store should reflect your brand identity and values. The default WooCommerce theme is functional but might not fully align with your brand’s style. By changing the layout of product and cart pages, you can:
- Align design with brand colors and fonts: Customize the visual style of the product and cart pages to fit your branding.
- Create a unique look and feel: Tailor the layout to ensure your store stands out from competitors.
- Improve consistency: Ensure that the look and feel of your product and cart pages match other parts of your website for a seamless experience.
5. Increase Conversion Rates
The ultimate goal of customizing your WooCommerce layout is to increase conversions. When customers can easily navigate your site, find the products they’re interested in, and check out quickly, they are more likely to complete a purchase. By focusing on layout improvements, you can:
- Simplify product discovery: A more organized product layout helps customers find what they want faster, leading to quicker decisions.
- Optimize calls to action: Make buttons like “Add to Cart” and “Proceed to Checkout” more visible and engaging.
- Provide trust signals: Display security icons, reviews, and clear return policies in your cart or product pages to build trust.
How to Change the Product or Cart Layout in WooCommerce?
Now that you understand why it’s important to change the WooCommerce product layout and cart page customization, it’s time to dive into the process. There are several ways to make these changes, ranging from simple modifications using settings to more advanced customization with theme files and page builders.
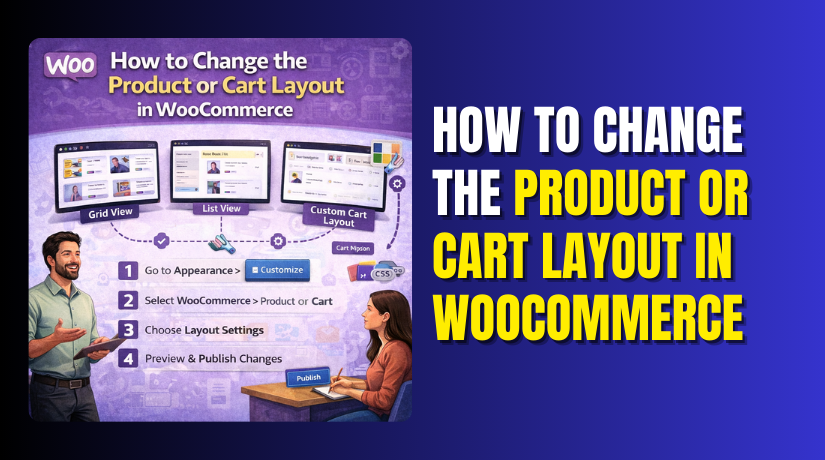
1. Change the Product Layout Using the Theme Customizer
- Go to WordPress Dashboard → Appearance → Customize
- Locate the WooCommerce Section in the Customizer
- Adjust Layout and Style
- Change the layout: You may have options to adjust how the product page is displayed, such as rearranging the product title, price, or description.
- Modify product image size: You can also control the size of product images to make them more prominent or fit a certain design aesthetic.
- Customize product tabs: If your theme allows, you can decide how product information like reviews, description, and additional information are displayed.
- Control display of add-to-cart button: You might have control over the placement and styling of the add-to-cart button to make it more visible.
- Preview and Save Changes
- After making changes, you can preview them in real-time. Once satisfied with your customizations, click Publish to apply the changes to your site.
2. Change the Cart Page Layout Using the Theme Customizer
- Go to WordPress Dashboard → Appearance → Customize
- Navigate to WooCommerce Cart Settings
- Find the WooCommerce or Cart Page section within the Customizer. Some themes will allow you to customize cart page layout directly.
- Modify Layout Elements
- Adjust cart display: You can change how the cart details like item name, quantity, and price are shown.
- Add or remove fields: Some themes allow you to add custom fields to your cart page or remove unnecessary ones, like the coupon field.
- Customize buttons and checkout styles: The button styling for checkout, update cart, or apply coupon can be changed to match your store’s branding.
- Change cart page fonts: You can control the typography and make cart text more readable or visually appealing.
- Preview and Save Changes
- After you’ve made the changes, preview them in real-time and click Publish to save your customizations.
3. Using Page Builders (Elementor) to Customize Product and Cart Pages
- Install and Activate Elementor Pro
- Elementor Pro is required for WooCommerce integration, so make sure you’ve installed and activated it.
- Create a New Product Template
- Go to Templates → Add New, and select Single Product as the template type.
- Customize Your Product Page Layout
- Use Elementor’s drag-and-drop features to add product details, images, pricing, reviews, and other elements to the page.
- You can add dynamic content such as product title, description, and price using WooCommerce widgets in Elementor.
- Style and position these elements in a way that best suits your branding and store design.
- Create or Edit the Cart Page Layout
- Similarly, you can design a custom cart page by going to Templates → Add New, selecting Cart Page, and using Elementor to create a layout that matches your store’s aesthetic.
- Customize cart details, buttons, and add custom functionality like upsells or related products.
- Publish and Apply the Template
- Once satisfied with your design, hit Publish, and set the conditions for where the template should be applied (e.g., all products, specific categories).
4. Modify the Layout Using WooCommerce Hooks and Filters
- Go to WordPress Dashboard → Appearance → Theme Editor
- Open the functions.php file or create a child theme to safely add custom code.
- Add Custom Hook Code
- Use hooks like woocommerce_before_single_product, woocommerce_after_single_product, and woocommerce_after_cart to rearrange elements.
Example: To move the product title, use the following code snippet in functions.php:
remove_action( ‘woocommerce_single_product_summary’, ‘woocommerce_template_single_title’, 5 );


add_action( ‘woocommerce_single_product_summary’, ‘woocommerce_template_single_title’, 25 );
- Adjust Filters for Data Display
- You can use filters like woocommerce_product_tabs or woocommerce_cart_item_name to modify how product data is displayed, including changing layout structures.
Example: To remove the description tab from the product page:
remove_filter( ‘woocommerce_product_tabs’, ‘woocommerce_product_description_tab’ );
- Test the Changes
- Once you’ve added your hooks and filters, test your product and cart pages to ensure everything is working as expected.
5. Modify the Layout Using WooCommerce-Compatible Plugins
For those who are not comfortable with coding but still want more customization options than what the default WooCommerce settings offer, WooCommerce plugins are an excellent choice. There are a variety of plugins available that can help you change WooCommerce product layout and customize WooCommerce cart layout to match your store’s design and functionality goals.
- Install and Activate the Plugin
- Go to Plugins → Add New and search for WooCommerce layout customization plugins. Popular plugins include WooCommerce Product Page Customizer, WooCommerce Customizer, and WooCommerce Checkout Field Editor.
- Select the Plugin That Best Fits Your Needs
- Each plugin has a different set of features. Choose a plugin that provides the customization options you require, such as layout grids, customizable buttons, or advanced field management for checkout.
- Access the Plugin Settings
- After installation, go to the plugin settings page. Most plugins will add their own menu in the WooCommerce or WordPress dashboard. Review the available options for layout changes and select the ones that align with your design vision.
- Customize the Product and Cart Layout
- Using the plugin, start customizing your product page layout. You can change the position of elements like the product image, add to cart button, product description, and price.
- Next, head to the cart page settings and adjust elements such as the cart item display, coupon fields, checkout buttons, and shipping method options.
- Test the Changes and Save
- Preview your changes on both desktop and mobile views. Ensure the design looks good and functions smoothly before saving and publishing.
Final Verdict
In conclusion, customizing your WooCommerce product layout and cart page layout can greatly improve the user experience and drive more sales by making your store more visually appealing and easier to navigate. Each method discussed in this guide provides different levels of customization, allowing you to select the one that best aligns with your needs, expertise, and business goals.
For those who are looking for quick and easy changes, the Theme Customizer method is the best option. It allows you to make small adjustments to the product and cart pages without needing any coding skills. This method is ideal for beginners or store owners who only need basic customizations. However, it’s worth noting that the customizer method has limitations, especially for stores that need more advanced design control or custom functionality.
For advanced customization, using Elementor or a WooCommerce-compatible theme provides greater flexibility. These methods allow you to create unique product and cart pages that align with your brand and business needs. Elementor, in particular, offers drag-and-drop tools that make customizing your WooCommerce pages easy and visually intuitive, while a WooCommerce-compatible theme offers deeper control over design elements. However, these methods may require the Pro version of Elementor or premium themes, which can be costly for smaller stores.
If you’re comfortable with coding, using hooks and filters or a child theme is the most powerful and flexible method. This approach allows you to make precise changes to the layout and functionality of your product and cart pages, giving you full control over the structure of your WooCommerce store. However, this method requires advanced knowledge of PHP and WooCommerce’s template system and comes with a higher risk of errors, so it’s best suited for experienced developers.
Have questions before starting with WooCommerce & WordPress? Get support here at WooHelpDesk.