How to Add an HTML Widget in WordPress?
Table of Contents
- Introduction
- What is an HTML Widget in WordPress?
- Why You Might Want to Add a Custom HTML Widget
- How to Add an HTML Widget in WordPress (Step-by-Step)
- Best Practices for Using HTML Widgets in WordPress
- Conclusion
Introduction
WordPress widgets make your site easy to customize. They let you add features to sidebars, footers, or headers. No coding skills needed for basic changes. Widgets help you show recent posts, search bars, or contact info fast.
Many users want more control than standard widgets give. That’s where the custom HTML widget shines. It lets you add your own code in any widget area your theme provides. You gain full freedom to place unique elements.
Why choose an HTML widget? It boosts your site’s look and function. You can embed videos, forms, or ads quickly. Your visitors get a better experience right away.
This guide shows you the simple way forward. We explain how to add an HTML widget in WordPress. Follow the steps to personalize your site today. You will feel confident after reading this.
What is an HTML Widget in WordPress?
An HTML widget in WordPress is a simple tool. It lets you insert raw HTML code into widget areas. In the block-based Widgets screen, you add a Custom HTML block. In the classic Widgets screen, it appears as a Custom HTML widget. Many still say “HTML widget” every day.
This widget works in sidebars, footers, or any widget area your theme supports. You paste code and see it live on your site. It renders valid HTML where you place it, but some tags may be filtered. Many sites also block <script> unless you have admin-level permissions.
Here are common ways people use HTML widgets:
- Embed a YouTube video or Vimeo clip.
- Add a custom contact form from another service.
- Show banner ads or sponsored links.
- Insert social media feed scripts.
- Place personalized text with special formatting.
The real power comes from flexibility. Standard widgets limit what you can do. An HTML widget breaks those limits wide open. You add third-party scripts or custom designs easily.
Themes and plugins often work well with it. You create features that match your brand perfectly. No need to edit theme files or hire a developer. This makes your WordPress site truly yours.
Why You Might Want to Add a Custom HTML Widget
You already know HTML widgets give extra power. Now let’s look at real reasons to use one. A custom HTML widget helps when normal options fall short. It opens doors to fresh ideas on your site.
Here are top reasons people add a custom HTML widget:
- Show custom content fast. Add forms, videos, or banners easily.
- Embed tools from other sites. Pull in calendars, maps, or chat boxes.
- Place ads or sponsor links. Control how they look and where they go.
- Add special scripts. Track visitors or run interactive features.
- Fix theme limits. Add styles or elements your theme does not offer.
These tasks stay hard with basic widgets. Standard ones lock you into set choices. A custom HTML widget gives full control instead. You decide exactly what shows up and how.
The big benefit stands clear. Other widgets follow strict rules. HTML widgets let you write your own code. This means more creative freedom for your site. You build features that fit your needs perfectly. No extra plugins needed most times. Your WordPress site grows stronger and unique.
How to Add an HTML Widget in WordPress (Step-by-Step)
Adding an HTML widget is simple and quick. WordPress uses blocks for widgets now. You insert a Custom HTML block in widget areas. Follow these steps to get it done fast.
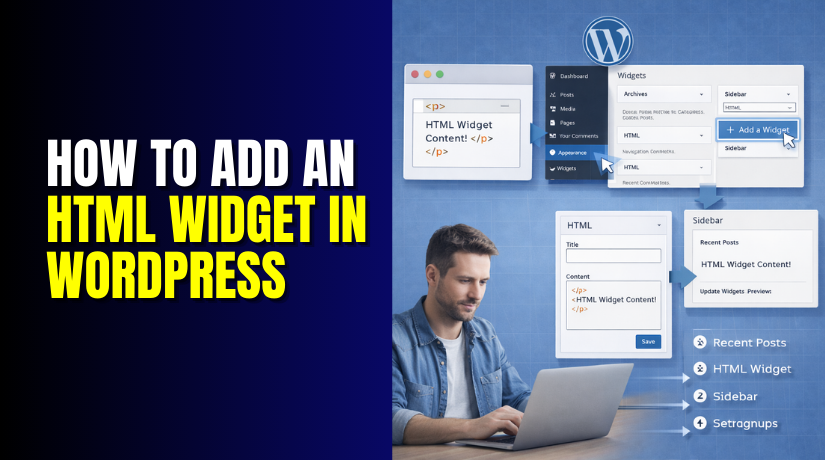
Step 1: Access the Widget Section
Log in to your WordPress dashboard. Look at the left menu. Hover over Appearance. Click Widgets.
This screen shows your widget areas. Common spots include sidebar, footer, or header. Pick the area where you want your widget. Click inside that area to start.
Note: Block themes use the Site Editor sometimes. Go to Appearance > Editor if Widgets is missing. Find template parts for sidebars or footers there.
Step 2: Add the Custom HTML Widget
Click the + icon in your chosen area. A block inserter pops up. Type “Custom HTML” in the search box. Select the Custom HTML block.
It adds right away. You see a box ready for code. This is your custom HTML widget. Drag it if you need to move spots.
Step 3: Embed Your HTML Code


Click inside the new block. Paste or type your HTML code. Here are quick examples to try:
- Embed a YouTube video: Use the <iframe> tag.
- Add a contact form: Paste code from your form tool.
- Show an ad: Insert the script from your ad network.
The block shows a preview as you type. Use the block’s Preview option to confirm the embed shows correctly. Fix any small errors right there.
Step 4: Save and Preview
Click Update or Save at the top. Changes go live on your site. Open your website in a new tab. Check the widget area you picked.
If your site uses a classic theme, you can preview in Appearance > Customize. If your site uses a block theme, preview using Appearance > Editor and view changes on the front end. Navigate to Widgets or footer section. See how it looks on desktop and mobile.
Step 5: Troubleshooting
Changes not showing? Clear your cache first. HTML code broken? Check for missing tags. Widget invisible? Theme may block scripts.
Common fixes:
- Temporarily disable caching, minify, or security plugins and test again.
- Test code in a blank page first.
- Use preview mode often.
If stuck, refresh the Widgets page. Your custom HTML widget should work now.
Best Practices for Using HTML Widgets in WordPress
You now know how to add an HTML widget. Next, learn ways to use it smartly. Good habits keep your site fast, safe, and pretty. Follow these tips every time.
Ensure Proper HTML Formatting Always write clean code. Close every tag you open. Use correct structure like this:
- Start with <div> or proper wrapper.
- End with matching </div>.
- Avoid broken lines or typos.
Clean code stops display errors. Your custom HTML widget works smoothly.
Responsive Design Considerations Most visitors use phones now. Make sure your HTML looks good on small screens. Add these quick fixes:
- Use percentage widths like width: 100%.
- Add max-width to images and videos.
- Test on mobile with browser tools.
Responsive code helps everyone enjoy your site. Your HTML widget stays sharp everywhere.
SEO Optimization Custom HTML widgets can support SEO when used carefully. Add smart elements inside them. Try these ideas:
- Insert schema markup for rich results.
- Place important internal links.
- Add alt text to images.
- Use clear labels, and avoid repeating keyword-heavy headings sitewide.
Good SEO draws more visitors. Your site grows faster with careful HTML.
These simple rules make big differences. Your custom HTML widget becomes a strong tool.
Conclusion
You learned the full process today. First, you saw what an HTML widget does. Then, you found strong reasons to use one. Finally, you followed clear steps to add it.
Adding a custom HTML widget is easy. It gives you power over your WordPress site. You embed videos, forms, ads, or anything else. Your design matches your exact vision.
Experiment with different codes now. Try new ideas in your sidebar or footer. Small changes create big improvements. Your visitors notice the extra effort.
Keep exploring WordPress widgets. They help you build a site you love. Start with one HTML widget today. Watch your website come alive. If you need support, contact WooHelpDesk.