How to Fix Fatal Error Maximum Execution Time Exceeded
Table of Contents
- Introduction
- What is max_execution_time?
- What Is max_execution_time Error?
- How to Figure out if a WordPress max_execution_time Error Occurred
- How to Check Your Current max_execution_time Setting
- How to Know if WordPress max_execution_time Error Has Occurred
- How to Fix the Maximum Execution Time Exceeded in WordPress
- How to Prevent the Error in the Future
- Conclusion
Introduction
The Fatal Error Maximum Execution Time Exceeded is a technical issue that happens when a PHP script runs for too long and surpasses a time limit set by the server. PHP scripts perform various tasks on your website, such as updating plugins, running backups, or processing large files. Every hosting environment sets a maximum execution time for these scripts to prevent the server from being overloaded or slowed down by a single operation. This time limit is meant to maintain the server’s stability, ensuring that one script doesn’t block other processes from running smoothly.
When this limit is exceeded, the server automatically stops the script’s execution and shows an error. This doesn’t mean the code is necessarily wrong; it simply means the server cut it off because it was taking too long to complete. This error often appears as a blank page or a message like “Maximum execution time exceeded.” Without fixing this problem, users may continue to encounter the error whenever they attempt large tasks that need more time to finish.
What is max_execution_time?
The max_execution_time setting in PHP is a server configuration directive. It specifies how many seconds a PHP script can run before the server forces it to stop. Think of it as a safety mechanism. If a script starts running, a timer begins counting. Once the timer hits the max_execution_time value, the server ends the script and returns an error.
The default max_execution_time on many hosting environments is 30 seconds. This is a standard starting point, ensuring that poorly optimized scripts or unexpectedly large tasks won’t slow down the entire server. However, some hosting providers might set this limit to 60 seconds, 120 seconds, or even higher, depending on the resources available. For example, if your website handles large data imports or complex calculations, a higher max_execution_time might be necessary. By increasing this limit, you allow these tasks to finish rather than being stopped mid-way.
What Is max_execution_time Error?
This error occurs when a PHP script tries to run beyond the allowed max_execution_time. Instead of finishing the task, the server stops it and shows an error message. For example, you may see Fatal Error Maximum Execution Time Exceeded or Maximum execution time of 30 seconds exceeded. These messages mean the script didn’t complete within the allowed time frame.

In technical terms, this error isn’t a bug in the code itself. It’s the server enforcing its built-in rules. Scripts that need more time—like large WordPress updates, lengthy data imports, or processing high-resolution image uploads—often hit this limit. When that happens, the server interrupts the script and displays the error.
Increasing the limit helps, but it’s also important to find what’s making the task slow (heavy plugins, large imports, slow hosting, or database issues).
How to Figure out if a WordPress max_execution_time Error Occurred
The main method is checking for the error message. You’ll find it in the dashboard while uploading a plugin, theme, or updating WordPress.
The installation page shows if the process succeeded or failed. A “fatal error” message means you’ve exceeded the maximum execution time.

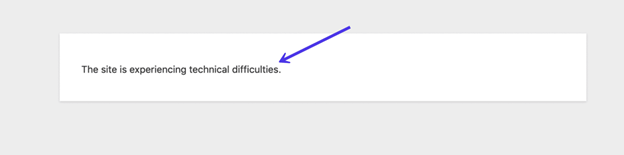
You can also identify the error from a frontend message. It may read, “The site is experiencing technical difficulties.”
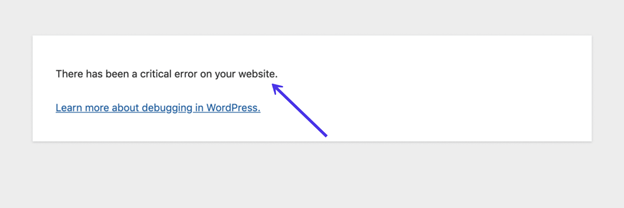
Other versions of this message mention critical errors. Some also provide a debugging link.
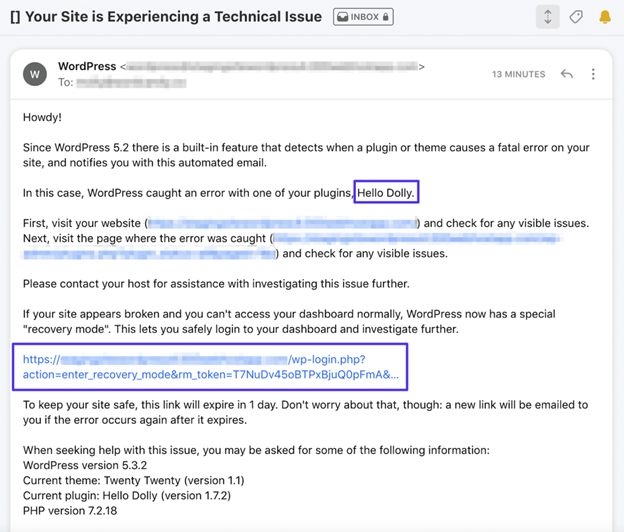
WordPress may send an email to the site administrator (if emails are working). This email explains which plugin or theme caused the fatal error. It also provides a link to help fix the problem. Solutions might include removing the plugin or increasing the execution time limit.
Understanding the Error Variants
- Maximum execution time of 30 seconds exceeded:
This means the server stopped the script after 30 seconds. Most hosting plans use this as the default time limit. It happens when tasks like updates or plugin installations take too long. The server won’t let the process continue, so it ends and shows the error. - Maximum execution time of 60 seconds exceeded:
Some hosting providers set a longer time limit of 60 seconds. This gives a script more time to finish, but it’s still limited. If the task is large or slow, it may still time out. For example, importing a big data file might run past 60 seconds and fail. - Maximum execution time of 120 seconds exceeded:
This limit is often used on mid-tier hosting plans. It allows more demanding tasks, like large file uploads, to finish. However, if the script is very complex, it may still take longer. The server will stop it once it hits 120 seconds, showing the error. - Maximum execution time of 300 seconds exceeded:
A five-minute limit is common on premium hosting plans. This is useful for tasks like major migrations or big database imports. If the process takes longer than 300 seconds, it will be cut off. Seeing this error means the task is very heavy and needs more time. - Maximum execution time of 600 seconds exceeded:
A ten-minute limit is usually for very large operations. This can handle big jobs like restoring a full-site backup or importing thousands of products. If the error still appears, it means the task needs further optimization. Even with a longer time, the server stops it when it’s not done in 600 seconds.
How to Check Your Current max_execution_time Setting
Understanding your current max_execution_time setting is the first step.This value indicates how long a PHP script can run before timing out. There are a few ways to check it:
- Using phpinfo():
Create a simple PHP file and include the phpinfo() function. When you open this file in a browser, it will display detailed PHP configuration, including the max_execution_time. As an example, you may notice that the default setting is 30 seconds. If you see Maximum execution time of 30 seconds exceeded, this confirms that your script took longer than 30 seconds. - Checking cPanel or Hosting Control Panel:
Many hosting providers let you view and adjust max_execution_time directly in their control panels. Go to the settings for PHP or MultiPHP INI Editor. There, the current value can be found and increased if permitted. This is especially useful if you’re experiencing Maximum execution time exceeded error in cPanel and need a quick fix. - Command Line or Configuration Files:
If you have server access, you can look at the php.ini file directly. Search for the max_execution_time directive to see the current setting. This helps in identifying why a script failed and shows if you need a PHP maximum execution time exceeded fix.
How to Know if WordPress max_execution_time Error Has Occurred
- Check the Error Message:
When this error happens, you will usually see a message like Maximum execution time exceeded. This message might appear on your admin screen or in a popup when trying to install plugins, update WordPress, or run an import. If you see this message, it means that the script took longer than the server’s set time limit and was automatically stopped. - Enable Debugging in wp-config.php:
There is a built-in debugging feature in WordPress that can assist you in identifying errors. To enable it, open your wp-config.php file and add these lines of code:define(‘WP_DEBUG’, true);
define(‘WP_DEBUG_LOG’, true);
define(‘WP_DEBUG_DISPLAY’, false);After enabling WP_DEBUG_LOG, WordPress can record errors in a debug log file. You can find this log file at wp-content/debug.log. - Check the WordPress Debug Log:
After enabling debugging, look at the wp-content/debug.log If a script exceeds the allowed time, you might see lines that mention a timeout error. For example, it might say Execution time limit exceeded or Maximum execution time of 30 seconds exceeded. This confirms that a timeout occurred and identifies where it happened. - Observe Site Behavior:
Sometimes the error doesn’t show a clear message on the screen, but your site’s behavior can be a clue. For instance, if you’re running a large import and the process suddenly stops or the admin area freezes, it’s likely because the script took too long. Other signs might include a blank page or a partial update that never finishes. If this happens repeatedly during the same task, it’s a strong indicator that a WordPress maximum execution time exceeded error is occurring.
How to Fix the Maximum Execution Time Exceeded in WordPress
The Fatal Error Maximum Execution Time Exceeded in WordPress occurs when a script runs longer than the server’s set time limit. This can happen during updates, plugin installations, or data imports. Luckily, there are different ways to fix this mistake and stop it from happening again.

1. Using WordPress Recovery Mode to Address Execution Time Errors
WordPress Recovery Mode helps recover from errors, including execution time issues. Here’s how to use it:


- Check Your Email:
After a fatal error, WordPress sends an email to the administrator. - Click the Recovery Link:
Follow the link in the email to activate recovery mode. - Deactivate the Problematic Plugin or Theme:
When you are in recovery mode, you can disable the plugin or theme that is causing the error.

2. Edit Your .htaccess File
How to Use .htaccess to Fix Execution Time Errors
One effective method is to edit your site’s .htaccess file. Here’s how:
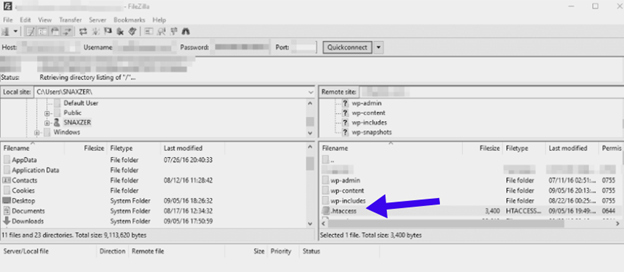
- Access Your Site Files:
Use an FTP client like FileZilla or your hosting file manager. Locate the .htaccess file in your WordPress root directory. - Open and Edit the File:
Open the .htaccess file with a text editor. Add the following line:
php_value max_execution_time 300
Note: This works only on some Apache setups (mod_php). If your site uses Nginx, PHP-FPM, or FastCGI, this may not work and can even cause a 500 error. If that happens, remove the line and use the php.ini / control panel method instead.
This increases the script time limit to 300 seconds. - Save and Test:
Save the file and refresh your site. Check if the error is resolved.
- Edit the .htaccess file. Add this line at the bottom:
The execution time limit is set to 300 seconds by the code.
3. Modify the php.ini File
The php.ini file manages your server’s PHP settings, including execution time. To fix the error, edit this file.
- Locate the php.ini file. On shared hosting, you may not see a global php.ini. Use your hosting panel (MultiPHP INI Editor / PHP Settings), or create/edit a user-level config file if your host supports it.

- Increase the execution time by adding or modifying this line:
max_execution_time = 300
Save your changes and restart the server if needed.
4. Optimize Your WordPress Database
A cluttered database may cause slow performance and script timeouts. To fix this issue by optimizing the database:
- Use a Plugin:
Use a plugin like WP-Optimize or WP-Sweep. - Run the Optimization:
Follow the plugin’s guide to clean the database. It will remove extra data and improve speed.
5. Editing the wp-config.php
You can also increase execution time by editing the wp-config.php file. Similar to the .htaccess method, you’ll need a file client like Filezilla.
- Locate the wp-config.php file in your site root (commonly /public_html/ on cPanel).
- Open the file in a text editor.

Add this code before the “stop editing” comment: set_time_limit(300);.
Note: Some hosts disable set_time_limit(). If it doesn’t work, use the hosting PHP settings method.
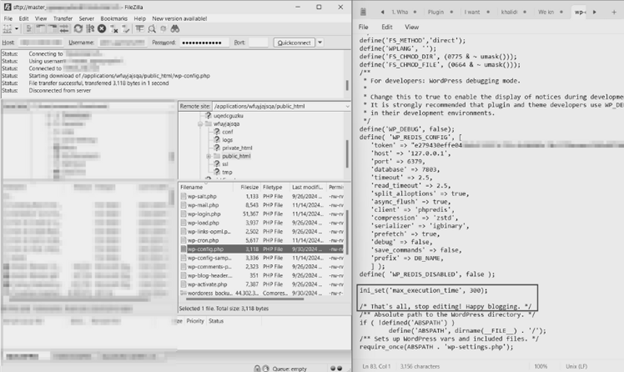
Save the file, upload it back to the server, then retest the same task.
How to Prevent the Error in the Future
It is crucial to fix the fatal error of maximum execution time exceeded at least once. However, ensuring it doesn’t occur again is even better. Your site can run smoothly with regular maintenance and simple adjustments. Let’s explore some easy ways to prevent this error.
- Keep WordPress and PHP Updated
Utilize the most recent versions of WordPress and PHP at all times. Updates fix bugs and make processes faster. Older versions may slow down tasks and cause timeouts.
- Regularly update the WordPress core.
- Request your host to upgrade PHP to the most recent version.
- Newer versions improve performance and help avoid WordPress maximum execution time exceeded errors.
- Clean Your Database Regularly
A messy database can slow things down. Cleaning it keeps your site fast and avoids timeouts.
- Utilize plugins such as WP-Optimize or WP-Sweep to tidy up the database.
- Eliminate old post revisions, spam comments, and unnecessary data.
- A clean database reduces the chances of long-running queries.
- Use Simple Plugins and Themes
Heavy plugins or themes can cause slow performance. Using lightweight options keeps tasks running smoothly.
- Choose well-coded themes and plugins from trusted developers.
- Remove plugins you don’t use anymore.
- Simple plugins mean less strain on your server and fewer errors.
- Monitor Server Performance
Your hosting plan affects how long scripts can run. If you frequently encounter timeouts, think about upgrading your hosting service.
- Check resource usage in cPanel or your host’s control panel.
- If limits are too low, upgrade to a better hosting plan.
- A faster server can help avoid the Maximum execution time exceeded error in cPanel.
- Optimize Your Media Files
Large images or files can cause timeouts. By optimizing media, tasks finish faster.
- Compress images before uploading them.
- Split large imports into smaller parts.
- Manage files well to avoid hitting time limits.
- Use Caching and a CDN
Caching stores static files so the server works less. A Content Delivery Network (CDN) accelerates file delivery.
- Utilize caching plugins such as WP Rocket or W3 Total Cache.
- Add a CDN to handle large image files and scripts.
- These tools reduce the server’s workload, preventing long execution times.
- Set Realistic Time Limits
Adjusting max_execution_time can help, but don’t go too high.
- Start with 120 seconds and test your site’s performance.
- Only increase to 300 or 600 seconds if truly needed.
- A balanced limit prevents overloading the server.
Conclusion
The Fatal Error Maximum Execution Time Exceeded happens when scripts take too long to run, leading the server to terminate them. Understanding and adjusting max_execution_time, using tools like .htaccess and php.ini, optimizing your database, and regularly updating WordPress and PHP are key steps. Following these methods prevents future errors and keeps your WordPress site running smoothly.