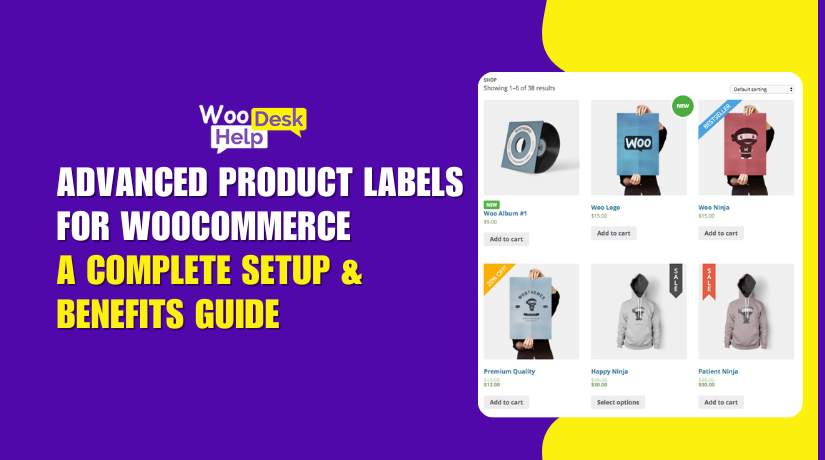
Advanced Product Labels for WooCommerce: A Complete Setup & Benefits Guide
Table of Contents
- Introduction
- Key Features of the Plugin
- Benefits of Using This Plugin
- Step-by-Step Setup Guide
- Real-World Use Cases
- Conclusion
Introduction
In a crowded online store, standing out is everything. With so many products listed, customers often overlook the best deals. This is where Advanced Product Labels for WooCommerce can help.
This plugin lets you add custom labels to products in your store. These labels can highlight deals, discounts, or features like “Free Shipping.” The objective is straightforward: increase the visibility and clickability of your products.
Your customers demand speed and transparency if you operate a WooCommerce business in the United States. They want to see what’s new, what’s on sale, and what’s worth buying. This plugin helps deliver exactly that.
Key Features of the Plugin
The WooCommerce product labels plugin comes packed with useful features. It can be used without the need for design or coding knowledge. The interface is easy, and everything works inside your WordPress dashboard.
Here’s a breakdown of the main features:
Global and Single Labels
You can add two types of labels:
- Global labels: Apply to many products at once. Set them based on rules like category, price, or tags.

- Single labels: Add custom labels to individual products. You can also exclude products from global labels.
This offers you full control over where each label shows up.
Conditional Logic for Targeting
Target labels using flexible conditions:
- Product category or type
- On sale or featured items
- Bestsellers or stock status
- Price or sale price range
- Shipping class or total sales
You can combine these to create smart product groups.
Smart Labels (Dynamic Text)
Use auto-filled values inside labels, like:
- {price} for regular price
- {discount} for dollar amount off
- {percentage} for discount percent
- {saleprice} for the sale price
These update automatically based on product details.
Label Design & Preview
Customize labels easily:
- Choose from 6 built-in label styles
- Upload your own image if needed
- Use color pickers to match your brand
- Align labels left, center, or right
- See a live preview before saving changes
You can even drag and drop labels into place. For advanced users, custom CSS is supported too.
Benefits of Using This Plugin
Boost Click-Through and Conversion Rates
One of the biggest benefits of this plugin is better product visibility. Custom product labels catch the eye fast. They help your products stand out in a crowded store.
When customers see labels like “30% OFF” or “Free Shipping,” they click more often. This improves your click-through rate (CTR). More clicks mean more chances of making a sale.
Even simple labels can guide users to what matters. A label like “New Arrival” creates interest and builds trust.
Improve Shopping Experience
Shoppers want to find the best deals quickly. You assist them with that by using this plugin. Labels give clear, instant information without needing to click into the product page.
That’s especially useful on mobile, where screen space is small. A label like “Best Seller” or “Only 3 Left” makes users act fast.
Better product discovery means less frustration. And that means higher satisfaction and more repeat customers.
Easy to Use — No Coding Needed
Using this plugin doesn’t require you to be a developer. It works inside your WooCommerce dashboard with a user-friendly setup.
Here’s what makes it simple:
- Visual label editor with live preview
- Drag-and-drop positioning
- Easy style and color customization
- Upload your own label images
You can make great-looking labels in minutes, not hours.
Save Time With Smart Labels
The smart label feature is a big time saver. You can add dynamic text to your labels using smart tags like:
- {percentage} – Discount percent
- {discount} – Dollar amount off
- {saleprice} – Product sale price
These update automatically based on the product details. You don’t have to change each label by hand. That’s ideal for stores with many products.
Focus on the Right Products
You can show labels only where they matter. Use conditions like category, price, or sale status. This keeps your store clean and avoids overloading every item with a label.
You can also highlight:
- Limited-time deals
- Seasonal collections
- Featured products
This targeted approach helps drive more results with less effort.


Step-by-Step Setup Guide
The WooCommerce Advanced Product Labels plugin is easy to set up. You don’t have to be an expert in technology. To have your product labels live in a matter of minutes, simply adhere to these simple procedures.
Step 1: Install the Plugin
Installing the plugin on your WooCommerce store is the first step.
- The plugin file (.zip) can be downloaded from your WooCommerce account.
- Log in to your WordPress dashboard.
- Go to Plugins → Add New → Upload Plugin.
- Click Choose File and upload the .zip file.
- Click Install Now, then activate the plugin.
Once activated, the label settings will appear in your WooCommerce menu.
Step 2: Create Global Product Labels
Global labels let you apply one label to many products. You can choose which items get the label by setting rules.
- Go to WooCommerce → Settings → Product Labels.
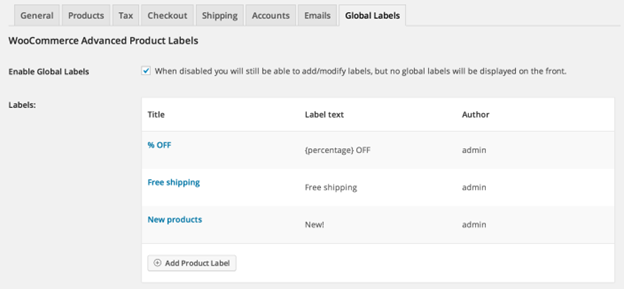
- Click Add Product Label to create a new label.

- Select the label text and enter the name of your label.
- Pick a label style or upload your own image.
- Choose a color using the color picker.
- Set the label position (left, center, or right).

Now choose conditions to target products. For example:
- Show the label only for products on sale.
- Use it on products in a particular category.
- Target goods that cost more or less than a specific amount.
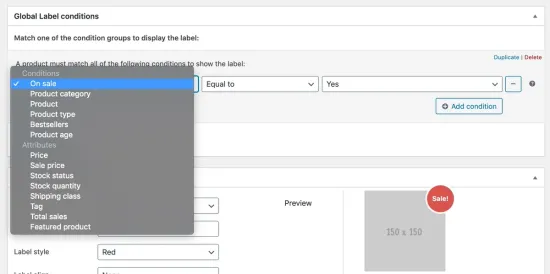
You can mix and match rules to control where labels appear.
Step 3: Add Labels to a Single Product
You can also create a custom label for a single product. This is helpful for highlighting one special item.
- Click Edit on any product after selecting Products → All Products.
- Click Product Label after scrolling to the Product Data section.
- Enter your label text and choose the style, color, and position.
- If necessary, you can remove this product from global labeling.
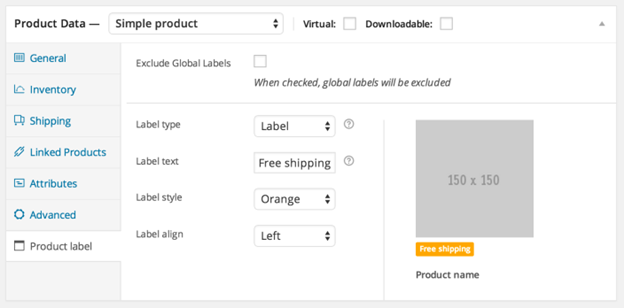
Click Update to save your changes. That label will now appear only on that product.
Step 4: Use Smart Labels for Dynamic Text
Smart labels update automatically using product data. The numbers don’t need to be typed by you.
Use these dynamic tags in your label text:
- {percentage} – shows the discount percent
- {discount} – shows the amount saved
- {price} – shows the regular price
- {saleprice} – shows the sale price
- {delprice} – shows price with strikethrough
Example: A label saying “Save {percentage}!” will show “Save 25%!” on the front end.
This feature saves time and keeps labels accurate as prices change.
Step 5: Customize Label Placement and Style
You can place your label exactly where you want it.
- Drag and drop can be used to move it around.
- Or type your own top and left pixel values.
- Choose alignment: left, center, or right.
- Advanced users can use CSS to change layout or colors.
The live preview shows how your label looks before you save it.
Real-World Use Cases
Product labels are not just for looks. They serve a real purpose. They help customers make faster, smarter choices. Let’s examine some typical applications for this plugin that store owners find useful.
- Highlight Discounts and Offers
Labels like “$10 OFF” or “Save 25%” can grab quick attention. These can be applied using smart labels like {discount} or {percentage}. They help push buyers to take action fast.
- Free Shipping Indicators
Shipping costs often stop people from checking out. Add a clear label that says “Free Shipping” to eligible products. This can improve conversions and reduce cart abandonment.
- New Arrivals or Limited-Time Products
Launch a new product line? Add a label like “New Arrival” or “Just In.” You can also use labels to show urgency, such as “Only 5 Left” or “Limited Stock.”
- Highlight Bestsellers
If a product is a top seller, show it off. Use a label like “Customer Favorite” or “Top Pick.” More customers are inspired to follow the trend as a result of the increased trust.
- Category-Based Labels
Want to highlight a collection? Apply labels to categories like:
- “Winter Collection”
- “HD Films”
- “Summer Picks”
This helps organize the store visually and guides customer focus.
Conclusion
Advanced Product Labels for WooCommerce is a smart plugin that works. It helps store owners turn attention into action. With just a few clicks, you can guide shoppers, boost sales, and improve user experience.
Labels are not just design — they’re strategy. They make your products easier to notice, compare, and buy. Whether you’re promoting free shipping, discounts, or seasonal items, this plugin helps you do it better.
If you run a WooCommerce store and want a quick way to increase sales, this plugin is a must-try. It’s easy to manage, highly customizable, and helps your products get noticed.
Need help setting it up or customizing it for your store?
Contact WooHelpDesk for expert WooCommerce and WordPress support.
📞 Call us at +1 888 602 0119 (US & Canada)— we’re here to help your store grow.