How To Add GST to a WooCommerce Product Step by Step?
Introduction
Adding GST (Goods and Services Tax) to your WooCommerce products is an essential step if you’re running an online store in countries where GST applies. GST is a consumption tax that is imposed on goods and services sold within a country. For businesses selling physical products, WooCommerce GST setup ensures that the right tax is applied to every sale, ensuring compliance and helping you avoid penalties.
In this guide, we will walk you through the entire process of adding GST to WooCommerce products step by step. Whether you’re just starting out with WooCommerce product tax setup or need to configure GST for existing products, this article covers everything you need to know to make sure your store handles taxes correctly.
By the end of this guide, you will understand how to add GST to WooCommerce products, manage different GST rates for various product categories, and streamline your WooCommerce GST configuration process.
What is GST in WooCommerce?
GST (Goods and Services Tax) is a value-added tax imposed on most goods and services sold for domestic consumption. It is implemented in many countries, including India, Canada, Australia, and more. For online stores like those built with WooCommerce, GST must be added to the prices of products, and this tax must be tracked and paid to the government.
In WooCommerce, adding GST to your products ensures that:
- The correct tax rate is applied during the checkout process.
- GST is visible on the invoices and receipts for customers.
- You are compliant with tax regulations in the country or region where you are operating.
The WooCommerce GST setup process ensures that the tax is automatically added to your product prices based on the applicable GST rates and the shipping address of the customer.
What are the Key Features of Adding GST to a WooCommerce Product?
1. Automatic Tax Calculation
- Built-in tax feature: Automatically calculates GST based on your tax settings.
- Time-saving automation: Applies the correct GST rate automatically for each order.
- Simplified tax application: GST is applied correctly for both physical and digital products.
2. Tax Classes for Different Rates
- Different GST rates: Allows configuration of different GST rates for various product types.
- Create tax classes: Set up Standard, Reduced, or Zero Rate tax classes for products.
- Tax class flexibility: Apply different tax classes to product categories for accurate rate assignment.
3. Geolocation-based Tax Calculation
- Location-based GST calculation: Calculates GST based on the customer’s shipping address.
- Applicable for multi-region stores: Automatically applies the correct rate based on the customer’s location.
- Accurate tax application: Adjusts GST rates based on region-specific rules during checkout.
4. Customizable Tax Labels
- Control how GST is displayed: Choose whether to show GST Included or GST Extra.
- Flexible labeling: Customize tax labels to suit local conventions and customer preferences.
- Tax transparency: Provides clear tax breakdowns for customers before checkout.
5. Tax Reports
- Detailed tax reports: Tracks GST collected on each sale.
- Report generation: Offers monthly, quarterly, or annual tax reports.
- Simplified tax filing: Helps prepare tax filings with a detailed summary of GST collected.
What are the Benefits of Adding GST to a WooCommerce Product?
Adding GST to WooCommerce products offers a range of advantages that enhance store efficiency, customer trust, and ensure tax compliance. Here are the top benefits:
1. Legal Compliance
- Ensure tax compliance: Adding GST ensures that your store is compliant with local tax laws. In countries where GST is mandated, businesses must collect and remit GST on sales.
- Taxation laws enforcement: WooCommerce helps you apply the correct GST rate based on the customer’s location. This eliminates the need for manual calculations and ensures that your store is following tax laws.
- Mitigate the risk of non-compliance: WooCommerce’s built-in tax features reduce the chances of errors, helping you stay fully compliant with GST regulations and avoid penalties.
2. Automated Tax Calculation
- Simplified tax calculation: With WooCommerce GST setup, the tax calculation is fully automated. GST is calculated automatically based on the customer’s shipping address and applied to the product price during checkout.
- Reduces manual errors: Automation minimizes the chances of errors in tax calculation, making the process more efficient and accurate. This ensures the right GST rate is applied every time a customer makes a purchase.
- Automatic updates: WooCommerce will automatically apply the correct GST rate to each product and order based on predefined tax classes and geolocation, ensuring consistency and accuracy across your store.
3. Improved Customer Trust
- Builds credibility: When customers see that your store is GST-compliant, they are more likely to trust your brand. Displaying GST on invoices, receipts, and product pages signals that your business operates legally and responsibly.
- Transparency in pricing: Clearly showing GST details on the checkout page and product pages makes your pricing structure more transparent. Customers can easily understand how the total price is broken down, which leads to better customer satisfaction.
- Positive impact on customer retention: Customers who trust your store’s compliance and transparent pricing are more likely to return and make additional purchases, leading to stronger, long-term relationships.
4. Accurate Tax Reporting
- Simplifies tax filing: WooCommerce provides detailed tax reports that track the GST collected from each sale, simplifying the tax filing process.
- Generate detailed reports: With WooCommerce, you can generate monthly, quarterly, or annual tax reports that provide a detailed breakdown of the GST collected, which helps streamline your tax preparation.
- Comprehensive audit trail: WooCommerce’s tax reports also provide a complete audit trail, keeping track of every sale and ensuring that you maintain accurate records for tax filing and audits.
5. Faster Checkout Experience
- Streamlined checkout process: Adding GST to your products makes the checkout process faster by automatically calculating the GST during checkout. This eliminates the need for manual tax calculation.
- Improved customer experience: Customers appreciate seeing the final price (including GST) upfront. A quick and efficient checkout experience reduces confusion and builds trust, encouraging customers to complete their orders.
- Encourages more purchases: A faster checkout process increases the likelihood of customers completing their purchases. When customers don’t have to wait for manual tax calculations, they are more likely to proceed with the transaction, improving your conversion rates.
What are the Reasons to Add GST to a WooCommerce Product?
1. Legal Requirement
- GST collection is required in GST supported countries.
- Missing GST setup can cause fines and legal trouble.
- Proper setup keeps your store compliant with tax rules.
2. Correct Tax Handling
- Correct GST avoids overcharging customers at checkout.
- Correct GST avoids undercharging and profit loss issues.
- It also keeps billing, totals, and invoices fully accurate.
3. International Compliance
- Different regions can have different GST or tax rates.
- WooCommerce GST setup supports location based tax charging.
- This helps you follow rules for every selling region.
4. Accurate Financial Reporting
- GST setup keeps tax records clean and easy.
- WooCommerce reports help track GST collected per order.
- This makes filing returns faster and less error prone.
5. Builds Customer Confidence
- Customers trust stores that show GST clearly.
- Transparent invoices reduce complaints and refund disputes.
- Trust helps customers complete purchases more confidently.
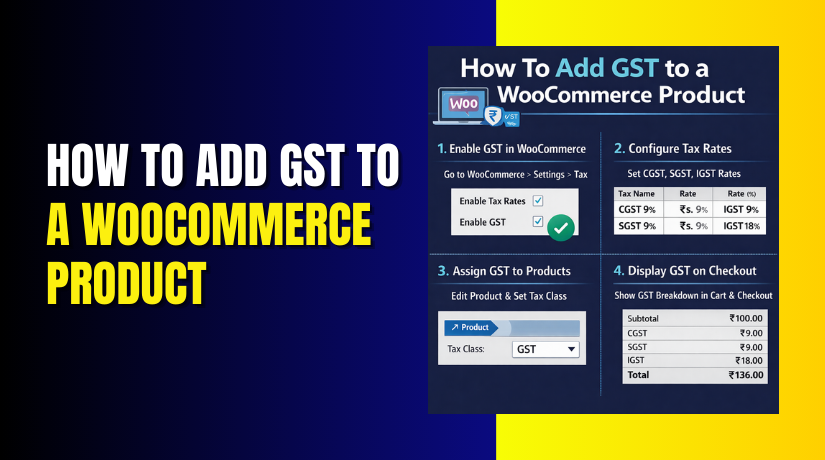
How To Add GST to a WooCommerce Product Step by Step?
Now that we understand the importance and benefits of adding GST to WooCommerce products, let’s walk through the step-by-step process of setting up GST rates and applying them to your WooCommerce store. This process ensures that the correct GST rate is applied to each sale and your store remains tax-compliant.
Step 1: Enable Taxes in WooCommerce Settings
- Navigate to WooCommerce settings:
- Go to your WordPress Dashboard.
- From the left-hand menu, select WooCommerce → Settings.
- Activate tax settings:
- In the General Settings tab, find the Enable Taxes option.
- Check the box next to Enable taxes and tax calculations. This enables the tax-related settings for your store.
- Save your settings:
After enabling taxes, click the Save changes button at the bottom of the page.
Go to Dashboard ➡ Select WooCommerce → Settings ➡ Enable taxes ➡ Save changes.
Step 2: Configure Tax Settings
- Access the Tax Settings page:
After enabling taxes, a new tab called Tax will appear under WooCommerce Settings. Click on the Tax tab to configure tax-related options. - Set tax options:
In the Tax Settings, you can configure several key settings:- Prices entered with tax: Decide whether the prices you enter for products are inclusive or exclusive of tax. For example, in some countries, you may need to show the price including GST on your product pages.
- Calculate tax based on: Choose whether tax should be calculated based on the customer’s shipping address, billing address, or store base address. For most stores, a shipping address is the best option.
- Shipping tax status: Choose whether shipping costs should be taxed. In many regions, shipping is also subject to GST.
- Save your changes:
Once you’ve set your tax options, click the Save changes button at the bottom of the page.
Go to Tax Settings ➡ Configure options (prices, tax calculation) ➡ Save changes.
Step 3: Add GST Rates to Your Store
- Navigate to Standard Rates:
In the Tax settings, you’ll find a section called Standard Rates. Click on Standard Rates to add your GST rates. - Insert a New Tax Rate:
- Click Insert Row to add a new tax rate.
- Fill in the following details:
- Country Code: Select the country where the tax rate applies.
- State Code (optional): If applicable, select the state or region where this rate applies.
- Postcode/ZIP: If needed, define the specific postal code range for the tax rate.
- City: You can also set a tax rate specific to a city if required.
- Rate %: Enter the GST rate (for example, 18% for standard GST rates).
- Tax Name: Enter a name for the tax (e.g., GST).
- Priority: Set the priority if you have multiple tax rates.
- Save the rate:
After entering all the necessary details, click Save Changes. Your GST rate will now be applied to products within the configured tax region.
Go to Standard Rates ➡ Insert tax rate ➡ Fill in country, state, rate details ➡ Save changes.
Step 4: Apply GST to Products
- Edit the product you want to apply GST to:
- Navigate to Products → All Products.
- Select the product you want to add GST to, and click Edit.
- Set the Tax Status and Tax Class:
- Scroll down to the Product Data section.
- Go to the General tab.
- In the Tax Status dropdown, select Taxable. This indicates that the product is subject to tax.
- In the Tax Class dropdown, select the appropriate tax class (e.g., Standard Rate, which is the default for most products).
- Save the product:
After setting the tax status and class, click the Update button to save your changes.
Go to Product Data ➡ Set Tax Status to Taxable ➡ Select Tax Class (Standard Rate) ➡ Update product.
Step 5: Verify GST Configuration on the Frontend
- Test your setup:
- Go to your WooCommerce store’s frontend and browse the product page you modified.
- Add the product to your cart and go to the checkout page.
- Verify that GST is correctly displayed on the checkout page, either as included in the price or as extra (depending on your settings).
- Check invoice and order details:
Ensure that the GST amount is visible on the order confirmation page and invoice, so customers can see a clear breakdown of the total price.
Go to Product Page ➡ Add product to cart ➡ Verify GST in Checkout and Invoice.
How to Apply Different GST Rates for Different Product Categories?
In WooCommerce, applying different GST rates to various product categories is essential for businesses that sell products with different tax rates. For example, standard-rated products might have an 18% GST, while zero-rated products (like certain food items or books) may have 0% GST. Here’s how to apply different GST rates to product categories in WooCommerce.
Step 1: Create Different Tax Classes for Each GST Rate
Before you can apply different GST rates to product categories, you need to set up tax classes in WooCommerce. Tax classes allow you to assign specific tax rates to different product categories or individual products.
- Go to your WordPress Dashboard → WooCommerce → Settings → Tax.
- In the Tax settings, under the Standard rates, you will see options to add tax classes.
- Click on the Insert row button, and add tax classes like Standard, Reduced rate, Zero rate, etc., depending on the GST rates you need to configure.
- Standard rate: For most products that have a regular GST rate (e.g., 18%).
- Reduced rate: For products that are eligible for a lower GST rate (e.g., 5%).
- Zero rate: For products that are exempt from GST (e.g., food and educational items).
WooCommerce Settings ➡ Tax ➡ Add Tax Classes (e.g., Standard, Reduced, Zero Rate) ➡ Save changes.
Step 2: Assign Tax Classes to Product Categories
Now that you’ve created tax classes for each GST rate, the next step is to assign tax classes to product categories based on the applicable GST rate.
- Go to Products → Categories in your WordPress dashboard.
- Select the category you want to assign a specific GST rate to or create a new product category.
- For each category, you’ll find an option to assign a tax class (under the Taxonomy settings).
- Assign the correct tax class based on the GST rate for that category.
- For example, if the category consists of standard-rated products, assign it to the Standard Rate tax class.
- If the category contains zero-rated products, assign it to the Zero Rate class.
Go to Product Categories ➡ Select Category ➡ Assign Tax Class (e.g., Standard, Reduced, Zero) ➡ Save.
Step 3: Assign Products to Relevant Categories
After assigning the tax classes to the product categories, the next step is to ensure that each WooCommerce product is placed in the correct category.
- Go to Products → All Products and select the product you want to assign a tax class
- Scroll down to the Product Data section.
- Under the General tab, you will see the Tax Class dropdown. Choose the appropriate tax class for the product based on its category.
- If the product belongs to multiple categories, it will inherit the tax class of the primary category.
- Click Update to save the changes.
Go to Product Page ➡ Select Tax Class ➡ Save Product.


Step 4: Set Up Geolocation-Based Tax Calculation (Optional)
If your WooCommerce store operates in multiple regions or countries with different GST rates, you can set up geolocation-based tax calculation. This allows WooCommerce to automatically apply the correct GST rate based on the customer’s shipping address.
- In WooCommerce Settings, go to the Tax tab.
- Under Tax options, enable Calculate tax based on shipping address.
- Choose Geolocation to determine tax rates based on the customer’s location. WooCommerce will automatically apply the correct GST rate based on the customer’s shipping address.
- Save changes.
WooCommerce Settings ➡ Tax ➡ Enable Geolocation-based Tax Calculation ➡ Save Changes.
Step 5: Test Your Tax Setup
After setting up your GST rates for different product categories, it’s essential to test that the correct tax rates are applied at checkout.
- Add a product from a different tax class (e.g., standard-rated and zero-rated) to the cart.
- Go to the checkout page and verify that the correct GST rate is applied based on the product category.
- Review the tax breakdown in the order summary to ensure it’s accurate.
Add Products to Cart ➡ Proceed to Checkout ➡ Verify GST Rate Application.
What are the Top 3 Best Plugins to Add GST to a WooCommerce Product?
While WooCommerce provides built-in tax management tools, using dedicated plugins can simplify and automate the GST setup process even further. These plugins offer advanced features, such as automated tax calculation, GST reports, and better regional tax management. Here are the top three plugins to help you add GST to your WooCommerce products:
1. WooCommerce Tax Setup Plugin
The WooCommerce Tax Setup Plugin simplifies the tax setup process by allowing you to configure GST rates for multiple regions with ease. It integrates well with WooCommerce and helps manage different GST rates for various product categories and regions.
Key Features of WooCommerce Tax Setup Plugin
- Automatic GST Calculation: Automatically calculates GST based on the customer’s shipping location.
- Multiple Tax Rates Support: Easily configure different GST rates such as standard, reduced, and zero-rate for various product categories.
- Seamless WooCommerce Integration: The plugin integrates smoothly with WooCommerce, simplifying your tax setup process.
- Regional Tax Rate Support: Supports the configuration of regional tax rates, making it ideal for stores selling in multiple regions.
Pros of WooCommerce Tax Setup Plugin
- Quick Setup: The plugin offers an easy and fast setup process, making it suitable for both small and large stores.
- GST Customization: Supports customization of GST rates for different product categories.
- Accurate Tax Calculation: Automatically applies the correct GST rate for each order.
Cons of WooCommerce Tax Setup Plugin
- Limited Reporting Features: The plugin lacks the advanced reporting features available in some premium plugins.
- Limited Customizability: Compared to premium options, WooCommerce Tax Setup Plugin offers fewer customization options for configuring GST settings & tax management.
Download Link: WooCommerce Tax
2. WooCommerce AvaTax
WooCommerce AvaTax is an advanced tax automation plugin by Avalara. It provides real-time tax calculations for products in any location, including GST for businesses in countries like India, Australia, and Canada.
Key Features of WooCommerce AvaTax
- Real-time Tax Calculation: Provides real-time tax calculations for products and orders.
- Automatic GST Setup: Handles GST setup and compliance automatically for multiple regions, including countries like India, Australia, and Canada.
- Real-time Tax Reporting: Offers detailed tax reports with real-time summaries of GST collected.
- Integration with eCommerce Platforms: Seamlessly integrates with major eCommerce platforms and accounting systems.
Pros of WooCommerce AvaTax
- Automatic Updates: Supports automatic updates for tax rates and compliance.
- Accurate Tax Calculations: Ensures real-time, accurate tax calculations based on the customer’s location.
- GST Compliance: Helps maintain full compliance with GST regulations across multiple regions.
Cons of WooCommerce AvaTax
- Requires Premium Subscription: Full access to advanced features requires a premium subscription.
- Complex Setup: The plugin may be more complex to set up compared to other tax plugins.
Download Link: Avalara for WooCommerce
3. GST Invoice for WooCommerce Plugin
The GST Invoice for WooCommerce plugin automates the process of generating GST-compliant invoices, tax calculations, and GST reports for your WooCommerce store. It simplifies the entire GST setup for stores in India and ensures your products comply with GST laws by automating the tax calculations and invoicing process.
Key Features of GST Invoice for WooCommerce
- Automatic GST Calculation: Automatically calculates CGST, SGST, IGST, and UTGST based on the customer’s location (billing/shipping).
- HSN/SAC Code Integration: Allows assigning HSN/SAC codes to each product for accurate GST reporting.
- GSTIN Support: Lets you enter and display your store’s GSTIN on invoices and receipts.
- Multiple Tax Slabs: Supports multiple GST tax rates, including 0%, 5%, 12%, 18%, and 28%.
- GST‑Compliant Invoices: Automatically generates GST‑ready invoices for all completed orders, with detailed tax information.
- Customizable Invoice Labels: You can customize how GST is displayed on invoices, like showing GST included or GST extra.
Pros of GST Invoice for WooCommerce
- Automates GST Setup: Automatically calculates and applies the correct GST rate based on location and product tax class.
- GST‑Compliant Invoicing: Helps generate GST-compliant invoices automatically with HSN codes and GSTIN details, ensuring accurate paperwork.
- Easy Configuration: Simple to install and set up without needing technical expertise or coding knowledge.
- Transparency: Provides a clear breakdown of GST on orders, invoices, and receipts, making it easier for customers to understand the tax application.
- Supports Multiple GST Rates: Flexibility to configure multiple GST rates for different product categories, making it ideal for diverse product offerings.
Cons of GST Invoice for WooCommerce
- Limited Advanced Features in Free Version: Features like PDF invoice generation and custom tax labels are only available in the premium version.
- India-Focused: Primarily built for Indian WooCommerce stores, so it may not be suitable for international stores with different tax requirements.
- Basic Template Customization: The free version may offer limited customization options for invoice templates and styling, with more features unlocked in the premium version.
Download Link: GST Invoice for WooCommerce Plugin
Final Verdict
Incorporating GST into your WooCommerce products is a critical step for compliance and smooth operation. WooCommerce provides built-in features that handle most GST setup needs, but using plugins can enhance and simplify the process, especially when managing multiple GST rates and regions.
If you’re looking for basic tax management, WooCommerce Tax Setup Plugin is a great choice for simple setups. For businesses that need real-time tax calculations and detailed reporting, WooCommerce AvaTax is an excellent option. WooCommerce GST Plugin by WP Prime is a great tool for quick and easy GST setup for new businesses or smaller stores.
Have questions before starting with WooCommerce & WordPress? Get support here at WooHelpDesk.


