How to Revert to Classic Checkout in WooCommerce (Step-by-Step Guide)
Table of Contents
- Introduction
- Before You Switch To Classic Checkout WooCommerce Do These Quick Checks
- How to Revert to Classic Checkout in WooCommerce Easily
- Common Issues After Switching Back And How To Fix Them
- Testing Checklist After Reverting To Classic Checkout WooCommerce
- Best Practices To Keep Classic Checkout WooCommerce Stable Long Term
- Conclusion
Introduction
Many WooCommerce stores now use a newer block-style checkout layout. Some store owners love it, but many face issues quickly. They see layout changes, missing fields, or plugin conflicts. That is why many users want to revert to classic checkout in WooCommerce. The classic checkout WooCommerce style is simple and proven. It works well with most themes and popular payment plugins.
It also feels familiar to returning customers. When you use the WooCommerce classic checkout, you control the experience better. You can also reduce checkout errors caused by blocks. This guide helps you understand what classic checkout means. It also shows when it makes sense to go back.
Before You Switch To Classic Checkout WooCommerce Do These Quick Checks
Confirm Your Current Checkout Type
Open your Checkout page in the editor. If you see blocks, it is a block checkout. If you see a shortcode, it is a classic checkout. This check saves time and avoids wrong changes later. It also helps you plan how to switch to classic checkout WooCommerce safely.
Take A Full Site Backup First
Create a complete backup of files and database. If anything breaks, you can restore fast. This is the safest step before you revert to classic checkout in WooCommerce. It also protects orders, customers, and payment settings.
Use A Staging Site If Possible
Make changes on staging before touching the live store. This avoids checkout downtime and lost sales. You can test the WooCommerce classic checkout without risk. If staging is not available, choose low traffic hours.
Note Down Key WooCommerce Checkout Settings
Check the Checkout page selection in WooCommerce settings. Note your shipping, tax, and account settings too. These settings affect checkout behavior after changes. This helps you spot issues after disabling WooCommerce block checkout steps.
List All Checkout Related Plugins And Addons
Write down payment, shipping, and checkout field plugins. Some plugins behave differently with blocks and classics. This list helps you find conflicts quickly later. It is useful if you need a WooCommerce checkout block to disable troubleshooting.
Clear Cache And CDN After Each Change
Clear your cache plugin and server cache if enabled. Clear CDN cache too, if you use one. Old cached files can show the wrong checkout layout. This step prevents confusion after you switch to classic checkout WooCommerce.
Plan A Full Checkout Test After Switching
Prepare a basic test order flow for verification. Test coupon, shipping, and each payment method. Also test mobile checkout for layout issues. This confirms the classic checkout WooCommerce setup works correctly.
How to Revert to Classic Checkout in WooCommerce Easily
The easiest way to revert to classic checkout in WooCommerce starts with your page setup. Many stores already have a classic checkout page ready. The issue is the wrong page gets selected in settings. When you fix that, checkout often returns to normal. This method keeps changes small and easy to undo. It also avoids extra plugins and risky code edits. Use it first before deeper changes. It is the safest way to switch to classic checkout WooCommerce.
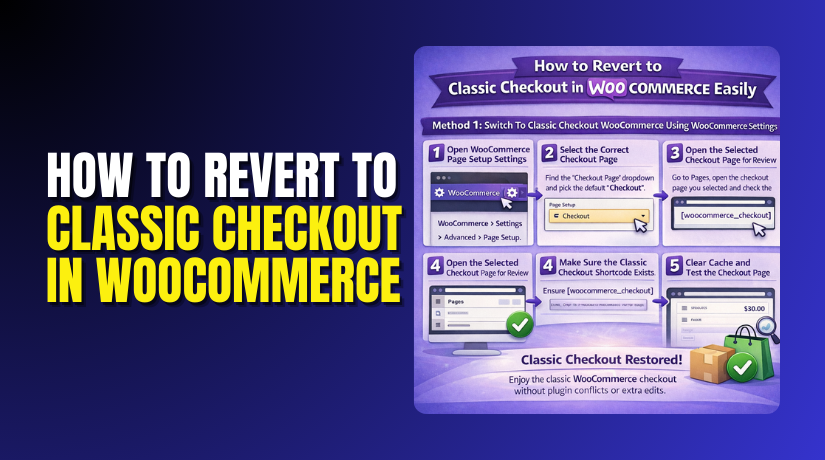
Method 1: Switch To Classic Checkout WooCommerce Using WooCommerce Settings
This method is the safest and most recommended starting point. It changes only the WooCommerce page setup and checkout page content. Many stores can revert to classic checkout in WooCommerce just by selecting the right page. It also avoids heavy edits and reduces plugin conflicts. If you want a clean way to switch to classic checkout WooCommerce, start here first.
Step 1: Open WooCommerce Page Setup Settings
- Go to your WordPress dashboard and open WooCommerce settings.
- Click the Advanced tab and find the Page Setup section.
- This area controls which pages WooCommerce uses for checkout.
- If the wrong page is selected, checkout may load blocks.
- Fixing page selection often helps you revert to classic checkout in WooCommerce.
Step 2: Select The Correct Checkout Page
- Locate the Checkout page dropdown in Page Setup.
- Choose the page you want WooCommerce to use for checkout.
- Pick the default Checkout page if you have one. Save the settings after selecting the correct page.
- This step is required before you switch to classic checkout WooCommerce.
Step 3: Open The Selected Checkout Page For Review
- Go to Pages in your WordPress dashboard and open the selected Checkout page.
- Check what content is inside the page editor.
- If it contains blocks, it is block checkout. If it contains a shortcode, it is classic checkout.
- This helps confirm the path to classic checkout WooCommerce.
Step 4: Make Sure The Classic Checkout Shortcode Exists
- If the page does not have a classic shortcode, add it.
- The classic shortcode must be placed in the main content area.
- This is what loads the WooCommerce classic checkout layout. Save the page after adding the shortcode.
Step 5: Clear Cache And Refresh The Checkout Page
- Clear your cache plugin cache after saving changes.
- Clear server cache and CDN cache if they exist.
- Then open your checkout page in a private browser tab. This avoids old cached checkout layouts showing again.
- It also supports WooCommerce checkout block disable results.
Step 6: Run A Quick Checkout Test
- Add a product to cart and go to checkout.
- Confirm billing, shipping, and payment sections load correctly.
- Check if your payment gateways appear as expected. If the classic layout loads, the switch worked.
- This confirms you can revert to classic checkout in WooCommerce safely.
If the checkout now shows the old layout, you are done. Keep this setup and avoid further edits. If the page still loads blocks, do not worry yet. Some stores have block features forced by WooCommerce settings. In that case, you may need a deeper disable WooCommerce block checkout approach. Move to the next method only if this one fails.
Method 2: Remove Checkout Blocks And Restore The Classic Shortcode
Use this method when your Checkout page is built using blocks. It works by removing the checkout blocks and restoring the shortcode layout. This is a direct way to revert to classic checkout in WooCommerce. It is also useful when you want full control over the checkout page content. If you need a clean WooCommerce checkout block disable at page level, this method fits well.
Step 1: Open The Checkout Page In The Editor
- Go to Pages and open your Checkout page.
- If you see checkout blocks, it is using block checkout.
- This is the common reason people want to disable WooCommerce block checkout. You will replace blocks with the classic shortcode.
Step 2: Remove The Checkout Block Carefully
- Click the checkout block and remove it from the page.
- Do not delete the entire page by mistake.
- Remove only the checkout block elements you see.
- This step is required for WooCommerce checkout block disabled at page level.
Step 3: Add The Classic Checkout Shortcode In Content
- Add the classic checkout shortcode in the main content area.
- This shortcode loads the WooCommerce classic checkout layout.
- It also restores the older checkout flow many plugins expect. Save the page once the shortcode is added.
Step 4: Update The Page And Clear Cache Again
- Click update to save the Checkout page changes.
- Then clear all site cache layers again.
- Cached files can keep showing the block checkout layout.
- Clearing cache helps you switch to classic checkout WooCommerce fully.
Step 5: Verify The Checkout Looks Like Classic Checkout WooCommerce


- Open the checkout page on the front end.
- Add a product and proceed to checkout.
- Confirm the page looks like the older checkout style.
- Check billing fields, shipping methods, and payment options.
- If it works, you successfully revert to classic checkout in WooCommerce.
Step 6: Test Payment And Order Completion
- Enable test mode for your payment gateway if possible.
- Place a test order and confirm it completes properly.
- Check the thank you page and order emails too. This confirms the classic checkout WooCommerce setup is stable.
If your checkout now loads the shortcode layout, keep it as is. Avoid adding checkout blocks back on this page later. If the page still shows block behavior, it may be forced site-wide. That is when you must disable WooCommerce block checkout from WooCommerce features. You can also review theme templates that override checkout. The next part of your guide will cover those deeper changes.
Method 3: Disable WooCommerce Block Checkout From WooCommerce Features
Use this method when your store keeps showing block checkout. Even after you update the Checkout page content. It works by turning off the block checkout feature inside WooCommerce. After this change, WooCommerce will stop prioritizing blocks. This helps you switch to classic checkout WooCommerce more reliably. It also reduces block based layout issues on checkout.
Step 1: Update WooCommerce To A Stable Version First
- Check your WooCommerce version and confirm it is stable.
- Update only if you are behind by many releases. A stable version reduces random checkout behavior.
- It also prevents feature toggles from behaving strangely.
Step 2: Open WooCommerce Settings And Locate Advanced Features
- Go to WooCommerce in your WordPress dashboard.
- Open Settings and then go to the Advanced section.
- Look for features related to checkout blocks. Some sites show a Features or Experimental area.
Step 3: Turn Off Cart And Checkout Blocks Feature
- Find the features related to Cart and Checkout blocks.
- Disable it if your store offers that option. This is the core step for WooCommerce checkout block disable.
- It helps WooCommerce prefer shortcode based checkout again.
Step 4: Save Changes And Clear All Cache Layers
- Save your settings changes immediately after disabling blocks.
- Clear plugin cache, server cache, and CDN cache.
- Cached pages can keep showing the block layout. This step is required after you disable WooCommerce block checkout.
Step 5: Confirm Your Checkout Page Uses The Classic Shortcode
- Open the Checkout page again in your editor.
- Make sure it contains the classic checkout shortcode.
- If blocks still exist, remove them and save again. This ensures a true WooCommerce classic checkout output.
Step 6: Test Checkout End To End On The Front End
- Add a product to cart and proceed to checkout.
- Confirm billing and shipping fields load correctly.
- Confirm payment methods appear and can be selected. Place a test order if your gateway supports test mode.
Step 7: Check For Block Templates In Your Theme
- Some themes add custom checkout templates using blocks.
- Open your theme settings and look for checkout layout options.
- Disable any checkout templates that force blocks.
- This helps your revert to classic checkout in WooCommerce fully.
If checkout now loads in the old layout, keep this setup. Avoid enabling checkout blocks again unless you really need them. Always test checkout after any plugin or theme update. This prevents new block features from returning silently. If issues still appear, the next step is deep troubleshooting. That includes plugin conflicts and checkout related errors.
Common Issues After Switching Back And How To Fix Them
When you revert to classic checkout in WooCommerce, small issues can appear. Most problems come from cache, wrong pages, or plugin conflicts. Fix them step by step and avoid quick rollback. Use the checks below to restore a stable classic checkout WooCommerce flow.
Checkout Page Looks Blank Or Broken
- Confirm The Checkout Page Is Not Empty
Open the Checkout page and confirm the classic shortcode exists. If it is missing, add it and update the page. This restores the WooCommerce classic checkout layout immediately. - Clear Cache And Open In Private Window
Clear plugin cache, server cache, and CDN cache if used. Open checkout in an incognito window for a fresh load. Old cache can hide your WooCommerce checkout block and disable changes. - Switch Theme Temporarily For A Quick Test
Change to a default theme like Storefront for testing. If checkout works, your theme is causing the layout issue. Then fix theme checkout settings and switch back safely.
Checkout URL Is Wrong Or Shows Page Not Found
- Re-Select Checkout Page In WooCommerce Settings
Go to WooCommerce settings and confirm the correct Checkout page. Save changes even if it looks correct already. This refresh can help after you switch to classic checkout WooCommerce. - Re-Save Permalinks Once
Go to Permalinks and click Save without changing anything. This rebuilds rewrite rules and fixes many 404 issues. It is a common fix after checkout changes. - Confirm The Page Slug Matches Your Checkout Link
Open the Checkout page and confirm the slug is correct. Avoid changing slugs often, as links may break. Keep it simple for a stable classic checkout WooCommerce.
Shipping Methods Are Not Showing At Checkout
- Confirm Shipping Zones And Methods Are Set
Open WooCommerce shipping settings and review your zones. Confirm at least one method exists for the customer location. This affects classic and block checkout both. - Check If Your Product Needs Shipping
Open the product and confirm it is not marked virtual. Virtual products skip shipping sections by design. Many store owners mistake this after they disable WooCommerce block checkout. - Test With A Real Address And ZIP Code
Add a full address and correct ZIP code at checkout. Shipping rates may require city, state, and ZIP to load. Test with a USA address format for best results.
Payment Gateways Are Missing Or Not Selectable
- Confirm Gateways Are Enabled In WooCommerce Settings
Open Payments and confirm your gateway is turned on. Some gateways disable themselves after updates or failures. Enable them and save settings again. - Check Currency And Location Rules For The Gateway
Some gateways work only in supported countries or currencies. Confirm store currency matches your gateway requirements. This matters after you revert to classic checkout in WooCommerce. - Disable One Checkout Plugin And Retest
Temporarily disable checkout field or layout plugins. Test checkout again to confirm a conflict. Then enable plugins one by one to find the culprit.
Coupon Field Is Missing On Classic Checkout
- Confirm Coupons Are Enabled In WooCommerce
Go to WooCommerce settings and enable coupons if disabled. Save changes and reload checkout again after cache clear. - Check Theme Options That Hide Coupons
Some themes hide coupon fields using settings. Open theme checkout options and confirm coupons are visible. This often returns after the WooCommerce checkout block is disabled. - Test With A Default Theme For Fast Proof
Switch to a default theme for a quick test. If coupons show, your theme is hiding them. Fix the theme setting and switch back.
Place Order Button Not Working Or Keeps Loading
- Check For JavaScript Errors In Browser Console
Open the console and look for red errors on checkout. Errors often come from minify plugins or broken scripts. Fix those and reload the checkout. - Exclude Checkout From Cache And Minify
Exclude checkout, cart, and my account pages from optimization. Disable JS delay for checkout pages if enabled. This improves WooCommerce classic checkout stability. - Re-Test With Only Core Plugins Enabled
Disable non essential plugins for a short test. If checkout works, enable plugins one by one again. This isolates what breaks after you switch to classic checkout WooCommerce.
Testing Checklist After Reverting To Classic Checkout WooCommerce
After fixes, always test checkout like a real customer. A clean test proves the change is safe for sales. Follow this checklist every time you change checkout.
- Test Guest Checkout And Logged-In Checkout Test as a guest and as a customer account user. Confirm both flows reach the payment step without errors.
- Test Simple Product And Variable Product Checkout
Add a simple product and test checkout once fully. Add a variable product with options and test again. This catches variation bugs early. - Test Coupons, Shipping, Taxes, And Address Rules
Apply a coupon and confirm it reduces totals correctly. Confirm shipping updates when you change ZIP code. Check tax changes by state for USA rules. - Test Each Payment Gateway End To End
Enable test mode and place a full test order. Confirm the order status updates and the thank you page loads. This confirms classic checkout WooCommerce works. - Test Mobile Checkout Layout And Field Usability
Open checkout on mobile and fill fields smoothly. Confirm buttons are visible and easy to tap. Mobile issues can reduce conversions quickly. - Test Order Emails And Order Details In Admin
Confirm order emails arrive for customer and admin. Confirm order details show products, totals, and customer data. This validates the full checkout flow.
Best Practices To Keep Classic Checkout WooCommerce Stable Long Term
Keeping checkout stable is ongoing work for every store. Follow these habits after you revert to classic checkout in WooCommerce. They reduce surprises during future updates.
- Update Carefully And Test After Every Update
Update WooCommerce and plugins during low traffic hours. Test checkout after each update, not after five updates. This makes fixes faster and safer. - Avoid Using Multiple Checkout Editor Plugins Together
Too many checkout plugins often cause conflicts and broken fields. Use one trusted plugin for checkout edits and keep it updated. This improves WooCommerce classic checkout reliability. - Exclude Checkout From Heavy Cache And Script Changes
Keep checkout pages excluded from minify and delay scripts. Use cache exclusions for cart, checkout, and account pages. This prevents broken buttons and missing fields. - Document What You Changed And Why You Changed It
Write down which method you used and what you disabled. Note any plugin settings you changed for checkout stability. This helps when issues return after updates.
Conclusion
Now you know how to troubleshoot after switching back. You also know how to test and keep checkout stable. If you still see checkout errors, get help quickly. Checkout issues can reduce sales in a single day. If you want expert help, WooHelpDesk can fix it fast. We can confirm your setup and remove conflicts safely. We can also improve checkout speed and trust for better conversions.


